
Blazor server apps use the standard ASP.NET Core application and they execute .NET code on the server. We can access any .NET library or server-side feature in these apps in the same way as we use in ASP.NET Core web applications. One such feature is to use HTTP Client instances to make HTTP requests to third-party Web APIs. In this tutorial, I will show you different ways to create HTTP Client instances. I will also show you how to consume a third-party API to fetch and display data in Blazor Server Apps.
Table of Contents
Overview of Third Party Web API
We will develop a Blazor server app that will allow the user to input a country code and a year on a Blazor page component and then we will call a third party API to fetch the list of public holidays of that particular country in that particular year. The third-party API we will consume is Nager.Date which is a worldwide public holidays API.

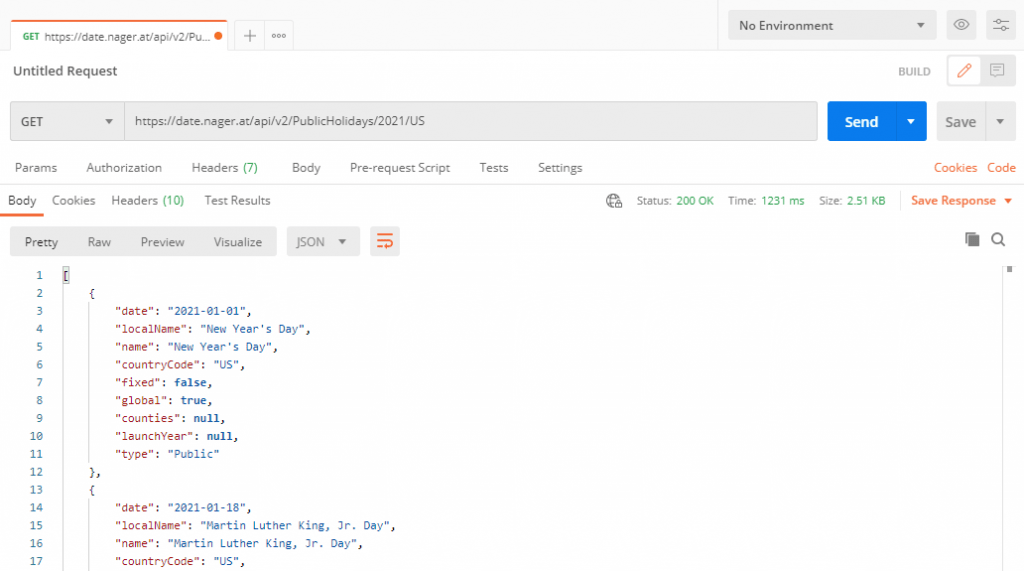
It is a very simple API and you can easily test this API in Postman by entering the following URL.
https://date.nager.at/api/v2/PublicHolidays/2020/US
The response of this API is the list of public holidays in JSON format as shown below:
Getting Started with Blazor Sever App
Create a Blazor Server App in Visual Studio 2019 and create a folder named Models. Add the following two model classes in the Models folder to map Holidays API request and response shown above.
HolidayRequestModel.cs
public class HolidayRequestModel
{
    public string CountryCode { get; set; }
    public int Year { get; set; }
}
HolidayResponseModel.cs
public class HolidayResponseModel
{
    public string Name { get; set; }
    public string LocalName { get; set; }
    public DateTime? Date { get; set; }
    public string CountryCode { get; set; }
    public bool Global { get; set; }
}
Next, create a new Razor component HolidaysExplorer.razor in the Pages folder along with its code-behind file HolidaysExplorer.razor.cs. If you want to learn more about Razor components and code-behind files then you can read my post A Beginner’s Guide to Blazor Components.
HolidaysExplorer.razor.cs
public partial class HolidaysExplorer
{
    private HolidayRequestModel HolidaysModel = new HolidayRequestModel();
    private List<HolidayResponseModel> Holidays = new List<HolidayResponseModel>();

    [Inject]
    protected IHolidaysApiService HolidaysApiService { get; set; }

    private async Task HandleValidSubmit()
    {
        Holidays = await HolidaysApiService.GetHolidays(HolidaysModel);
    }
}
The HolidaysModel field is an instance of the HolidayRequestModel class that will help us in creating a simple form to ask the user the Country Code and the Year. The following code snippet shows the Blazor form created using the HolidaysModel object. The HandleValidSubmit method is configured with the Blazor Form’s OnValidSubmit event and it will be called when the user will submit the form.
<EditForm Model="@HolidaysModel" OnValidSubmit="@HandleValidSubmit" class="form-inline">

   <label class="ml-2">Country Code:</label>
   <InputText id="CountryCode" @bind-Value="HolidaysModel.CountryCode" class="form-control" />

   <label class="ml-2">Year:</label>
   <InputNumber id="Year" @bind-Value="HolidaysModel.Year" class="form-control" />

   <button class="btn btn-primary ml-2" type="submit">Submit</button>

</EditForm>
The Holidays list will be used to display the holidays returned from the third-party API. We need to generate a simple bootstrap table by iterating the holidays with a simple @foreach loop.
@if (Holidays.Count > 0)
{
    <table class="table table-bordered table-striped table-sm">
       <thead>
          <tr>
             <th>Date</th>
             <th>Name</th>
             <th>Local Name</th>
             <th>Country Code</th>
             <th>Global</th>
          </tr>
       </thead>
       <tbody>
          @foreach (var item in Holidays)
          {
              <tr>
                 <td>@item.Date.Value.ToShortDateString()</td>
                 <td>@item.Name</td>
                 <td>@item.LocalName</td>
                 <td>@item.CountryCode</td>
                 <td>@item.Global</td>
              </tr>
          }
       </tbody>
    </table>
}
The complete code of HolidaysExplorer.razor view is shown below.
HolidaysExplorer.razor
@page "/"
<h3>Holidays Explorer</h3>
<br />

<EditForm Model="@HolidaysModel" OnValidSubmit="@HandleValidSubmit" class="form-inline">

   <label class="ml-2">Country Code:</label>
   <InputText id="CountryCode" @bind-Value="HolidaysModel.CountryCode" class="form-control" />

   <label class="ml-2">Year:</label>
   <InputNumber id="Year" @bind-Value="HolidaysModel.Year" class="form-control" />

   <button class="btn btn-primary ml-2" type="submit">Submit</button>

</EditForm>

<br />
@if (Holidays.Count > 0)
{
    <table class="table table-bordered table-striped table-sm">
       <thead>
          <tr>
             <th>Date</th>
             <th>Name</th>
             <th>Local Name</th>
             <th>Country Code</th>
             <th>Global</th>
          </tr>
       </thead>
       <tbody>
          @foreach (var item in Holidays)
          {
              <tr>
                 <td>@item.Date.Value.ToShortDateString()</td>
                 <td>@item.Name</td>
                 <td>@item.LocalName</td>
                 <td>@item.CountryCode</td>
                 <td>@item.Global</td>
              </tr>
          }
       </tbody>
    </table>
}
If you will run the app at this point, you will see a simple HTML form without any holidays. This is because the method HandleValidSubmit is empty and we are not calling any API to fetch holiday data yet.

Creating HttpClient using IHttpClientFactory in Blazor Server Apps
There are different ways to consume third-party APIs in Blazor server apps using HttpClient so let’s start with a basic example in which we will create HttpClient object using IHttpClientFactory.
Create a Services folder in the project and create the following IHolidaysApiService interface. The interface has just one method GetHolidays that takes HolidayRequestModel as a parameter and returns the list of HolidayResponseModel objects.
IHolidaysApiService.cs
public interface IHolidaysApiService
{
    Task<List<HolidayResponseModel>> GetHolidays(HolidayRequestModel holidaysRequest);
}
Next, create a class HolidaysApiService in the Services folder and implement the above interface.
HolidaysApiService.cs
public class HolidaysApiService : IHolidaysApiService
{
    private readonly IHttpClientFactory _clientFactory;

    public HolidaysApiService(IHttpClientFactory clientFactory)
    {
        _clientFactory = clientFactory;
    }

    public async Task<List<HolidayResponseModel>> GetHolidays(HolidayRequestModel holidaysRequest)
    {
        var result = new List<HolidayResponseModel>();

        var url = string.Format("https://date.nager.at/api/v2/PublicHolidays/{0}/{1}",
            holidaysRequest.Year, holidaysRequest.CountryCode);

        var request = new HttpRequestMessage(HttpMethod.Get, url);
        request.Headers.Add("Accept", "application/vnd.github.v3+json");

        var client = _clientFactory.CreateClient();

        var response = await client.SendAsync(request);

        if (response.IsSuccessStatusCode)
        {
            var stringResponse = await response.Content.ReadAsStringAsync();

            result = JsonSerializer.Deserialize<List<HolidayResponseModel>>(stringResponse,
                new JsonSerializerOptions() { PropertyNamingPolicy = JsonNamingPolicy.CamelCase });
        }
        else
        {
            result = Array.Empty<HolidayResponseModel>().ToList();
        }

        return result;
    }
}
In the GetHolidays method above, we first created a URL for a third party API and appended the country code and year parameters in the URL.
var url = string.Format("https://date.nager.at/api/v2/PublicHolidays/{0}/{1}", holidaysRequest.Year, holidaysRequest.CountryCode);
Next, we created HttpRequestMessage object and configured it to send HTTP GET request to third part API URL.
var request = new HttpRequestMessage(HttpMethod.Get, url);
request.Headers.Add("Accept", "application/vnd.github.v3+json");
An IHttpClientFactory can be requested using dependency injection (DI) and this is why we are injecting it in the constructor of the above class. The following line is using IHttpClientFactory to create an HttpClient instance.
var client = _clientFactory.CreateClient();
Once we have the HttpClient object available, we are simply calling its SendAsync method to send an HTTP GET request
var response = await client.SendAsync(request);
If the API call is successful, we are reading the response as a string using the following line.
var stringResponse = await response.Content.ReadAsStringAsync();
Finally, we are deserializing the response using the Deserialize method of JsonSerializer class.
result = JsonSerializer.Deserialize<List<HolidayResponseModel>>(stringResponse,
   new JsonSerializerOptions() { PropertyNamingPolicy = JsonNamingPolicy.CamelCase });
Before we test our app, we need to register HolidaysApiService in the Startup.cs file. We also need to register IHttpClientFactory using the AddHttpClient method.
Startup.cs
public void ConfigureServices(IServiceCollection services)
{
    services.AddRazorPages();
    services.AddServerSideBlazor();

    services.AddSingleton<IHolidaysApiService, HolidaysApiService>();

    services.AddHttpClient();
}
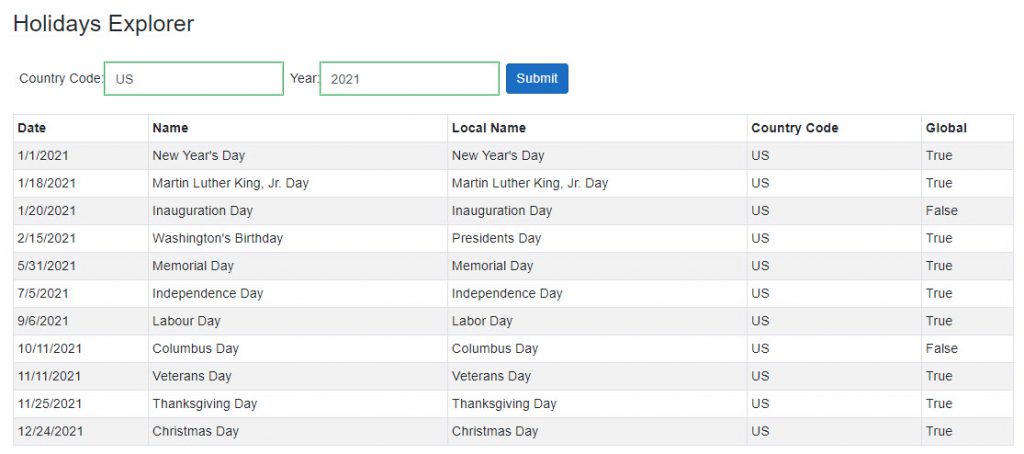
Run the application and provide any country code and year in the text fields. Clicking the Submit button should invoke our GetHolidays method in the background and you should be able to see the list of public holidays as shown below.
Creating Named HttpClient objects in Blazor Server Apps
The above example is good for scenarios where you are refactoring an existing application and you want to create HttpClient objects in some methods using IHttpClientFactory without affecting the entire application. If you are creating a new application or you want to centralize the way HttpClient objects are created, then you have to use named HTTP clients.
Following are the benefits of creating named HTTP clients:
- We can give each HttpClient a name and specify all configurations related to HttpClient at the application startup instead of having configurations scattered throughout the application.
- We can configure the named HttpClient once and reuse it multiple times for calling APIs of a particular API provider.
- We can configure multiple named HttpClient objects with different configurations depending upon the usage of these clients in different areas of the application.
We can specify a named client in the ConfigureServices method of Startup.cs file using the name AddHttpClient method we used above.
Startup.cs
public void ConfigureServices(IServiceCollection services)
{
    services.AddRazorPages();
    services.AddServerSideBlazor();

    services.AddSingleton<IHolidaysApiService, HolidaysApiService>();

    services.AddHttpClient("HolidaysApi", c =>
    {
        c.BaseAddress = new Uri("https://date.nager.at/");
        c.DefaultRequestHeaders.Add("Accept", "application/vnd.github.v3+json");
    });
}
We need to specify the name of the client e.g. HolidaysApi and we can also configure the BaseAddress, DefaultRequestHeaders, and other properties as shown above.
Once the named HttpClient is configured, we can now create HttpClient objects throughout the application by using the same CreateClient method but this time we need to specify which named client e.g. HolidaysApi we want to create.
HolidaysApiService.cs
public class HolidaysApiService : IHolidaysApiService
{
    private readonly IHttpClientFactory _clientFactory;

    public HolidaysApiService(IHttpClientFactory clientFactory)
    {
        _clientFactory = clientFactory;
    }

    public async Task<List<HolidayResponseModel>> GetHolidays(HolidayRequestModel holidaysRequest)
    {
        var result = new List<HolidayResponseModel>();

        var url = string.Format("api/v2/PublicHolidays/{0}/{1}",
            holidaysRequest.Year, holidaysRequest.CountryCode);

        var request = new HttpRequestMessage(HttpMethod.Get, url);

        var client = _clientFactory.CreateClient("HolidaysApi");

        var response = await client.SendAsync(request);

        if (response.IsSuccessStatusCode)
        {
            var stringResponse = await response.Content.ReadAsStringAsync();

            result = JsonSerializer.Deserialize<List<HolidayResponseModel>>(stringResponse,
                new JsonSerializerOptions() { PropertyNamingPolicy = JsonNamingPolicy.CamelCase });
        }
        else
        {
            result = Array.Empty<HolidayResponseModel>().ToList();
        }

        return result;
    }
}
The name e.g. HolidaysApi we mentioned in the CreateClient method must match with the name we configured in Startup.cs file. Each time a CreateClient method is called, a new instance of HttpClient is created for us.
We also don’t need to specify the API hostname in the Request URL because we already specified the base address in Startup.cs file.
Run the application once again and provide the country code and year values and you should be able to see the list of public holidays.
Creating Typed HttpClient objects in Blazor Server Apps
The third option for creating and using HttpClient objects is to use Typed clients. These clients have the following benefits:
- They provide the same capabilities as named clients without the need to use strings as keys.
- They provide IntelliSense and compiler help when consuming clients.
- They provide a single location to configure and interact with a particular HttpClient. For example, we can configure a typed HttpClient specific to a particular endpoint of Facebook API, and that HttpClient can encapsulate all the logic required to use that particular endpoint.
- They work with Dependency Inject (DI) and can be injected where required.
To configure a typed HTTPClient, we need to register it in Startup.cs file using the same AddHttpClient method but this time, we need to pass our service name HolidaysApiService as the type.
Startup.cs
public void ConfigureServices(IServiceCollection services)
{
    services.AddRazorPages();
    services.AddServerSideBlazor();

    services.AddSingleton<IHolidaysApiService, HolidaysApiService>();

    services.AddHttpClient<HolidaysApiService>();
}
In the code snippet above, the HTTP client and our service HolidaysApiService both will be registered as transient client and service. This will allow us to pass the HttpClient in the constructor of the service as shown in the following code snippet. Notice, how the HttpClient is exposed as the public property of the service.
HolidaysApiService.cs
public class HolidaysApiService : IHolidaysApiService
{
    public HttpClient Client { get; }

    public HolidaysApiService(HttpClient client)
    {
        client.BaseAddress = new Uri("https://date.nager.at/");
        client.DefaultRequestHeaders.Add("Accept", "application/vnd.github.v3+json");
        Client = client;
    }

    public async Task<List<HolidayResponseModel>> GetHolidays(HolidayRequestModel holidaysRequest)
    {
        var result = new List<HolidayResponseModel>();

        var url = string.Format("api/v2/PublicHolidays/{0}/{1}",
            holidaysRequest.Year, holidaysRequest.CountryCode);

        var response = await Client.GetAsync(url);

        if (response.IsSuccessStatusCode)
        {
            var stringResponse = await response.Content.ReadAsStringAsync();

            result = JsonSerializer.Deserialize<List<HolidayResponseModel>>(stringResponse,
                new JsonSerializerOptions() { PropertyNamingPolicy = JsonNamingPolicy.CamelCase });
        }
        else
        {
            result = Array.Empty<HolidayResponseModel>().ToList();
        }

        return result;
    }
}
The configuration for a typed client can be specified during registration in the ConfigureServices method of Startup.cs file, rather than in the typed client’s constructor.
Startup.cs
public void ConfigureServices(IServiceCollection services)
{
    services.AddRazorPages();
    services.AddServerSideBlazor();

    services.AddHttpClient<IHolidaysApiService, HolidaysApiService>(c =>
    {
        c.BaseAddress = new Uri("https://date.nager.at/");
        c.DefaultRequestHeaders.Add("Accept", "application/vnd.github.v3+json");
    });
}
If you are using this technique, then you don’t need to register your service separately. You can remove the following line from the ConfigureServices method.
services.AddSingleton<IHolidaysApiService, HolidaysApiService>();
The HttpClient object can be encapsulated within a typed client rather than exposed as a public property. We can then use this client internally in any method of service.
public class HolidaysApiService : IHolidaysApiService
{
    private readonly HttpClient _httpClient;

    public HolidaysApiService(HttpClient client)
    {
        _httpClient = client;
    }

    public async Task<List<HolidayResponseModel>> GetHolidays(HolidayRequestModel holidaysRequest)
    {
        var result = new List<HolidayResponseModel>();

        var url = string.Format("api/v2/PublicHolidays/{0}/{1}",
            holidaysRequest.Year, holidaysRequest.CountryCode);

        var response = await _httpClient.GetAsync(url);

        if (response.IsSuccessStatusCode)
        {
            var stringResponse = await response.Content.ReadAsStringAsync();

            result = JsonSerializer.Deserialize<List<HolidayResponseModel>>(stringResponse,
                new JsonSerializerOptions() { PropertyNamingPolicy = JsonNamingPolicy.CamelCase });
        }
        else
        {
            result = Array.Empty<HolidayResponseModel>().ToList();
        }

        return result;
    }
}
Run the application once again and provide the country code and year values and you should be able to see the list of public holidays.

Summary
In this tutorial, I covered different techniques of creating and using HTTP clients in Blazor Server Apps. Most of the techniques mentioned here can also be used in ASP.NET Core applications because Blazor Server Apps are built on top of ASP.NET Core infrastructure. In my next post Making HTTP Requests in Blazor WebAssembly Apps, I will try to cover the creation and usage of HTTP clients in Blazor WebAssembly Apps.


Hi
I’m using Blazor server side .NET 6.
In my program.cs I want to call as method, on each http request, that is within the same Blazor application.
How can I do that?
Your source files seem to be off. First the “Download Source Code” button at the top of this article takes you to the ASP.net source. I got the Blazor Server source from the comment just above. However, in that source, you are not using HttpClientFactory as shown in the above example. Your HolidaysApiService.cs in the source files just uses System.Net.Http.
The source code button URL is now fixed. Please try again. Thanks.
WOW, this tutorial is awesome! Thank you so much! I have been searching for a hours for a tutorial that was contemporary, dealt with Blazor Server rather than WebAssembly, and actually went into detail beyond to let me see how I’d structure things overall. This hit every checkbox!
I really like the scenario of the tutorial, as well. It’s a great idea. In addition, you were really good about showing us what you were doing in each chunk of code.
Seriously, I appreciate this. This is one of the best tutorials I’ve run across in years, and the way you presented it really helped things start to click in my mind as someone looking to explore C#/.NET Core. Great work, and thank you!!
Thank you
Thank you!
do you have this source code in github?
Yes, you can download the source code from following link
https://github.com/ezzylearning/BlazorServerWebAPIsDemo
Am I missing the code where you are calling the service from the submit button
Sorry, I missed that part. The component code is updated.