Object Oriented Programming is all about classes and objects and to build complex software we have to create lots of objects to get the job done. If you don’t follow any design pattern to control the creation and lifetime of these objects, then you can easily end up in a mess where a small change in the software or a new requirement can force you to change lots of code throughout the application. There are number of software design patterns and principles which help us writing more flexible, manageable, and easy to test software. In this tutorial, I will try to cover one such design pattern called Dependency Injection which is also the first-class citizen in ASP.NET Core. I will try to explain everything with the help of some real-world examples so that you can grasp the concept easily and start using Dependency Injection in your projects with confidence.
Table of Contents
What is Dependency Injection
According to Wikipedia
“In software engineering, dependency injection is a technique in which an object receives other objects that it depends on. These other objects are called dependencies.”
Wikipedia
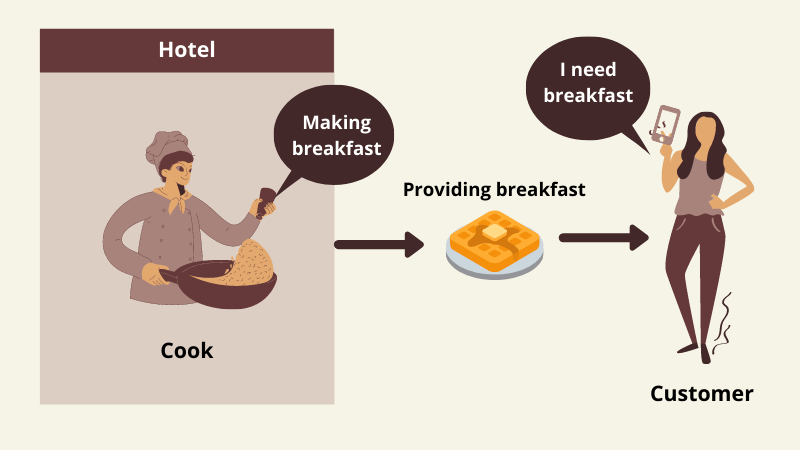
I have to say that the above Wikipedia definition is not particularly easy to understand so let me give you a real-world example that is closely related to Dependency Injection.
Let’s suppose you are in a hotel room and you are feeling hungry. Will you start cooking your breakfast yourself? I don’t think so. What we normally do in a hotel is that we call room service or hotel reception and request them to send us breakfast in our room. We are hungry and we are depending on hotel service/staff to provide us breakfast. We don’t care how the breakfast is made. We don’t even know who is making our breakfast in a hotel kitchen. When the breakfast is ready hotel room service will provide us our breakfast.
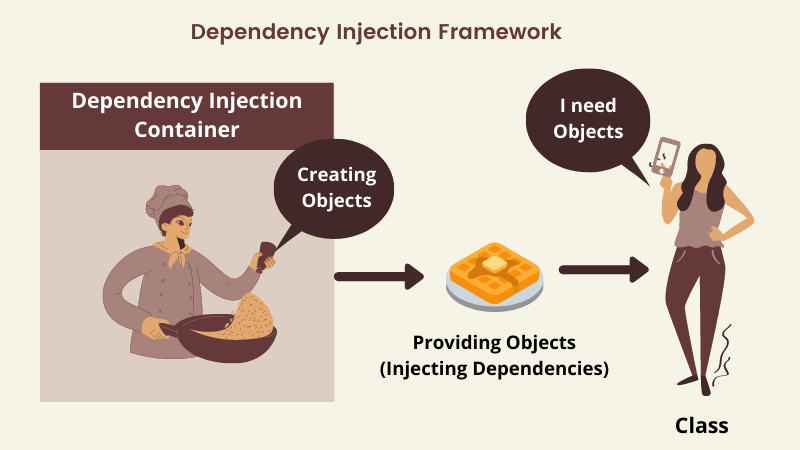
Now map the above real-world example to the programming world. When class A uses some functionality of class B, then it’s said that class A has a dependency on class B. To call any method of class B, we can create an object of class B inside class A and can use the functionality of class B easily. Let’s say after some time the requirement changes and now you need to replace the functionality of class B with a new class called class C. You are in big trouble now because you created class B objects in many different places in your code directly and now you have to change code everywhere. Your classes are tightly coupled and you can’t replace class B functionality with class C without changing the code.
Dependency injection is a programming technique that makes a class independent of its dependencies. We don’t create objects of other classes (dependencies) in our code directly but ask someone else (DI Container) to create objects for us and once these objects are created, they are provided (injected) in our classes so that we can use them in the code.
Benefits of Dependency injection
Here are some of the advantages of using Dependency Injection in your code.
- Flexible and Maintainable Code: it makes our code more flexible and maintainable because we can change the implementation of the class without changing the code or business logic in the application. Code is also easy to read because the initialization or creation of dependencies is done outside the code.
- Easy Unit Testing: We can easily test different implementations by injecting one class or another.
- Loose Coupling: Dependency Injection facilitates loose coupling of software components.
- Easy to Scale Applications: Dependency Injection makes it easy to extend our application as we can not only introduce new components more easily but we can also implement better versions of existing components and inject them into our applications easily.
Dependency Injection in ASP.NET Core
In the past, we were using libraries and frameworks like Autofac, Castle Windsor or Unity to implement Dependency Injection in our projects but Dependency injection is now part of the ASP.NET Core. All the Framework services like Configuration, Logging, Routing, etc. are now registered in a built-in DI Container and provided to us as services wherever we need them. The basic idea is to register all services (dependencies) when the application starts and then these services will be injected and resolved at runtime.
public class Startup
{
    public void ConfigureServices(IServiceCollection services)
    {
        services.AddTransient<IProductService, ProductService>();
        services.AddScoped<ILoggingService, LoggingService>();
        services.AddSingleton<ICacheProvider, CacheProvider>();
    }
}
ASP.NET Core Dependency Injection Framework and its related classes are available in Microsoft.Extensions.DependencyInjection namespace and the two most important components are the following:
IServiceCollection: This interface is a standard way to use Dependency Injection in .NET Core applications. We use this interface to register all the services we want to resolve and inject later in our application. The startup class (shown above) provides ConfigureServices method in which the instance of IServiceCollection is available as a parameter.
IServiceProvider: This interface is used to resolve service instances by actually looking up what interface belongs to what concrete implementation and carry out the creation.
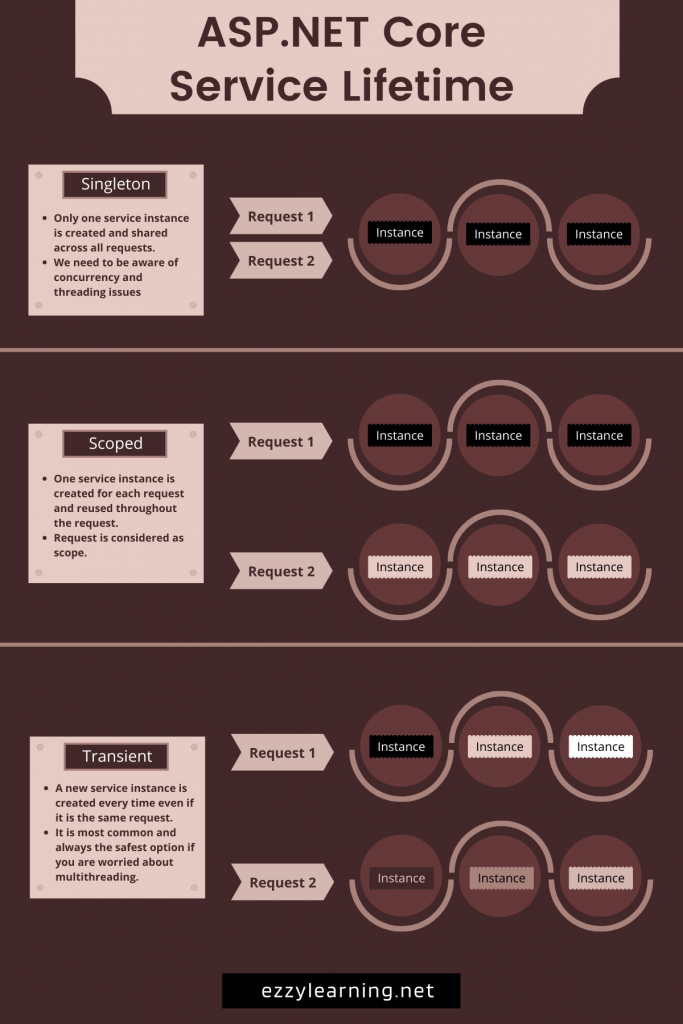
ASP.NET Core Service Lifetimes
The service lifetime means how long the service will live before it’s being garbage collected. Some services will be instantiated for a short time and will be available only in a particular component and request. Some will be instantiated just once and will be available throughout the application. Here are the service lifetimes available in ASP.NET Core.
Singleton
A single instance of the service class is created, stored in memory, and reused throughout the application. We can use Singleton for services that are expensive to instantiate. We can also use it in scenarios where we want to share state across multiple components. One important point to consider is the thread-safety as the instance is created just once and accessed by many consumers. We can register Singleton service using the AddSingleton method as follows:
services.AddSingleton<IProductService, ProductService>();
Scoped
The service instance will be created once per request. All middlewares, MVC controllers, etc. that participate in the handling of a single request will get the same instance. A good candidate for a scoped service is an Entity Framework context. We can register Scoped service using the AddScoped method as follows:
services.AddScoped<IProductService, ProductService>();
Transient
Transient lifetime services are created each time they’re requested. This lifetime works best for lightweight, stateless services. This is a good default choice when you don’t know which lifetime to use because each consumer will get its copy of the service and thread-safety will not be an issue. We can register Transient service using the AddTransient method as follows:
services.AddTransient<IProductService, ProductService>();
If you want to visualize the above concepts, then here is an infographic for your quick reference.
ASP.NET Core Dependency Injection Example
It is now time to see some practical examples of using dependency injection in ASP.NET Core. Create an ASP.NET Core MVC Web Application and inside Models folder create the following Product class.
public class Product
{
    public int Id { get; set; }
    public string Name { get; set; }
    public decimal Price { get; set; }
}
Create the folder Services and add an interface IProductService with a single GetProducts method.
public interface IProductService
{
    List<Product> GetProducts();
}
Next, create a class with the name AmazonProductService and Implement IProductService interface on this class. For this tutorial, I am not using any backend repository or service to load products from the database so to keep things simple, Let’s just return some hard-coded products from the GetProducts method as follows:
public class AmazonProductService : IProductService
{
    public List<Product> GetProducts()
    {
        return new List<Product>()
        {
            new Product() { Id = 1001, Name = "Apple AirPods Pro", Price = 249.00m },
            new Product() { Id = 1002, Name = "Sony Noise Cancelling Headphones", Price = 199.00m },
            new Product() { Id = 1003, Name = "Acer Aspire 5 Slim Laptop", Price = 346.00m }
        };
    }
}
Next, we need to register our service in Startup class as follows:
public class Startup
{
    public void ConfigureServices(IServiceCollection services)
    {
        services.AddTransient<IProductService, AmazonProductService>();
    }
}
Next, we need to inject our service into the controller. We can inject services inside the constructor of the controller as shown below:
public class HomeController : Controller
{
    private readonly IProductService _productService;
    public HomeController(IProductService productService)
    {
        _productService = productService;
    }
    public IActionResult Index()
    {
        var products = _productService.GetProducts();
        return View(products);
    }
}
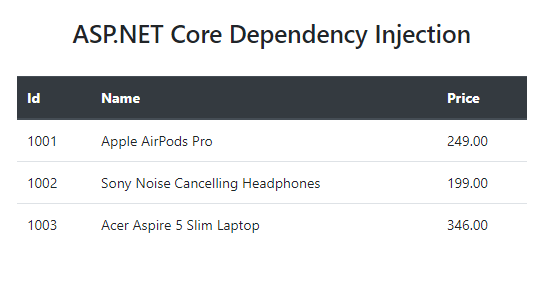
Finally, we can display products in our Index.cshtml razor view file as follows:
@model List<Product>
@{
    ViewData["Title"] = "Home Page";
}
<br />
<br />
<div>
    <h3 class="text-center">ASP.NET Core Dependency Injection</h3>
    <br />
    <table class="table">
        <thead class="thead-dark">
            <tr>
                <th>Id</th>
                <th>Name</th>
                <th>Price</th>
            </tr>
        </thead>
        <tbody>
            @foreach (var product in Model)
            {
                <tr>
                    <td>@product.Id</td>
                    <td>@product.Name</td>
                    <td>@product.Price</td>
                </tr>
            }
        </tbody>
    </table>
</div>
Run the application and you should be able to see all the products returned from AmazonProductService. This is because at runtime when our Home Controller has requested the instance of the class implementing IProductService, the dependency injection framework resolved it to the AmazonProductService registered in Startup.cs class.
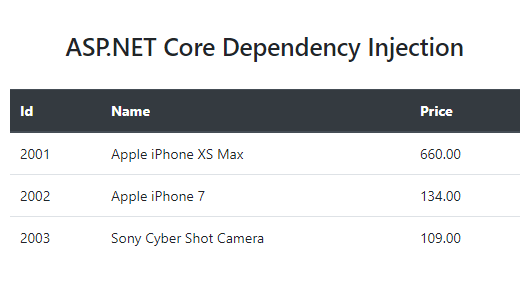
Let’s say your application requirements change and you suddenly decided that the products should load from Ebay instead of Amazon. You can create another class EbayProductService that is implementing the same IProductService interface and has its own implementation of GetProducts method.
public class EbayProductService : IProductService
{
    public List<Product> GetProducts()
    {
        return new List<Product>()
        {
            new Product() { Id = 2001, Name = "Apple iPhone XS Max", Price = 660.00m },
            new Product() { Id = 2002, Name = "Apple iPhone 7", Price = 134.00m },
            new Product() { Id = 2003, Name = "Sony Cyber Shot Camera", Price = 109.00m }
        };
    }
}
You don’t have to change a single line of code in your application. You just have to register EbayProductService in Startup.cs file and you are done.
public class Startup
{
    public void ConfigureServices(IServiceCollection services)
    {
        services.AddTransient<IProductService, EbayProductService>();
    }
}
Controllers and Views that have a dependency on IProductService will automatically start displaying Ebay Products instead of Amazon products.
Dynamically Register Services in DI Container
Let’s say you are in a situation where you want to use two different services based on the environment. You want to test Amazon service when you are in the development environment but you want to use Ebay service in the production environment. You can easily achieve this by injecting the IWebHostEnvironment inside the constructor of Startup class and then you can register services dynamically as shown below.
public class Startup
{
    private IWebHostEnvironment _env;

    public Startup(IWebHostEnvironment env)
    {
        _env = env;
    }

    public void ConfigureServices(IServiceCollection services)
    {
        if (_env.IsProduction())
        {
            services.AddTransient<IProductService, EbayProductService>();
        }
        else
        {
            services.AddTransient<IProductService, AmazonProductService>();
        }
    }
}
Summary
In this tutorial, I tried to clarify the main concepts related to the Dependency Injection design pattern. I have given you an overview of the infrastructure provided by .NET Core to support dependency injection. I hope you have now learned how to configure an ASP.NET Core application to use the built-in IoC container and register services. I hope you have also learned about the different service lifetimes available in .NET core applications.


“Loved this post, keep it up!”
This is really good startup tutorial for a beginner to understand..
Appreciated. Thanks
Very Nice and Simple Article.Good work Waqas.
Thanks a lot
Finally understood! Many thanks
Very helpful and wonderful article. Thanks to share such helpful post with great efforts. Happy!
Thank you for posting an excellent article.
Thanks for the well written article. It has helped me in understanding this concept after a long time. It is clear, short and to the point and the examples actually makes sense without going through jargon.
Why, When & How have been brilliantly drafted together ❤
thanks for simply describe the topic.
Fantastic, Thank you!
Thank you for this great article. It’s very concise and clear.
I have gone through different articles for the DI concept finally I landed here and this is well understood by your explanation, examples. Thanks for posting such a wonderful explanation and examples. Keep us teaching !
It is really very clear.. and easy to understand .. Thank you..
Hi,
Very good article. Thank you very much.
Just missing one point – when IProductService, like AmazonProductService has its own dependencies, like EF Core db context and / or IAmazonSQS .
This is important to know, when diff services/classes have diff requirement for lifetime.
Thanks and yes you raised a good and valid point. Other Services can also be injected in Services like AmazonProductService just as they can be injected in all other ASP.NET components e.g. TagHelpers, ViewComponents etc.
It seems like there can be a chaining. Say I have classes A, B, C, and D, and they are all registered in ConfigureServices. If a controller class takes class A as a constructor argument, and A takes class B as a constructor argument, and B takes C, and C takes D, then the dependency injection works right down the line, as you would expect. However you can’t come into the middle of this chain, and manually instantiate class B, for example, and expect the injection to work on the rest of the chain because to manually construct B you need to supply a manually constructed C, and for that you need a manually constructed D.
Hello there, just became aware of your blog through Google,
and found that it is truly informative. I am gonna watch out for brussels.
I’ll be grateful if you continue this in future. A lot of people will be benefited from your
writing. Cheers!