Two of my previous posts A Guide for Building Software with Clean Architecture and Building ASP.NET Core Apps with Clean Architecture received an overwhelming response from many developers around the world and many developers requested me to write a similar post on Blazor Server Apps. This post is about implementing the clean architecture in Blazor server apps using CQRS, Mediatr, Entity Framework Core, and repository patterns.
Table of Contents
What is Blazor?
Blazor is a free, open-source, single-page apps (SPA) development framework that enables developers to build interactive web apps using C# on both servers as well as client-side. Blazor allows developers to execute the .NET code inside a browser without any browser plugin. This means that developers can create rich, interactive web applications without the need for JavaScript. There are many hosting models for Blazor, but the most popular are Blazor Server and Blazor WebAssembly.
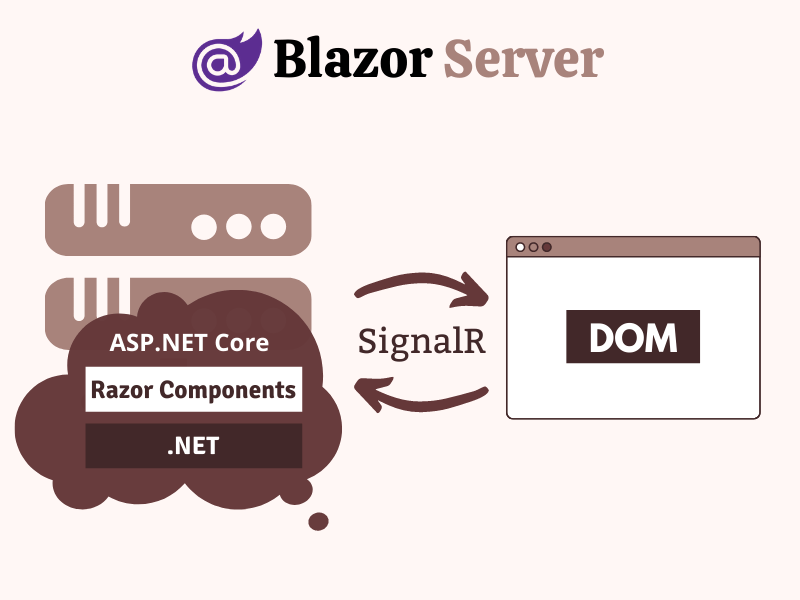
Blazor Server Apps – Blazor Server apps run on the server where they enjoy the support of full .NET Core runtime. All the processing is done on the server and UI/DOM changes are transmitted back to the client over the SignalR connection. As your .NET code is already running on the server, you don’t need to create APIs for your front end. You can directly access services, databases, etc., and do anything you want to do on traditional server-side technology.
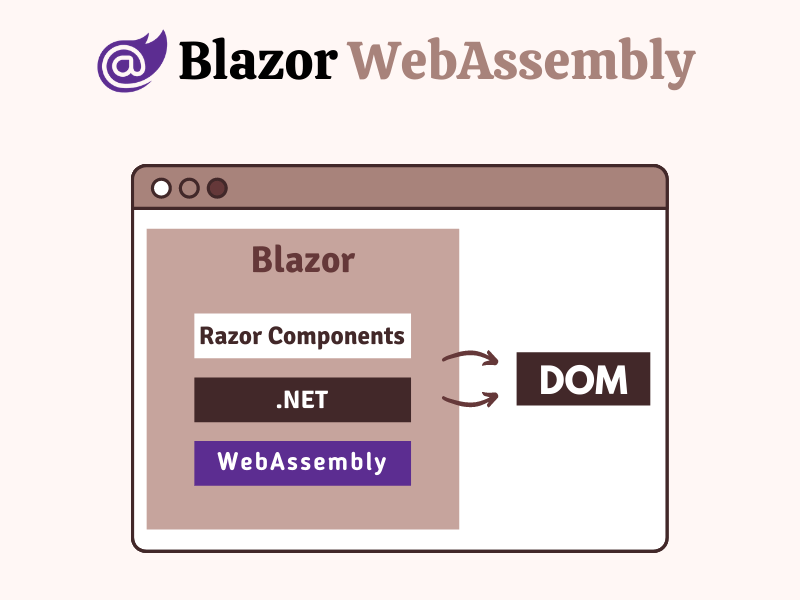
Blazor WebAssembly – In Blazor WebAssembly apps, the application logic runs directly in the browser, eliminating the need for server-side rendering. Blazor WebAssembly apps are deployed as static files, making them highly portable and easily hosted on any web server.
To learn more about Blazor Server and WebAssembly apps read my post A Beginner’s Guide To Blazor Server and WebAssembly Applications. If you want to learn Blazor in detail then read the series of posts, I wrote on Blazor.
What is Clean Architecture?
Clean Architecture is introduced by Robert C. Martin (also known as Uncle Bob) in 2012 and it emphasizes the separation of concerns and the independence of different layers within a system. It promotes a modular and highly maintainable codebase by enforcing clear boundaries and dependencies between components. In this architecture, the business logic is kept separate from the infrastructure and presentation layers, which allows developers to build scalable, testable, and maintainable software.
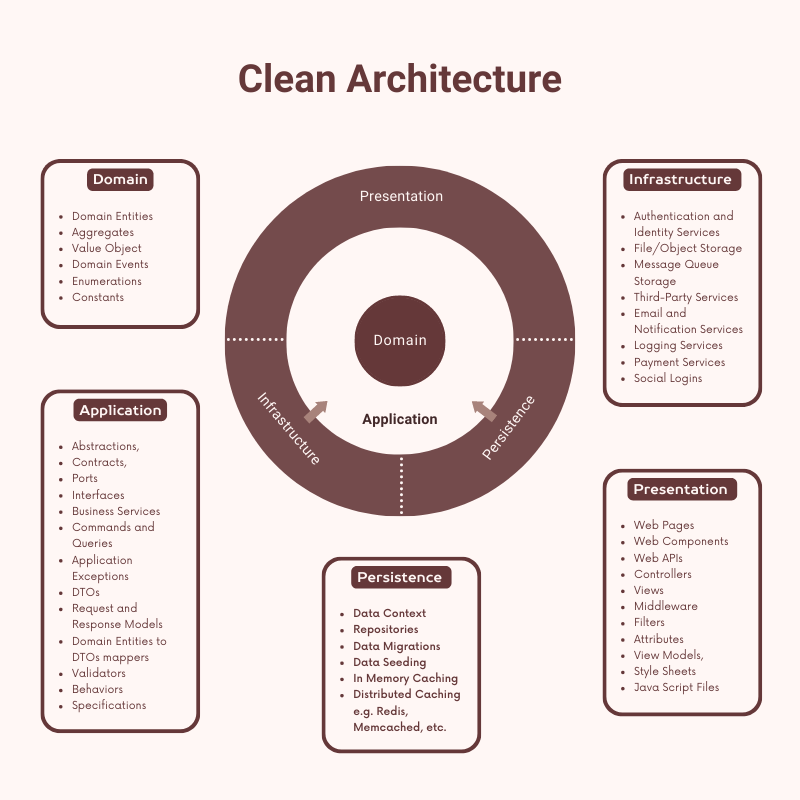
The clean architecture is implemented by organizing the application code into multiple layers which can contain one or more projects each with a specific responsibility. These layers typically include:
Domain Layer = This layer is the backbone of the clean architecture and all other projects defined in other layers should depend on this layer. This layer is highly abstracted and it contains domain entities, events, value objects, aggregates, etc.
Application Layer = The application business rules and use cases are available in this layer. Mostly it defines interfaces that are implemented by the outer layers. This layer contains business services, DTOs, mappers, validators, etc.
Infrastructure Layer = This layer contains the implementation of the interfaces defined in the Application layer. This layer is responsible for implementing the technical aspects of the system, such as data access, logging, security, etc. It can have multiple projects using different third-party libraries or frameworks.
Presentation Layer = This layer is responsible for presenting some user interface and handling user interaction with the system. It includes the views, controllers, and other web components.
To learn more about clean architecture, you can read my posts A Guide for Building Software with Clean Architecture and Building ASP.NET Core Apps with Clean Architecture.
If you like video tutorials then here are some of my videos on Clean Architecture
Getting Started with Clean Architecture in Blazor
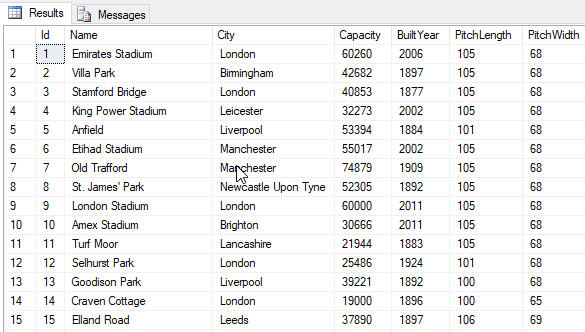
Before we dive into the actual implementation details of the application, we need to decide what type of application we need to build. For this post, I have decided to use a demo application that will display the list of football stadiums used in the famous English Premier League in the United Kingdom. The database table with stadium information will look similar to the following screenshot.
I have decided to use Visual Studio 2022 with .NET 7.0 to build the demo application so let’s get started.
- Open Visual Studio 2022 and create a new blank solution with the name “BlazorServerCleanArchitecture”.
- Next, create the following three solution folders inside the blank solution.
- Core
- Infrastructure
- Presentation
- Next, create the following two class library projects in the Core solution folder.
- BlazorServerCleanArchitecture.Domain
- BlazorServerCleanArchitecture.Application
- Next, create the following class library project in the Infrastructure folder
- BlazorServerCleanArchitecture.Persistence
- Finally, we need to create the following Blazor Server App project in the Presentation folder
- BlazorServerCleanArchitecture.WebUI
To create a Blazor Server App project, you can follow these steps:
Right-click on the Presentation solution folder and choose Add > New Project… option.
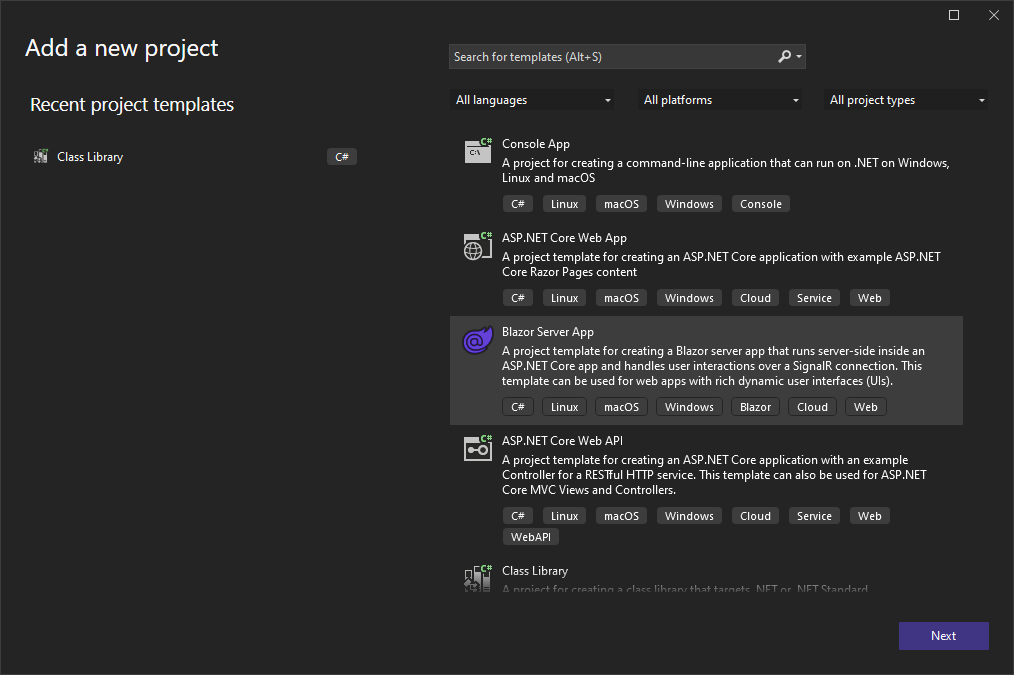
Select the Blazor Server App project template from the Add a new project dialog as shown in the screenshot below.
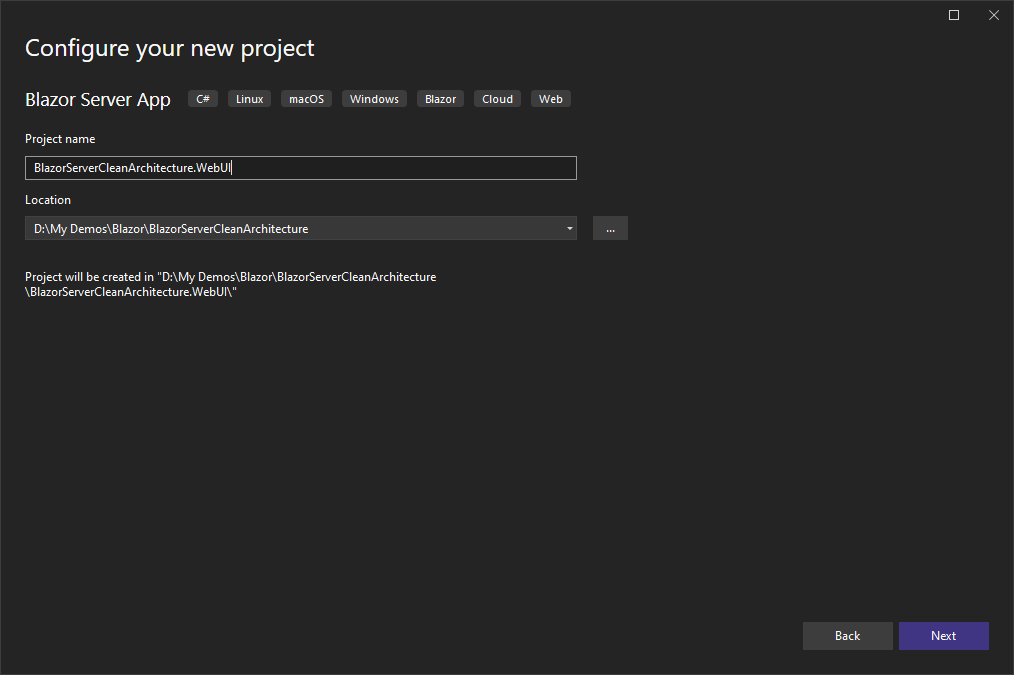
In the Configure your new project dialog
- Provide the Project name BlazorServerCleanArchitecture.WebUI
- Provide the location where you want to create the project
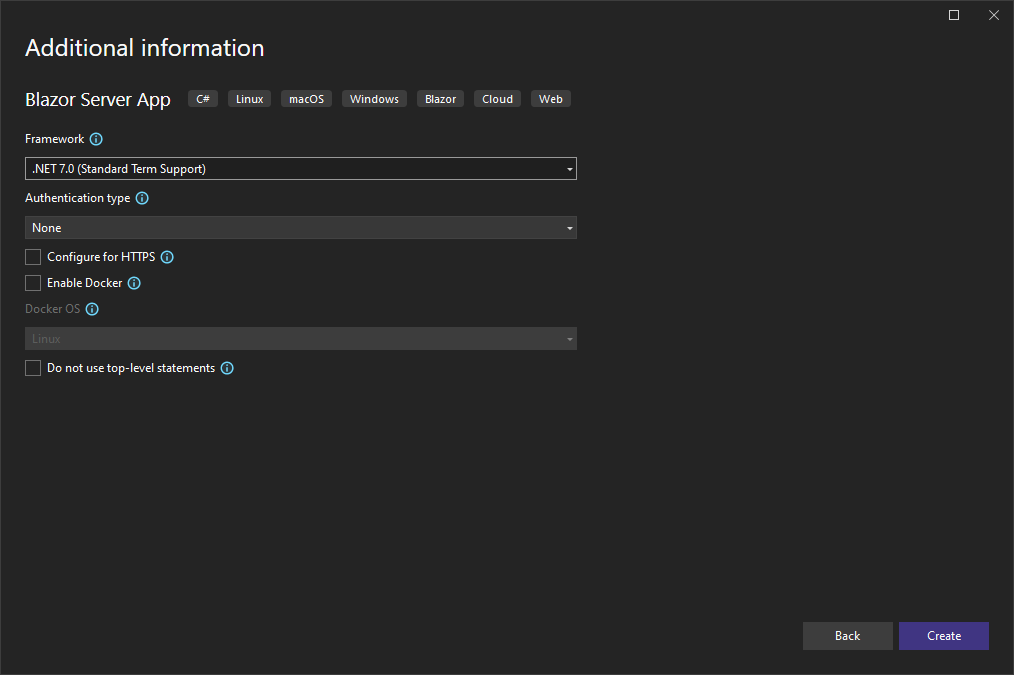
In the Additional information dialog
- Select .NET 7.0 (Standard Term Support) as the Framework
- Select None as the Authentication type
- Make sure the Configure for HTTPS, Enable Docker, and Do not use top level statements checkboxes are unchecked
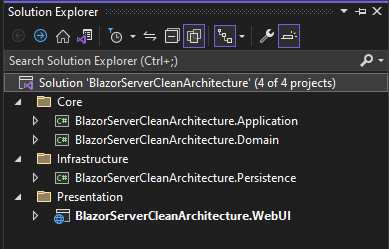
Once all the above projects are created, the project structure in Visual Studio solution explorer will look similar to the following screenshot.
Next, we need to add the following nuget packages in different projects of the solution.
BlazorServerCleanArchitecture.Domain project needs the following nuget packages
- MediatR (12.0.1)
BlazorServerCleanArchitecture.Application project needs the following nuget packages
- MediatR (12.0.1)
- AutoMapper (12.0.1)
- AutoMapper.Extensions.Microsoft.DependencyInjection (12.0.1)
- Microsoft.EntityFrameworkCore (7.0.5)
BlazorServerCleanArchitecture.Persistence project needs the following nuget packages
- Microsoft.EntityFrameworkCore (7.0.5)
- Microsoft.EntityFrameworkCore.SqlServer (7.0.5)
- Microsoft.Extensions.Configuration (7.0.0)
BlazorServerCleanArchitecture.WebUI project needs the following nuget packages
- MediatR (12.0.1)
Implementing the Domain Layer
The domain layer is the core component of clean architecture and it usually includes domain entities, aggregates, value objects, etc. This layer represents the domain and use-case-independent business logic of the system and has no dependency on any technology, third-party library, or frameworks. For our demo project, let’s create the following two folders Common and Entities in the project. We will add different base objects and entities in these folders.
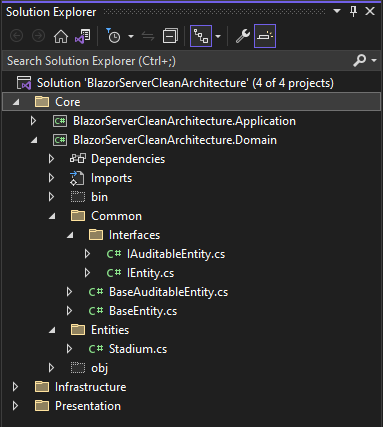
Common Folder
The Common folder contains base classes and interfaces.
IEntity.cs
This file contains a base IEntity interface and all domain entities will implement this interface either directly or indirectly.
public interface IEntity
{
    public int Id { get; set; }
}
IAuditableEntity.cs
This file defines a child interface of the IEntity interfaces defined above. This interface adds additional properties to keep track of the entity’s audit trail information.
public interface IAuditableEntity : IEntity
{
    int? CreatedBy { get; set; }
    DateTime? CreatedDate { get; set; }
    int? UpdatedBy { get; set; }
    DateTime? UpdatedDate { get; set; }
}
BaseEntity.cs
This file contains BaseEntity class that implements the IEntity interface.
public abstract class BaseEntity : IEntity
{
    public int Id { get; set; }
}
BaseAuditableEntity.cs
This class is the child class of BaseEntity and it implements the IAuditableEntity interface defined above.
public abstract class BaseAuditableEntity : BaseEntity, IAuditableEntity
{
    public int? CreatedBy { get; set; }
    public DateTime? CreatedDate { get; set; }
    public int? UpdatedBy { get; set; }
    public DateTime? UpdatedDate { get; set; }
}
Entities Folder
The Entities folder contains domain entities such as Stadium, Player, Club, etc. All domain entities inherit from the above BaseAuditableEntity class. For this post, I will only implement the Stadium entity.
Stadium.cs
public class Stadium : BaseAuditableEntity
{
    public string Name { get; set; }
    public string City { get; set; }
    public int? Capacity { get; set; }
    public int? BuiltYear { get; set; }
    public int? PitchLength { get; set; }
    public int? PitchWidth { get; set; }
}
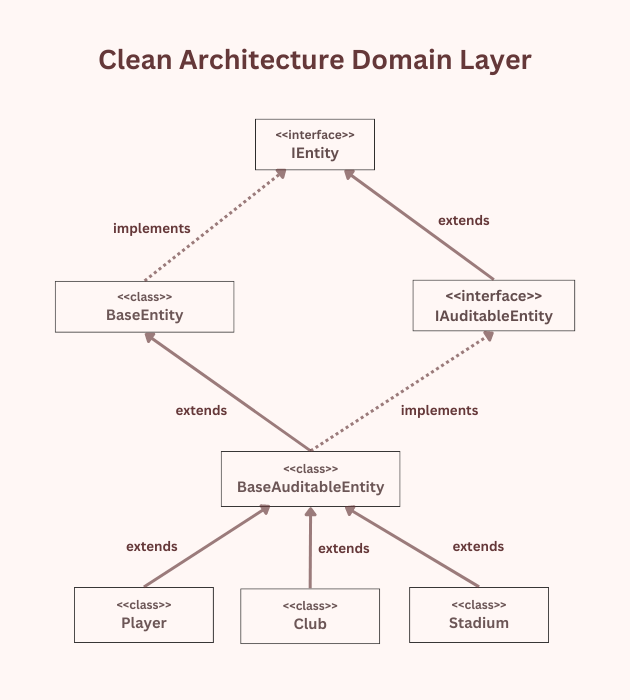
The following diagram shows the relationships between different classes and interfaces defined in the Domain layer.
Implementing the Application Layer
The application layer depends on the Domain layer and acts as a bridge between the Domain layer and external layers such as Persistence or Presentations layer. This layer contains business services, DTOs, Commands, Queries, etc.

Repositories Folder
This folder contains interfaces such as IUnitOfWork, IGenericRepository, and other domain-specific interfaces such as IStadiumRepository, etc. These interfaces define methods to read and update data.
IGenericRepository.cs
This interface defines a generic repository and it contains generic CRUD methods.
public interface IGenericRepository<T> where T : class, IEntity
{
    IQueryable<T> Entities { get; }

    Task<T> GetByIdAsync(int id);
    Task<List<T>> GetAllAsync();
    Task<T> AddAsync(T entity);
    Task UpdateAsync(T entity);
    Task DeleteAsync(T entity);
}
IUnitOfWork.cs
This interface defines a unit of work pattern that allows us to save changes made by multiple repositories at once.
public interface IUnitOfWork : IDisposable
{
    IGenericRepository<T> Repository<T>() where T : BaseAuditableEntity;
    Task<int> Save(CancellationToken cancellationToken);
    Task<int> SaveAndRemoveCache(CancellationToken cancellationToken, params string[] cacheKeys);
    Task Rollback();
}
IStadiumRepository.cs
Most of the time, repositories will only use the generic methods defined in the IGenericRepository class but if they have some additional functionality and require a custom method implementation then these methods can be defined in specific repository interfaces. In the following example, IStadiumRepository is defining an additional method to get the list of all stadiums in a specific city.
public interface IStadiumRepository
{
    Task<List<Stadium>> GetStadiumByCityAsync(string cityName);
}
Features Folder
I am a big fan of organizing the application code by functional features. This makes it easier to find all the related classes in one place and to understand and maintain the codebase over time. If you want to have multiple features related to a particular entity or domain then you can create a separate subfolder for each feature e.g. Players, Clubs, Stadiums, etc. Each feature folder can contain subfolders such as Queries and Commands which can contain CQRS commands and queries. Let’s implement the GetAllStadiumsQuery class inside the Features > Stadiums > Queries > GetAllStadiums folder to implement the functionality of fetching all stadiums from the database.
GetAllStadiumsQuery.cs
public record GetAllStadiumsQuery : IRequest<List<GetAllStadiumsDto>>;

internal class GetAllPlayersQueryHandler : IRequestHandler<GetAllStadiumsQuery, List<GetAllStadiumsDto>>
{
    private readonly IUnitOfWork _unitOfWork;
    private readonly IMapper _mapper;

    public GetAllPlayersQueryHandler(IUnitOfWork unitOfWork, IMapper mapper)
    {
        _unitOfWork = unitOfWork;
        _mapper = mapper;
    }

    public async Task<List<GetAllStadiumsDto>> Handle(GetAllStadiumsQuery query, CancellationToken cancellationToken)
    {
        return await _unitOfWork.Repository<Stadium>().Entities
               .ProjectTo<GetAllStadiumsDto>(_mapper.ConfigurationProvider)
               .ToListAsync(cancellationToken);
    }
}
GetAllStadiumsDto.cs
The above query and handler are using the following DTO class also defined in the Features > Stadiums > Queries > GetAllStadiums folder.
public class GetAllStadiumsDto : IMapFrom<Stadium>
{
    public int Id { get; init; }
    public string Name { get; set; }
    public string City { get; set; }
    public int? Capacity { get; set; }
    public int? BuiltYear { get; set; }
    public int? PitchLength { get; set; }
    public int? PitchWidth { get; set; }
}
Implementing the Infrastructure Layer
This layer contains the implementation of the interfaces defined in the Application layer. The project(s) defined in this layer communicate with external systems and technologies, such as databases, APIs, or cloud services. This layer should only interact with the domain layer through the application layer and should not contain any business logic or domain knowledge. The main goal of the infrastructure layer is to encapsulate the technical details of the application so that they can be easily changed or replaced without affecting the rest of the application.
Contexts Folder
There can be multiple database contexts in a large project so it is always a good idea to create a separate folder for all context classes. Currently, this folder will only contain ApplicationDbContext.cs file.
ApplicationDbContext.cs
This file contains the ApplicationDbContext that inherits from the EntityFramework DbContext.
public class ApplicationDbContext : DbContext
{
    public ApplicationDbContext(DbContextOptions<ApplicationDbContext> options)
        : base(options)
    { }

    public DbSet<Stadium> Stadiums => Set<Stadium>();

    protected override void OnModelCreating(ModelBuilder modelBuilder)
    {
        base.OnModelCreating(modelBuilder);
        modelBuilder.ApplyConfigurationsFromAssembly(Assembly.GetExecutingAssembly());
    }

    public override async Task<int> SaveChangesAsync(CancellationToken cancellationToken = new CancellationToken())
    {
        return await base.SaveChangesAsync(cancellationToken).ConfigureAwait(false);
    }

    public override int SaveChanges()
    {
        return SaveChangesAsync().GetAwaiter().GetResult();
    }
}
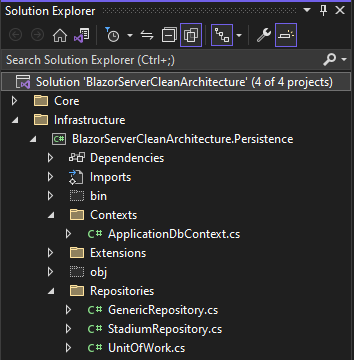
Repositories Folder
The Repositories folder contains the implementation of the repository and unit of work interfaces.
GenericRepository.cs
The implementation of GenericRepository is very straightforward. It uses ApplicationDbContext to perform standard CRUD operations.
public class GenericRepository<T> : IGenericRepository<T> where T : BaseAuditableEntity
{
    private readonly ApplicationDbContext _dbContext;

    public GenericRepository(ApplicationDbContext dbContext)
    {
        _dbContext = dbContext;
    }

    public IQueryable<T> Entities => _dbContext.Set<T>();

    public async Task<T> AddAsync(T entity)
    {
        await _dbContext.Set<T>().AddAsync(entity);
        return entity;
    }

    public Task UpdateAsync(T entity)
    {
        T exist = _dbContext.Set<T>().Find(entity.Id);
        _dbContext.Entry(exist).CurrentValues.SetValues(entity);
        return Task.CompletedTask;
    }

    public Task DeleteAsync(T entity)
    {
        _dbContext.Set<T>().Remove(entity);
        return Task.CompletedTask;
    }

    public async Task<List<T>> GetAllAsync()
    {
        return await _dbContext
            .Set<T>()
            .ToListAsync();
    }

    public async Task<T> GetByIdAsync(int id)
    {
        return await _dbContext.Set<T>().FindAsync(id);
    }
}
StadiumRepository.cs
If any repository has any custom method, it can be defined in its respective repository. In our demo app, the IStadiumRepository has a custom method GetStadiumByCityAsync which is implemented in StadiumRespository below.
public class StadiumRepository : IStadiumRepository
{
    private readonly IGenericRepository<Stadium> _repository;

    public StadiumRepository(IGenericRepository<Stadium> repository)
    {
        _repository = repository;
    }

    public async Task<List<Stadium>> GetStadiumByCityAsync(string cityName)
    {
        return await _repository.Entities.Where(x => x.City == cityName).ToListAsync();
    }
}
UnitOfWork.cs
public class UnitOfWork : IUnitOfWork
{
    private readonly ApplicationDbContext _dbContext;
    private Hashtable _repositories;
    private bool disposed;

    public UnitOfWork(ApplicationDbContext dbContext)
    {
        _dbContext = dbContext ?? throw new ArgumentNullException(nameof(dbContext));
    }

    public IGenericRepository<T> Repository<T>() where T : BaseAuditableEntity
    {
        if (_repositories == null)
            _repositories = new Hashtable();

        var type = typeof(T).Name;

        if (!_repositories.ContainsKey(type))
        {
            var repositoryType = typeof(GenericRepository<>);

            var repositoryInstance = Activator.CreateInstance(repositoryType.MakeGenericType(typeof(T)), _dbContext);

            _repositories.Add(type, repositoryInstance);
        }

        return (IGenericRepository<T>) _repositories[type];
    }

    public Task Rollback()
    {
        _dbContext.ChangeTracker.Entries().ToList().ForEach(x => x.Reload());
        return Task.CompletedTask;
    }

    public async Task<int> Save(CancellationToken cancellationToken)
    {
        return await _dbContext.SaveChangesAsync(cancellationToken);
    }

    public Task<int> SaveAndRemoveCache(CancellationToken cancellationToken, params string[] cacheKeys)
    {
        throw new NotImplementedException();
    }

    public void Dispose()
    {
        Dispose(true);
        GC.SuppressFinalize(this);
    }

    protected virtual void Dispose(bool disposing)
    {
        if (disposed)
        {
            if (disposing)
            {
                //dispose managed resources
                _dbContext.Dispose();
            }
        }
        //dispose unmanaged resources
        disposed = true;
    }
}
Implementing the Presentation Layer
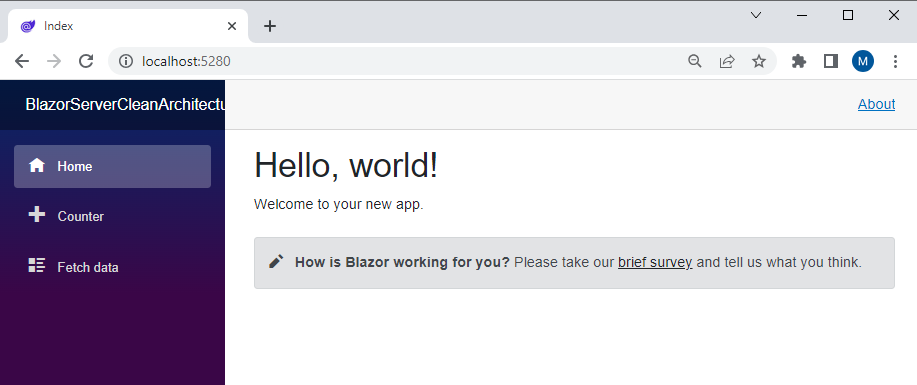
The presentation layer is the out most layer of the clean architecture and this is where we decide if we are going to build a Web API, an ASP.NET MVC web application, or a Blazor Server app. The presentation layer should not contain business logic or domain knowledge and should only interact with the rest of the application through the application layer. For our demo application, we already created a Blazor Server app at the start of this post so we will display the list of stadiums in this application.
If you will run the default Blazor Server App at this point, you will see the output similar to the following screenshot.
Stadiums.razor
To display a list of stadiums, we will create a new Razor component in the application. Right-click on the Pages folder and choose Add > Razor Component.. option. Type Stadiums.razor as the Name and click Add button.
@page "/stadiums"
@using BlazorServerCleanArchitecture.Application.Features.Stadiums.Queries.GetAllStadiums;
@using MediatR
@inject IMediator Mediator

<PageTitle>Stadiums</PageTitle>

<h1>Stadiums</h1>

@if (stadiums == null)
{
    <p><em>Loading...</em></p>
}
else
{
    <table class="table">
        <thead>
            <tr>
                <th>Name</th>
                <th>City</th>
                <th>Capacity</th>
                <th>Built Year</th>
                <th>Pitch Length</th>
                <th>Pitch Width</th>
            </tr>
        </thead>
        <tbody>
            @foreach (var stadium in stadiums)
            {
                <tr>
                    <td>@stadium.Name</td>
                    <td>@stadium.City</td>
                    <td>@stadium.Capacity</td>
                    <td>@stadium.BuiltYear</td>
                    <td>@stadium.PitchLength</td>
                    <td>@stadium.PitchWidth</td>
                </tr>
            }
        </tbody>
    </table>
}

@code {
    private List<GetAllStadiumsDto>? stadiums;

    protected override async Task OnInitializedAsync()
    {
        stadiums = await Mediator.Send(new GetAllStadiumsQuery());
    }
}
The first line in the file is using the Razor @page directive and this line specifies the component route. It means that the Stadiums component is a page-level or routable component and it can be accessed in the browser using the /stadiums path at the end of the URL.
@page "/stadiums"
The next important line is the following @inject directive that allows us to inject the services into the components. The first parameter IMediator specifies the type of service to inject and the second parameter Mediator is the name of the property receiving the injected service.
@inject IMediator Mediator
Inside the code block of the component, I declared a List of GetAllStadiumsDto objects which we are initializing in the OnInitializedAsync method by sending a GetAllStadiumsQuery using the Mediator service Send method.
@code {
    private List<GetAllStadiumsDto>? stadiums;

    protected override async Task OnInitializedAsync()
    {
        stadiums = await Mediator.Send(new GetAllStadiumsQuery());
    }
}
The HTML markup is simply iterating over the stadium’s list to display all stadiums on the page.
@foreach (var stadium in stadiums)
{
    <tr>
        <td>@stadium.Name</td>
        <td>@stadium.City</td>
        <td>@stadium.Capacity</td>
        <td>@stadium.BuiltYear</td>
        <td>@stadium.PitchLength</td>
        <td>@stadium.PitchWidth</td>
    </tr>
}
NavMenu.razor
To access the Stadiums component from the sidebar, open the NavMenu.razor file available in the Shared folder and add the following menu item.
<div class="@NavMenuCssClass nav-scrollable" @onclick="ToggleNavMenu">
    <nav class="flex-column">
        <div class="nav-item px-3">
            <NavLink class="nav-link" href="" Match="NavLinkMatch.All">
                <span class="oi oi-home" aria-hidden="true"></span> Home
            </NavLink>
        </div>
        <div class="nav-item px-3">
            <NavLink class="nav-link" href="counter">
                <span class="oi oi-plus" aria-hidden="true"></span> Counter
            </NavLink>
        </div>
        <div class="nav-item px-3">
            <NavLink class="nav-link" href="fetchdata">
                <span class="oi oi-list-rich" aria-hidden="true"></span> Fetch data
            </NavLink>
        </div>
        <div class="nav-item px-3">
            <NavLink class="nav-link" href="stadiums">
                <span class="oi oi-list-rich" aria-hidden="true"></span> Stadiums
            </NavLink>
        </div>
    </nav>
</div>
appsettings.json
We are fetching the stadiums list from the SQL Server database so we need to configure the database connection string in the appsettings.json file as follows.
{
  "ConnectionStrings": {
    "DefaultConnection": "Server=MyServer;Database=PremierLeagueAppDb;User Id=MyUser;Password=MyPassword;MultipleActiveResultSets=true;TrustServerCertificate=True;"
  },
  "Logging": {
    "LogLevel": {
      "Default": "Information",
      "Microsoft.AspNetCore": "Warning"
    }
  },
  "AllowedHosts": "*"
}
Program.cs
The Program.cs file is the entry point of the application. The Program.cs configure the services required by the application and also defines the application request handling pipeline. In our demo app, we need to call the extension methods AddApplicationLayer and AddPersistenceLayer defined in the projects available in the Application and Infrastructure layers.
builder.Services.AddApplicationLayer();
builder.Services.AddPersistenceLayer(builder.Configuration);
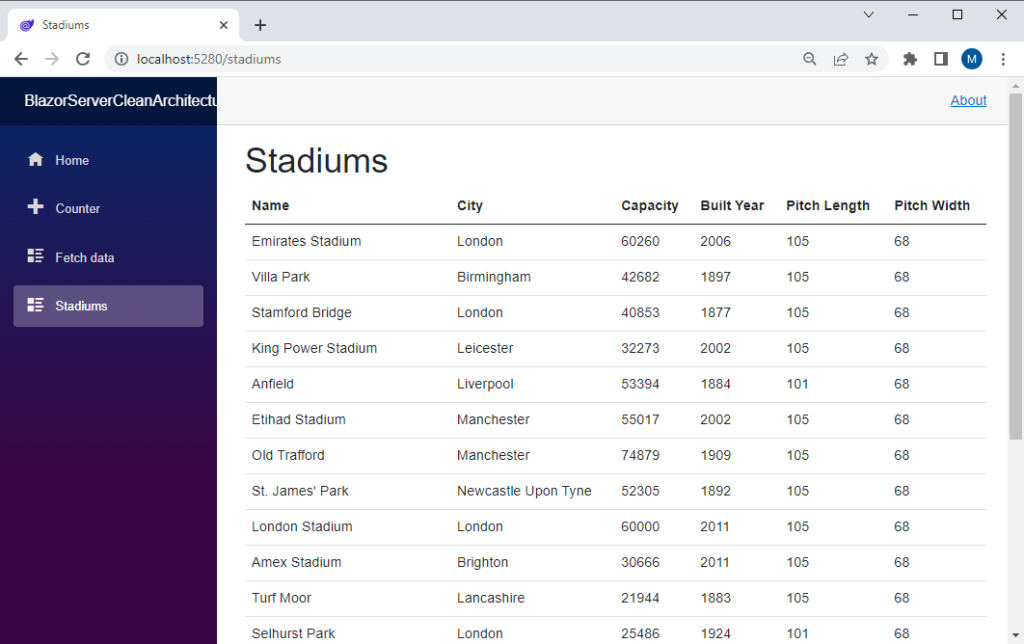
That’s all we need to test our demo app. Let’s run the application and once the application is shown in the browser, click the Stadiums menu item on the sidebar. You will see the output similar to the following screenshot.
Conclusion
In this article, I tried to give you a detailed example of implementing clean architecture and using it from a Blazor Server App. In my next post, I will show you how to use clean architecture from Blazor WebAssembly apps. The complete source code of our demo application is available on GitHub. If you have any comments or suggestions, please leave your comments below. Don’t forget to share this tutorial with your friends or community.

hi
i am not well in coding , it try your code but not able to use unit of work in other services can you help how you use add edit del and get with unit of work. as i cheched you just use only once unit of work to get stadium data. how i can use unit of work on services.?
do you have full project can you share this on email?
please complete CRUD operation
Thx for your article!.
For those who want to use migration. I had to correct a line in the context configuration:
builder => builder.MigrationsAssembly(“HERE NAME YOUR PRESENTATION PROJECT NAME”)));
and run dotnet ef …. from the startup project where we have program.cs
hi, but You are calling the repository from the app layer..? by Your first diagram only from persistence to application calls are available …
Sorry but do you mean this?
protected override async Task OnInitializedAsync()
{
stadiums = await Mediator.Send(new GetAllStadiumsQuery());
}
Microsoft recommends using dbcontextfactory to keep contexts around only for the scope of an action, or in some cases the scope of a component. See: https://learn.microsoft.com/en-us/aspnet/core/blazor/blazor-ef-core?view=aspnetcore-8.0
How would you change this project to take that into account?
He’s using MediatR as far as Blazor is concerned. Which means MediatR is the only thing that deals with scope. The rest is just communication and the layer that handles the repository is acting not much different than a web api.
Really valuable article, I appreciate your great work! Thank you
Any clue for the authentication?
The coverage of clean architecture is really good and easy to understand. But this couldn’t be used as a complete tutorial as there are elements missing. For example creating the IMapFrom class and the extension methods AddApplicationLayer and AddPersistenceLayer defined in the projects Application and Infrastructure layers are not covered in this article. Also as JDOE points out there is not mention of the SQL server other that in the reference to the appsettings.json file
I agree with you that I didn’t cover IMapFrom and AddApplicationLayer and AddPersistenceLayer methods in the article just to make sure that the article don’t become too long to read. These things are available in the demo project source code I uploaded on Github in case anyone want to see how they are implemented. As far as database is concern so as I already replied in some other comments that in this post, I am connecting to an existing SQL Server database.
I am facing the error while running migration commands
Unable to create an object of type ‘ApplicationDbContext’. For the different patterns supported at design time, see https://go.microsoft.com/fwlink/?linkid=851728
give Solution Please
You don’t need to use migrations with my reference project as I am using EF Core with database first approach and connecting to an existing SQL Server database.
Awesome post! Really like the clean setup and instructions – But when I run the source code GIT version I get DB error – I think I missed the part about how to perform the database migrations to get the data into SQL SERVER or is this just assumed to exist already?
Yes, I am connecting to an existing SQL Server database.
Thanks, good structured.
Thanks