
Inspecting incoming request URLs and route them to appropriate views or pages are the basic features of every single-page app (SPA) framework. Blazor Server and WebAssembly apps also support routing using some built-in components and services. In this tutorial, I will cover everything you need to learn about implementing routing in Blazor apps.
Table of Contents
Routing Configuration in Blazor Apps
Before we start creating routes for different Blazor components/pages we need to see how the Blazor Server apps are integrated into ASP.NET Core Endpoint Routing. Blazor Server apps communicate with the clients over SignalR connections and to accept incoming connections for Blazor components we call the MapBlazorHub method in Startup.cs file Configure method as follows:
app.UseEndpoints(endpoints =>
{
    endpoints.MapBlazorHub();
    endpoints.MapFallbackToPage("/_Host");
});
The default configuration routes all requests to a Razor page which acts as the host for the server-side part of the Blazor Server app. By convention, this host page is _Host.cshtml and it is available in the Pages folder of the app. The route specified in the host file is called a fallback route and has very low priority in route matching which means this route is used when no other route matches.
Introducing Blazor Router Component
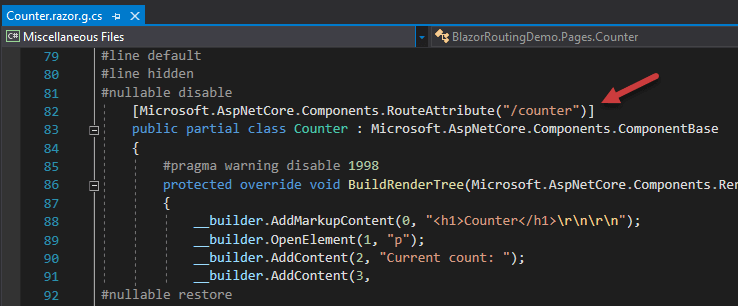
The Router component is one of the built-in components in Blazor and it is used in the App component of Blazor apps. This component enables routing in Blazor apps and supplies route data corresponding to the current navigation state. This component intercepts the incoming requests and renders the page that matches the requested URL.
<Router AppAssembly="@typeof(Program).Assembly" PreferExactMatches="@true">
    <Found Context="routeData">
        <RouteView RouteData="@routeData" DefaultLayout="@typeof(MainLayout)" />
    </Found>
    <NotFound>
        <LayoutView Layout="@typeof(MainLayout)">
            <p>Sorry, there's nothing at this address.</p>
        </LayoutView>
    </NotFound>
</Router>
The following tables show the properties of the Router component.
| AdditionalAssemblies | Gets or sets a collection of additional assemblies that should be searched for components that can match URIs. |
| AppAssembly | Gets or sets the assembly that should be searched for components matching the URI. |
| Found | Gets or sets the content to display when a match is found for the requested route. |
| Navigating | Get or sets the content to display when asynchronous navigation is in progress. |
| NotFound | Gets or sets the content to display when no match is found for the requested route. |
| OnNavigateAsync | Gets or sets a handler that should be called before navigating to a new page. |
When Blazor components (.razor) are compiled their generated C# classes are saved in obj\Debug\net5.0\Razor\Pages folder
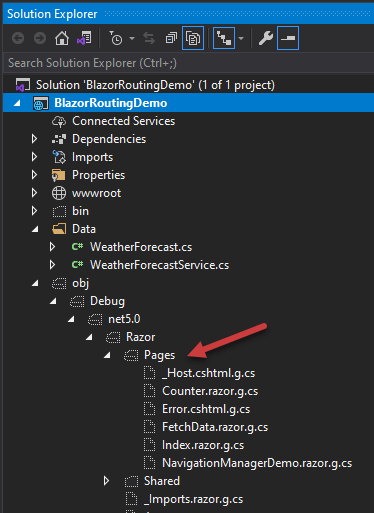
If you will open any of the compiled files you will notice that after compilation, all the components with an @page directive have generated a class with the RouteAttribute attribute.
When the app starts, the assembly specified by the AppAssembly property is scanned to gather the route information from all classes that have RouteAttribute specified on them.
<Router AppAssembly="@typeof(Program).Assembly" PreferExactMatches="@true">
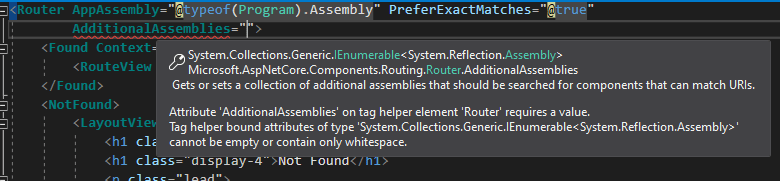
If you have created separate component class libraries and you want the app to scan and load routes from those assemblies, then you can use AdditionalAssemblies property that accepts a collection of Assembly objects.
Here is an example of loading route information from two routable components Component1 and Component2 defined in component class libraries.
<Router AppAssembly="@typeof(Program).Assembly" PreferExactMatches="@true"
        AdditionalAssemblies="new[] { typeof(Component1).Assembly, typeof(Component2).Assembly }">
</Router>
At runtime, the RouteView component receives the RouteData from the Router along with any route parameters and renders the specified component with the layout defined in the component. If no layout is defined, then it uses the layout specified by the DefaultLayout property. The default layout is normally the MainLayout component available in the Shared folder but you can also create and specify a custom layout.
<RouteView RouteData="@routeData" DefaultLayout="@typeof(MainLayout)" />
The Found template is used to display the contents of the matching route is found as you can see in the example below where a matching route is found and a Counter page is rendered in the browser.

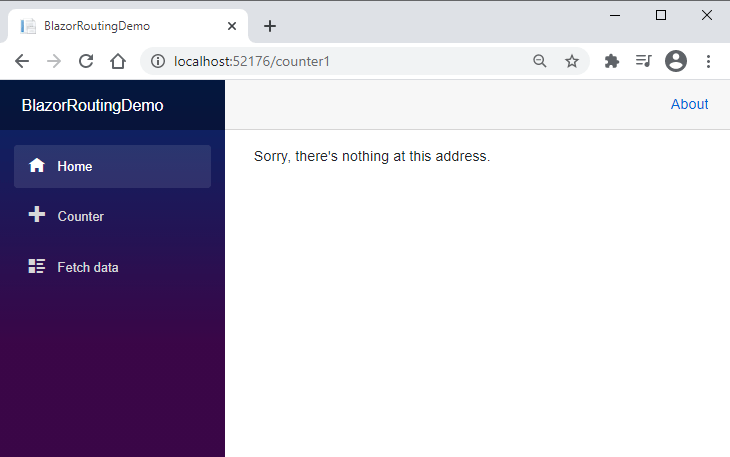
The NotFound template is used to display the contents if no matching route is found. By default, the NotFound template is just displaying a message as shown in the screenshot below.
We can also create a custom error layout and page and display a custom error page. Let’s create a new custom Layout with the name ErrorLayout.razor in the Shared folder.
ErrorLayout.razor
@inherits LayoutComponentBase

<main role="main" class="container">
    <div class="text-center">
        @Body
    </div>
</main>
Then change the Layout property of the LayoutView component to ErrorLayout and change the contents inside the LayoutView as follows
<Router AppAssembly="@typeof(Program).Assembly" PreferExactMatches="@true">
    <Found Context="routeData">
        <RouteView RouteData="@routeData" DefaultLayout="@typeof(MainLayout)" />
    </Found>
    <NotFound>
        <LayoutView Layout="@typeof(ErrorLayout)">
            <h1 class="display-1">404</h1>
            <h1 class="display-4">Not Found</h1>
            <p class="lead">
                Oops! Looks like this page doesn't exist.
            </p>
        </LayoutView>
    </NotFound>
</Router>
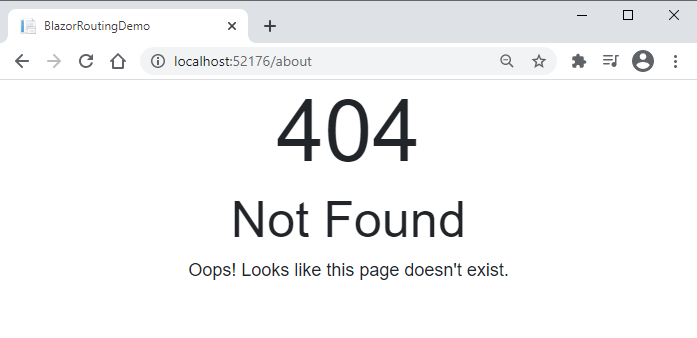
If you will run the app in the browser and will try to access a URL that is not specified anywhere in the application then you will see a custom 404 error page as shown below.
All Blazor apps should explicitly set the PreferExactMatches attribute to @true so that route matching prefers exact matches rather than wildcards. As per Microsoft official docs, this attribute will not be available from .NET 6 onward and the router will always prefer exact matches.
Defining Routes, Parameters and Constraints
Before we learn how to define routes for Blazor components, we need to make sure that we have the following base tag available on every page to resolve the URLs correctly. If you are creating Blazor Server App then you can add this tag in the head section of Pages/_Host.cshtml file and for Blazor WebAssembly apps this tag can be added in wwwroot/index.html file.
<base href="~/" />
To define routes, we can use the @page directive as shown in the Counter component example below.
@page "/counter"

<h1>Counter</h1>

<p>Current count: @currentCount</p>

<button class="btn btn-primary" @onclick="IncrementCount">Click me</button>

@code {
    private int currentCount = 0;

    private void IncrementCount()
    {
        currentCount++;
    }
}
We can now access the counter component using the /counter URL.
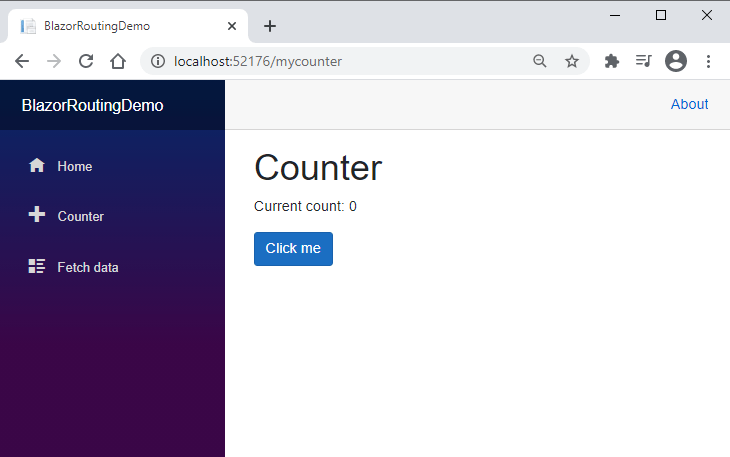
We are also allowed to define multiple route templates using multiple @page directives as shown in the example below.
@page "/counter"
@page "/mycounter"
This means that now the same Counter component can also be accessed using /mycounter URL:
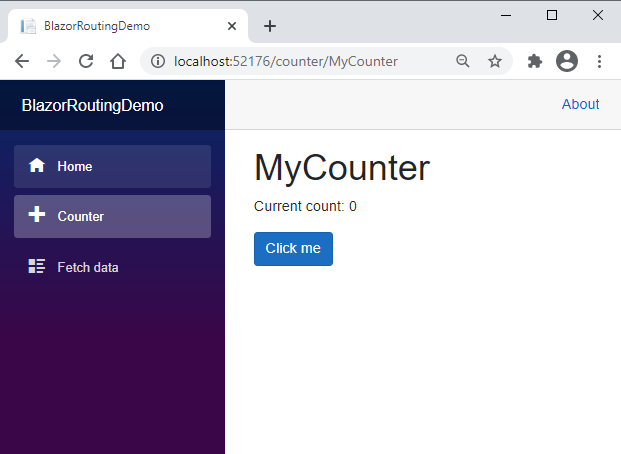
It is very common practice to pass data from one page to another page using the route parameters and Blazor route templates support parameters. The route parameter names are case insensitive and once we have the route parameter defined the router automatically populates the corresponding component property with the same name. For example, in the following code snippet, we define a route parameter title and also created a corresponding property Title in the component. This property will populate with the value of route parameter text automatically. We are then displaying the Title property as a heading of the page inside the h1 element.
@page "/counter/{title}"

<h1>@Title</h1>

<p>Current count: @currentCount</p>

<button class="btn btn-primary" @onclick="IncrementCount">Click me</button>

@code {
    private int currentCount = 0;

    [Parameter]
    public string Title { get; set; }

    private void IncrementCount()
    {
        currentCount++;
    }
}
Run the app and try to specify any string in the address bar after the /counter/ and you will see the route parameter value displayed as page heading.
We are also allowed to define optional route parameters as shown in the example below where the title is an optional parameter as it has the question mark (?) after the parameter name. If we will not provide the value of this route parameter, the parameter will initialize with the default value of Counter in the OnInitialized method.
@page "/counter/{title?}"

<h1>@Title</h1>

<p>Current count: @currentCount</p>

<button class="btn btn-primary" @onclick="IncrementCount">Click me</button>

@code {
    private int currentCount = 0;

    [Parameter]
    public string Title { get; set; }

    protected override void OnInitialized()
    {
        Title = Title ?? "Counter";
    }

    private void IncrementCount()
    {
        currentCount++;
    }
}
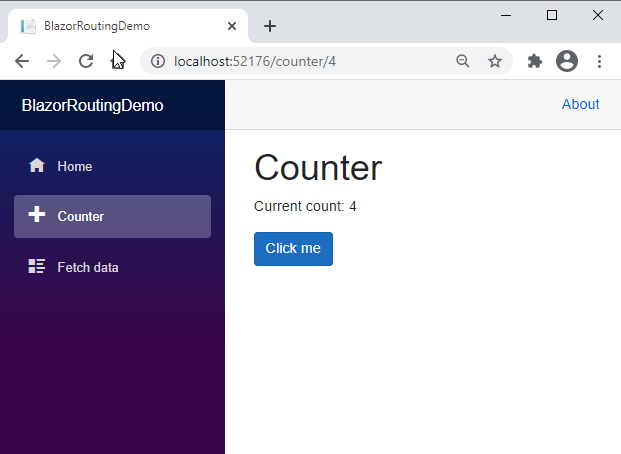
Blazor also supports route constraints that enforce the type matching on a route. In the code snippet below, I created a route parameter start with an int type which means now I can only provide the integer value for this route parameter. The counter will now start with the value specified in the route parameter.
@page "/counter/{start:int}"

<h1>Counter</h1>

<p>Current count: @Start</p>

<button class="btn btn-primary" @onclick="IncrementCount">Click me</button>

@code {
    [Parameter]
    public int Start { get; set; }

    private void IncrementCount()
    {
        Start++;
    }
}
Run the app in the browser and specify any integer value in the URL such as /counter/4 and you will see the counter will start incrementing from this starting value.
The following table shows the types supported by Blazor route constraints.
| Constraint | Example | Example Matches |
| bool | {active:bool} | true, FALSE |
| datetime | {dob:datetime} | 2016-12-31, 2016-12-31 7:32pm |
| decimal | {price:decimal} | 49.99, -1,000.01 |
| double | {weight:double} | 1.234, -1,001.01e8 |
| float | {weight:float} | 1.234, -1,001.01e8 |
| guid | {id:guid} | CD2C1638-1638-72D5-1638-DEADBEEF1638, {CD2C1638-1638-72D5-1638-DEADBEEF1638} |
| int | {id:int} | 123456789, -123456789 |
| long | {ticks:long} | 123456789, -123456789 |
Multiple route parameters can also be defined as shown in the example below where we defined start and increment as int type parameters.
@page "/counter/{start:int}/{increment:int}"

<h1>Counter</h1>

<p>Current count: @Start</p>

<button class="btn btn-primary" @onclick="IncrementCount">Click me</button>

@code {
    [Parameter]
    public int Start { get; set; }

    [Parameter]
    public int Increment { get; set; }

    private void IncrementCount()
    {
        Start+=Increment;
    }
}
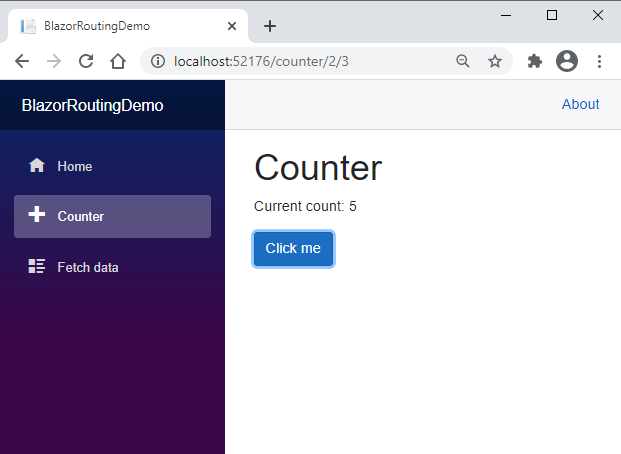
Run the app and specified both start and increment values in the address URL as shown below and you will notice that not only the counter will start with the value 2 but it will also increment by 3 every time you will click the Click me button.
Overview of Blazor NavigationManager Service
The NavigationManager service allows us to manage URIs and navigation in C# code. The NavigationManager class has the following common properties, methods, and events.
| BaseUri | Property | Gets or sets the current base URI. The BaseUri is always represented as an absolute URI in string form with a trailing slash. Typically this corresponds to the ‘href’ attribute on the document’s <base> element. |
| Uri | Property | Gets or sets the current URI. The Uri is always represented as an absolute URI in string form. |
| NavigateTo | Method | Navigates to the specified URI. |
| ToAbsoluteUri | Method | Converts a relative URI into an absolute URI. |
| ToBaseRelativePath | Method | Given a base URI (e.g., one previously returned by BaseUri), converts an absolute URI into one relative to the base URI prefix. |
| LocationChanged | Event | An event that fires when the navigation location has changed. |
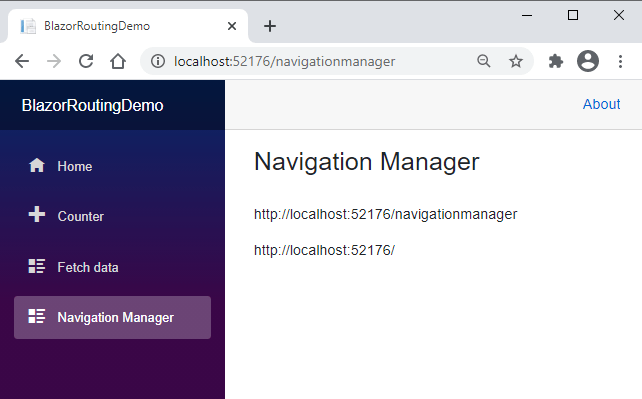
Let’s create a page to see some of the above properties and methods in action. Create a new Blazor component and inject the NavigationManager service using the @inject directive. Try to print the Uri and BaseUri properties on the page to see what type of URIs they return.
@page "/navigationmanager"
@inject NavigationManager nvm

<h3>Navigation Manager</h3>
<br />

<p>@nvm.Uri</p>
<p>@nvm.BaseUri</p>
Run the app and you will see output similar to the following in the browser. The Uri property will display the current absolute URI of the page whereas the BaseUri property will display the current base URI.
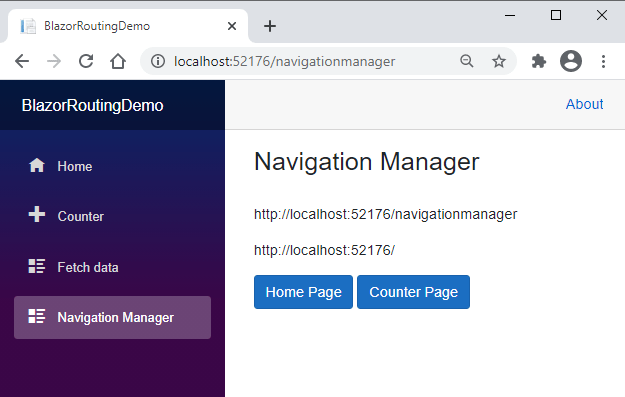
Add two buttons Home Page and Counter Page on the page and add their onclick event handler methods in the @code block. Inside the event handler methods, we can use the NavigateTo method to redirect the user to different Blazor components from the C# code.
@page "/navigationmanager"
@inject NavigationManager nvm

<h3>Navigation Manager</h3>
<br />

<p>@nvm.Uri</p>
<p>@nvm.BaseUri</p>

<button class="btn btn-primary" @onclick="GoToHome">
    Home Page
</button>

<button class="btn btn-primary" @onclick="GoToCounter">
    Counter Page
</button>

@code {

    private void GoToHome()
    {
        nvm.NavigateTo("/");
    }

    private void GoToCounter()
    {
        nvm.NavigateTo("counter");
    }
}
Run the app and try to click both buttons, you will be able to navigate to home and counter pages as expected.
If you don’t want to handle navigation programmatically and want to generate hyperlinks in HTML then you can use Blazor NavLink component. The NavLink component is similar to HTML <a> element with some cool features. It automatically toggles the active class with the element if the href attribute value matches with the current URL. This allows us to apply different styles on the currently selected link. You can see the usage of this component in Shared/NavMenu.razor file
<div class="@NavMenuCssClass" @onclick="ToggleNavMenu">
    <ul class="nav flex-column">
        <li class="nav-item px-3">
            <NavLink class="nav-link" href="" Match="NavLinkMatch.All">
                <span class="oi oi-home" aria-hidden="true"></span> Home
            </NavLink>
        </li>
        <li class="nav-item px-3">
            <NavLink class="nav-link" href="counter">
                <span class="oi oi-plus" aria-hidden="true"></span> Counter
            </NavLink>
        </li>
        <li class="nav-item px-3">
            <NavLink class="nav-link" href="fetchdata">
                <span class="oi oi-list-rich" aria-hidden="true"></span> Fetch data
            </NavLink>
        </li>
    </ul>
</div>
The component also has a Match property that can be set to one of the following:
- NavLinkMatch.All: The NavLink is active when it matches the entire current URL.
- NavLinkMatch.Prefix (default): The NavLink is active when it matches any prefix of the current URL.
Summary
In this tutorial, I tried to cover many routing features available in Blazor apps and also covered different routing related components and services available to developers. I hope you will be able to define routes, parameters, and constraints with more confidence now. If you liked this tutorial, please share it with others to spread the knowledge.


