
Blazor apps are the combination of components that are not only responsible for presenting the user interface but also work together to facilitate user interaction. They are the main building block of Blazor apps and most of the Blazor features revolves around components. In this tutorial, I will give you a detailed overview of components and will show you different techniques for creating and using components in Blazor Apps.
Table of Contents
Overview of Blazor Components
A Blazor component is a self-contained part of the UI such as a page, a sidebar menu, a contact form or a dashboard widget, etc. It includes the HTML markup to render the UI and the C# code to process the data or to handle the user events. Components can be nested in one another and they can also be reused within the project or even across multiple projects. Blazor components are implemented as Razor components and that’s why they use Razor syntax and also have .razor file extension.
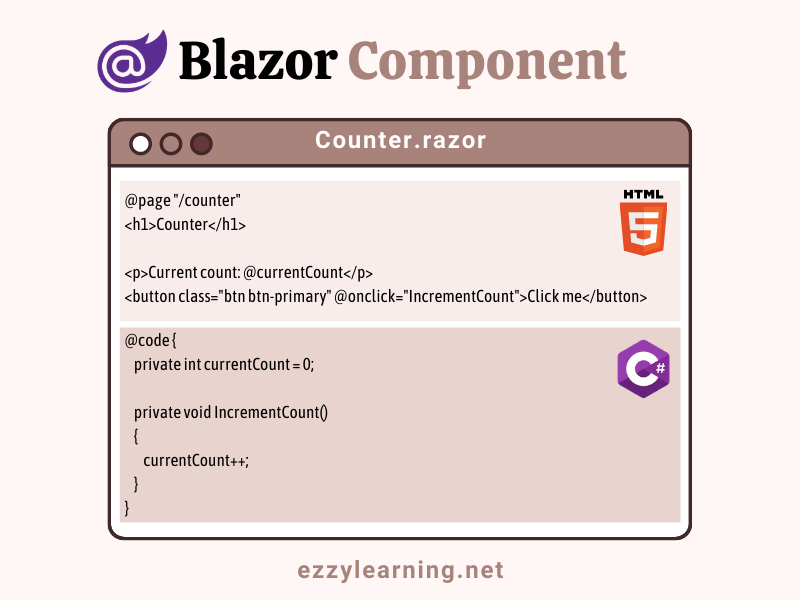
To understand how Blazor components are structured and how they work, let’s review the Counter.razor component which is automatically generated for us if you are using the Blazor App template in Visual Studio 2019. Here is the full code of Counter.razor.
@page "/counter"

<h1>Counter</h1>

<p>Current count: @currentCount</p>

<button class="btn btn-primary" @onclick="IncrementCount">Click me</button>

@code {
    private int currentCount = 0;

    private void IncrementCount()
    {
        currentCount++;
    }
}
The first line in the file is using the Razor @page directive and this line specifies the component route. It means that the Counter component is a page-level or routable component and it can be accessed in the browser using the /counter path at the end of the URL. If we don’t specify the @page directive, then the component will become a child component and it can be used by embedding it in other components.
@page "/counter"
We are also allowed to declare multiple @page level directives as shown below. This will allow us to access the component using two URLs.
@page “/counter”
@page “/mycounter”
After the @page directive, we have HTML markup that specifies the UI of the component. This markup can render HTML dynamically using expressions, conditions, or loops using a razor syntax. In case of above Counter component, the UI has a heading (h1), a paragraph (p), and a button element. The paragraph element is using a razor syntax to output the value of currentCount variable defined in the C# code block.
<p>Current count: @currentCount</p>
The button element is responding to the user click action by calling a method IncrementCount which is also defined in the code block.
<button class="btn btn-primary" @onclick="IncrementCount">Click me</button>
Finally, we have a code block where we are simply incrementing the value of currentCount variable by 1 every time the IncrementCount method is called.
@code {
    private int currentCount = 0;

    private void IncrementCount()
    {
        currentCount++;
    }
}
When a Blazor app will compile, the HTML markup and the C# code will convert into a component class whose name will match with the name of the file. The members of this class will be the same variables and methods we defined in the @code block. We are allowed to use more than one @code block and all these code blocks will merge into one component class after compilation.
Creating Blazor Components in Visual Studio 2019
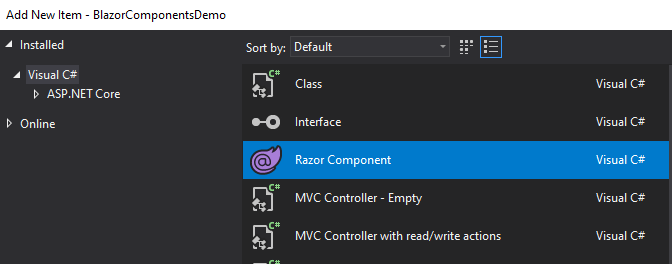
If you want to create a page-level component, then right-click on the Pages folder and choose Add > Razor Component… menu option.

You can also right-click on the project name in solution explorer and create a component using the Razor Component template.
Let’s create a component with the file name Calculator.razor and add the following code to it.
Calculator.razor
@page "/calculator"

<h3>Calculator</h3>

<div class="form-group">
    <label for="number1">Number 1</label>
    <input type="number" class="form-control" id="number1" @bind="number1">
</div>
<div class="form-group">
    <label for="number2">Number 2</label>
    <input type="number" class="form-control" id="number2"  @bind="number2">
</div>
<div class="form-group">
    <label><b>Total: </b>@total</label>
</div>

<button class="btn btn-primary" @onclick="Calculate">Calculate</button>

@code {
    private int number1 = 0;
    private int number2 = 0;
    private int total = 0;

    private void Calculate()
    {
        total = number1 + number2;
    }
}
The @code block has three private variables and a Calculate method. The Calculate method simply saves the sum of number1 and number2 in the total variable.
The HTML markup has two input fields which are using @bind attribute to bind the number1 and number2 variables
<input type="number" class="form-control" id="number1" @bind="number1">
The total variable value will render on the page using razor syntax @total
<label><b>Total: </b>@total</label>
Finally, we have a button element that binds the Calculate method with the @onclick event. Whenever the user will click the button, the Calculate method will be called and the value of the total variable will update on the page.
<button class="btn btn-primary" @onclick="Calculate">Calculate</button>
To make your Calculator component easily accessible, you can add your Calculator component in the application sidebar by adding the following markup in NavMenu.razor component.
<li class="nav-item px-3">
   <NavLink class="nav-link" href="calculator">
      <span class="oi oi-calculator" aria-hidden="true"></span> Calculator
   </NavLink>
</li>
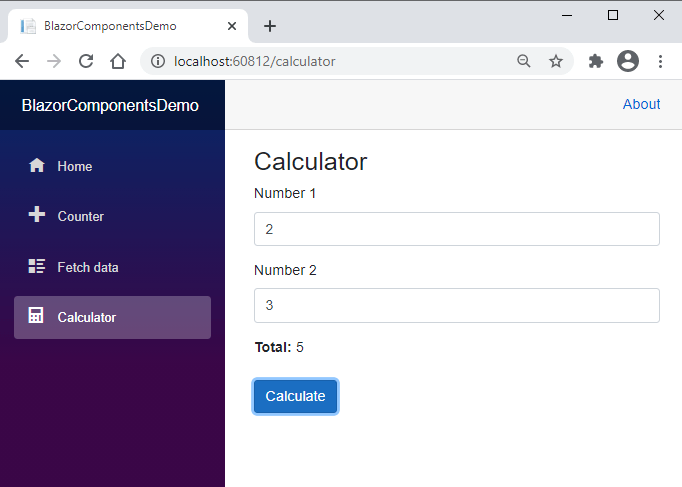
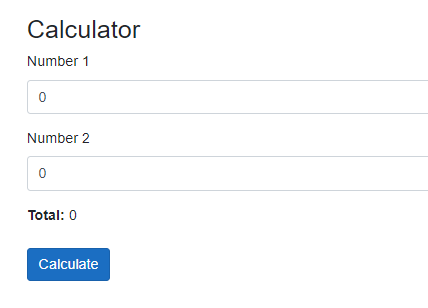
Press F5 to run your application and you should be able to see a page like the following. Try to input some numbers in the fields and you should be able to see the sum of the numbers displayed on the page. Pressing the Calculate button runs the server-side C# code but there is no browser postback or page refresh. Everything feels smooth and fast like you are doing calculations within the browser using some JavaScript.
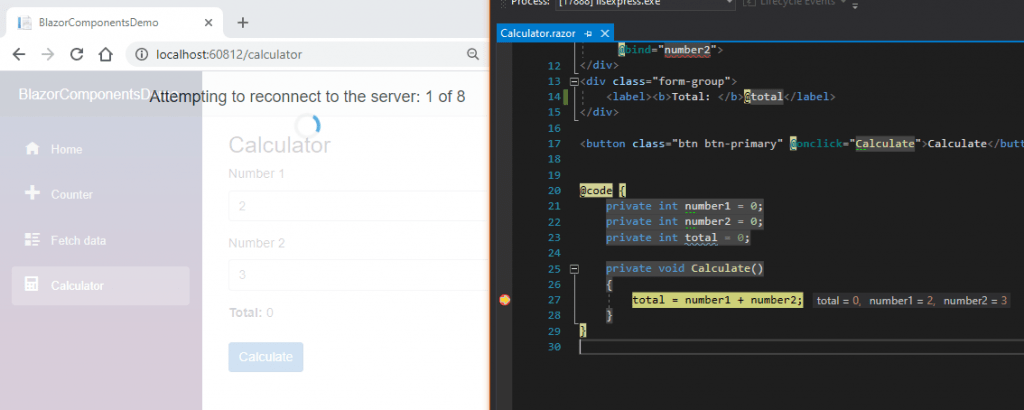
If you want to get the feeling that your code is running on the server-side, just try to add a breakpoint in the Calculate method and press F5 again. This time when you will click the Calculate button, you will see the code execution stopping at the breakpoint and you will also be able to see the user input in the tooltips as shown below.
Split Blazor Components Markup and Code
If you are creating small components, then you may want to write all C# code in a single .razor file but if you have lots of logic and for better code maintenance, you want to keep your C# code separate from your HTML markup then you can adopt one of the following two approaches.
Split Components using Base Class
Using this approach, you can create a separate class that should derive from ComponentBase class. You can then move components properties and methods from the @code block to this newly created class and finally, you can use the @inherits directive to specify the base class of your component. Let’s apply this approach to the Calculator component we created above. Create a class CalculatorBase in the project and move the C# code from the Calculator.razor into this new class.
CalculatorBase.cs
public class CalculatorBase : ComponentBase
{
    private int number1 = 0;
    private int number2 = 0;
    private int total = 0;

    private void Calculate()
    {
        total = number1 + number2;
    }
}
Then add the @inherits directive on top of the Calculator.razor file as follows:
Calculator.razor
@page "/calculator"
@inherits CalculatorBase

<h3>Calculator</h3>

<div class="form-group">
    <label for="number1">Number 1</label>
    <input type="number" class="form-control" id="number1" @bind="number1">
</div>
<div class="form-group">
    <label for="number2">Number 2</label>
    <input type="number" class="form-control" id="number2"  @bind="number2">
</div>
<div class="form-group">
    <label><b>Total: </b>@total</label>
</div>

<button class="btn btn-primary" @onclick="Calculate">Calculate</button>

@code {

}
If you will try to build your application at this point, you will lot of errors complaining about the accessibility of the fields and methods.

All of the above errors are coming because the Calculator component is inheriting from the CalculatorBase class and the properties and methods we pasted in the CalculatorBase class are private. To make sure your fields and methods are accessible by the child components, you need to declare them as public.
public class CalculatorBase : ComponentBase
{
    public int number1 = 0;
    public int number2 = 0;
    public int total = 0;

    public void Calculate()
    {
        total = number1 + number2;
    }
}
Split Components using Partial Class
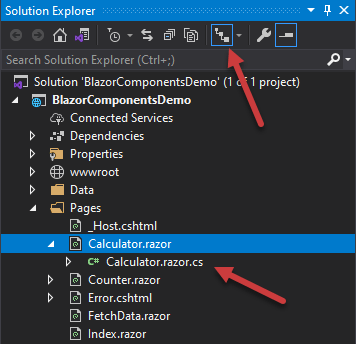
Blazor components are generated as partial classes which means we can create a partial class with the same name as our component and move all C# code in that partial class. This partial class will then become a code-behind file and the fields and properties declared in that file will be directly available in Blazor components. Let’s create a class Calculator.razor.cs and put our calculator code in this new class.
Calculator.razor.cs
public partial class Calculator
{
    public int number1 = 0;
    public int number2 = 0;
    public int total = 0;

    public void Calculate()
    {
        total = number1 + number2;
    }
}
If file nesting is enabled, you will see that Visual Studio will automatically start displaying both the component and code-behind files together.
Run the app again and the Calculator should work in the same way as before.
Creating and Using Child Components
Blazor Child Components are the components without @page directive. These components can be included inside other components using the standard HTML syntax. We can then build a complex UI by adding components on the page and we can even have multiple instances of the same child component on the same page. If a child component is supposed to be reused in multiple parent components or pages then it’s a good idea to place them inside the Shared folder. Let’s create a simple Heading.razor child component in the Shared folder and add the following code to it.
Heading.razor
<h3>Calculator</h3>
Next, replace the h3 element in the parent Calculator.razor file with <Heading /> element. Run the app and you should see the h3 heading rendered on the page from within the child component.
Calculator.razor
@page "/calculator"
@inherits CalculatorBase

<Heading />

<div class="form-group">
    <label for="number1">Number 1</label>
    <input type="number" class="form-control" id="number1" @bind="number1">
</div>
<div class="form-group">
    <label for="number2">Number 2</label>
    <input type="number" class="form-control" id="number2"  @bind="number2">
</div>
<div class="form-group">
    <label><b>Total: </b>@total</label>
</div>

<button class="btn btn-primary" @onclick="Calculate">Calculate</button>
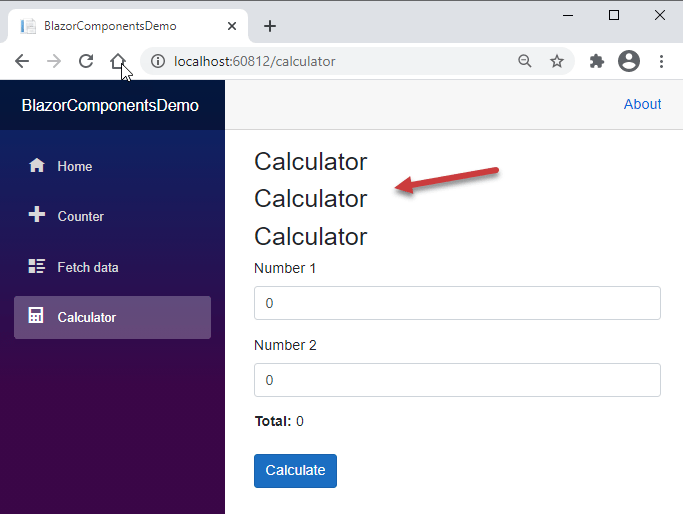
You can even use multiple instances of child components by just copying and pasting the same <Heading /> element.
<Heading />
<Heading />
<Heading />
If you will run your app now, you will see three h3 headings rendered on the page.
Customizing Blazor Components with Parameters
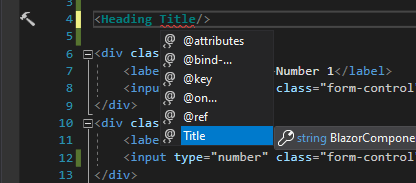
A static component that always generates the same contents will not be very useful. It is better if we can pass some data to a component and customize not only the UI it generates but also its behavior or functionality. We can customize Blazor components using the Parameters. These parameters can be simple e.g. int, bool or they can also be more complex e.g. Customer, Order, etc. Once parameters are declared, we can pass data to components using attributes. Let’s learn this concept by declaring a simple Title parameter in our Heading component. To specify a parameter, we attach [Parameter] attribute with a property.
Heading.razor
<h3>@Title</h3>

@code {
    [Parameter]
    public string Title { get; set; } = "Default Title";
}
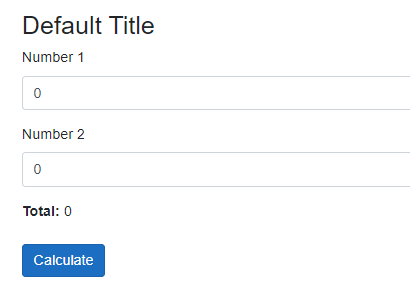
We also set the Title property with a default string Default Title which will be displayed if no Title is provided
Visual Studio IntelliSense also displays the component parameters which is helpful because we don’t need to memorize the parameters.
We can customize the Title from outside by passing any string as Title and the Heading component will automatically render different strings passed to it.
<Heading Title="Calculator" />
We can also pass data from parent-to-child components using expressions. Let’s create another child component CalculatorTotal.razor and add the following code to it.
CalculatorTotal.razor
<label><b>Total: </b>@Total</label>

@code {
    [Parameter]
    public int Total { get; set; }
}
Now you can pass the Total value using the @total field we declared and set in the parent Calculator controller.
Calculator.razor
@page "/calculator"

<Heading Title="Calculator" />

<div class="form-group">
    <label for="number1">Number 1</label>
    <input type="number" class="form-control" id="number1" @bind="number1">
</div>
<div class="form-group">
    <label for="number2">Number 2</label>
    <input type="number" class="form-control" id="number2" @bind="number2">
</div>
<div class="form-group">
    <CalculatorTotal Total="@total"/>
</div>

<button class="btn btn-primary" @onclick="Calculate">Calculate</button>
Passing Route Parameters to Blazor Components
Blazor components can also accept parameters from the route template provided in the @page directive. The router automatically populates the corresponding component parameters using the route parameters.
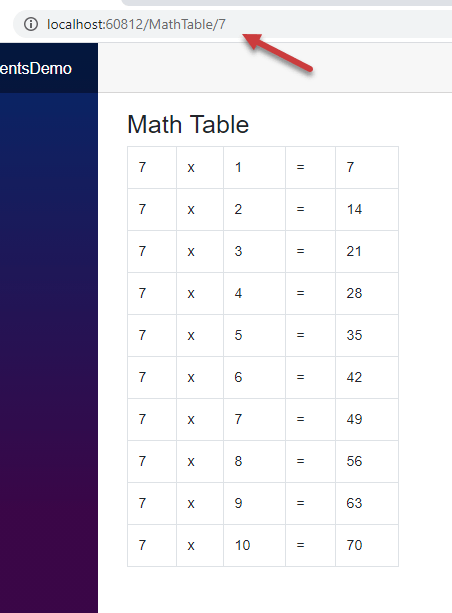
Let’s see an example of how to pass data to components from routes. Create a new Blazor component with the name MathTable.razor and add the following code.
MathTable.razor
@page "/MathTable/{number:int}"

<h3>Math Table</h3>

<table class="table table-bordered w-25">
    @for (int i = 1; i <= 10; i++)
    {
        <tr>
            <td>@Number</td>
            <td>x</td>
            <td>@i</td>
            <td>=</td>
            <td>@(Number * i)</td>
        </tr>
    }
</table>

@code {
    [Parameter]
    public int Number { get; set; }
}
We specified a route template with an int parameter number
@page "/MathTable/{number:int}"
The route parameter will map with the following component parameter automatically.
[Parameter]
public int Number { get; set; }
In the HTML markup, I am generating a Math table using the number parameter. Run the project and try to pass different numbers in the route URL and you will see the updated Math table as per the parameter value.
Summary
In this tutorial, I tried to cover the fundamentals of Blazor components. I tried to demonstrate every concept with easy to understand examples so that you can learn the basic concept quickly. Blazor components offer a lot more functionality than what I covered in this tutorial and there are so many other advanced topics related to Blazor components. I will try to write more posts on Blazor in the upcoming weeks so keep visiting my website to learn more about Blazor.


Extremely well written and clear – totally awesome! – This is how tutorials should be written. Thank you!
Thank you