In this article, we will learn what feature flags are and how to use these feature flags in an ASP.NET Core application. We will also explore how we can use the built-in feature filters to enable or disable features of an ASP.NET Core application.
Consider that you just released a new feature on production that allows users to generate invoices for their orders. But you’ve discovered that this new feature doesn’t work properly because it doesn’t print the customer’s name correctly on the invoice. Using feature flags you can disable the feature without changing your code or deploying a new version of your app. You can turn this off in production until you create a fix and deploy it to production.
Table of Contents
What is Feature Management?
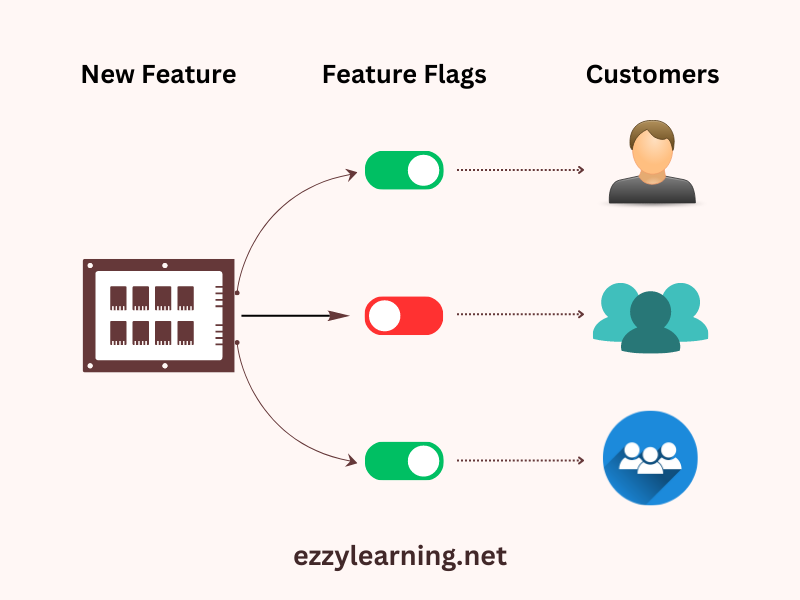
Feature management, also known as feature toggling or feature flags, is a software development technique used to enable or disable specific features or functionality in an application without the need to redeploy the entire application. This allows developers to control feature availability in a more dynamic and controlled way, which can be particularly useful for testing experimental features, gradual rollouts, A/B testing, and managing the release of new functionality.
ASP.NET Core provides a built-in feature management framework that makes it easy to implement and control feature flags. This framework includes different strategies and techniques for enabling or disabling features conditionally based on different criteria, such as user roles, environment variables, time-based activation, percentage of users, and more.
If you like video tutorials then here are my videos on Feature Management.
Benefits of Feature Management
Following are some of the benefits of using Feature Management or Feature Flags.
Gradual Rollouts and Testing
Feature flags allow you to release new features to a small group of users or in specific environments. This allows controlled testing, validation, and gradual adoption of new features before full release. This way, you can identify and fix problems quickly and improve the overall quality of your software.
Continuous Deployment and Continuous Integration
Feature flags support continuous deployment by separating feature releases from code deployment. Developers can merge new code into the main branch without enabling new features immediately. This promotes more frequent deployments and reduces the risk associated with large releases.
Reduced Risk and Faster Rollbacks
If a newly released feature causes unexpected problems or negatively impacts the user experience, you can quickly disable the feature with the feature flag. This provides a faster and safer way to roll back without the need for a complete code rollback or redeployment.
A/B Testing and Experimentation
Feature flags enable A/B testing, where different groups of users experience different versions of a feature. This allows you to collect feedback from real-world users and make data-driven decisions about which version of a feature performs better or meets user needs more effectively.
Hotfixes and Emergency Response
Feature flags can be used to quickly deploy emergency fixes or workarounds that do not require a full release cycle. This is especially useful for fixing critical issues that need immediate attention.
Feature Personalization
You can use feature flags to personalize the user experience based on user attributes, preferences, or roles. This makes it possible to tailor the application to different user segments and improve user satisfaction.
Smoother Collaboration
Feature flags promote collaboration between development, QA, and product teams. Developers can work on features independently, QA teams can test specific features without waiting for a full release, and product managers can control the release of the feature based on business priority.
Reduced Code Complexity
Instead of maintaining multiple branches of code for different feature versions, you can keep the codebase unified and enable/disable features using flags. This simplifies code management and reduces merge conflicts.
Feature Staging
Feature flags facilitate the staging of features, allowing you to prepare features for release by testing them in production while hiding them from users until they’re completely ready.
User-Centric Development
By enabling features for specific users or groups of users, you can gather feedback from real users and iterate on features based on their feedback, leading to user-centered development.
Introducing Microsoft Feature Management Library
Feature management support is provided by Microsoft in the Nuget package Microsoft.FeatureManagement.AspNetCore. This library allows you to add feature flags declaratively so you don’t need to write manual code to enable or disable features with conditional statements. This library also helps manage the lifecycle of feature flags i.e. library refresh flag status and also caches them in memory or can guarantee that a flag state remains constant during a request or session.
The key components of feature management in ASP.NET Core include:
Feature Flags: These are the toggles that control the availability of specific features. Each feature flag represents a certain feature of your application.
Feature Providers: These are the sources of truth for feature flag configuration. Feature providers can be configuration files, environment variables, remote configuration services, or custom providers that you implement.
Feature Filters: These are conditions that determine whether a feature should be enabled or disabled. ASP.NET Core provides built-in filters like percentage-based rollout, time window, and more. You can also create custom filters to suit your specific requirements.
Middleware: ASP.NET Core middleware is used to integrate feature management into the request processing pipeline. This allows you to apply feature toggling logic before or during the processing of each request.
Configuring Feature Flags in ASP.NET Core App
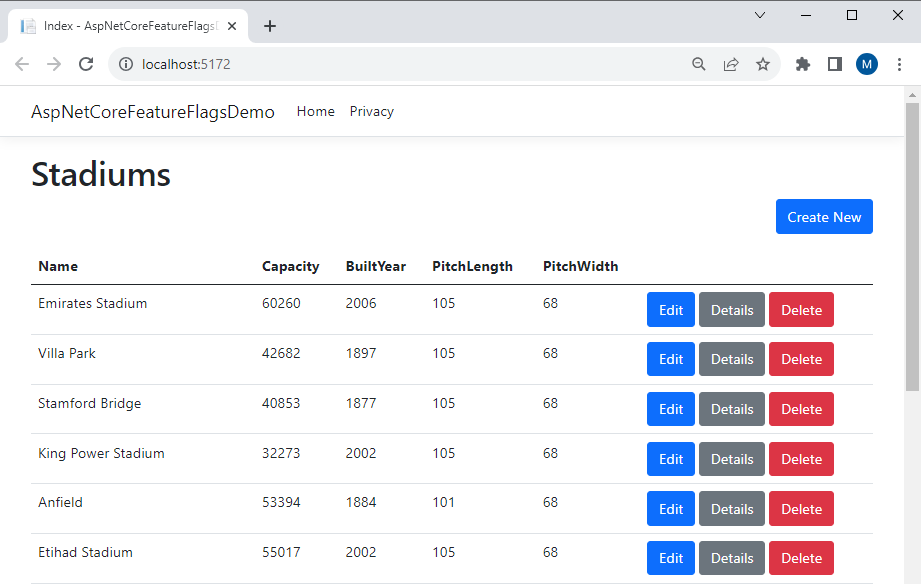
To demonstrate the feature management and how feature flags work, I have created an ASP.NET Core Web Application that allows users to perform the basic CRUD operations on the list of football stadiums. Users can create a new stadium, view or update existing stadium details, and can also delete a stadium.
To configure feature flags in ASP.NET Core you need to add the reference Microsoft.FeatureManagement.AspNetCore NuGet package. You can install this package using NuGet Package Manager available in Visual Studio or you can run the following command in Package Manager Console window.
Install-Package Microsoft.FeatureManagement.AspNetCore -Version 2.6.1
Once the package is installed in the ASP.NET Core application, we need to configure it in our application Program.cs file by adding the following line.
Program.cs
builder.Services.AddFeatureManagement();
The above line of code will register the required feature management services in the ASP.NET Core application. By default, the feature management service will look for the FeatureManagement setting in the ASP.NET Core appsettings.json file but if you want to use your custom setting name such as MyFeatureFlags you can specify it as follows.
builder.Services.AddFeatureManagement(Configuration.GetSection("MyFeatureFlags"));
Let’s add the following feature management section in the appsettings.json file to manage our application features such as CreateStadium, EditStadium, and DeleteStadium. For demonstration purpose, I disabled the CreateStadium and DeleteStadium features.
appsettings.json
"FeatureManagement":{
   "CreateStadium":false,
   "EditStadium":true,
   "DeleteStadium":false
}
Using Feature Flags in Razor Pages and Views
The package Microsoft.FeatureManagement.AspNetCore provides support for custom TagHelpers that we can use to conditionally render the HTML content using feature flags. To start using these Tag Helpers first we need to add the reference of feature management tag helpers in the Views/_ViewImports.cshtml file as follows.
_ViewImports.cshtml
@addTagHelper *, Microsoft.FeatureManagement.AspNetCore
Now we can surround the contents with the feature tag helper that can be used to conditionally render HTML content based on a feature’s state.
Let’s wrap the Create New button inside the feature tag and provide the name of the feature as CreateStadium. This means that the Create New button will only be visible if the CreateStadium feature is enabled.
<feature name="CreateStadium">
    <a class="btn btn-primary" asp-page="Create">Create New</a>
</feature>
Similarly, wrap the Edit and Delete buttons within feature tags and link them with feature names EditStadium and DeleteStadium.
<feature name="EditStadium">
   <a class="btn btn-primary" asp-page="./Edit" asp-route-id="@item.Id">Edit</a>
</feature>
<feature name="DeleteStadium">
   <a class="btn btn-danger" asp-page="./Delete" asp-route-id="@item.Id">Delete</a>
</feature>
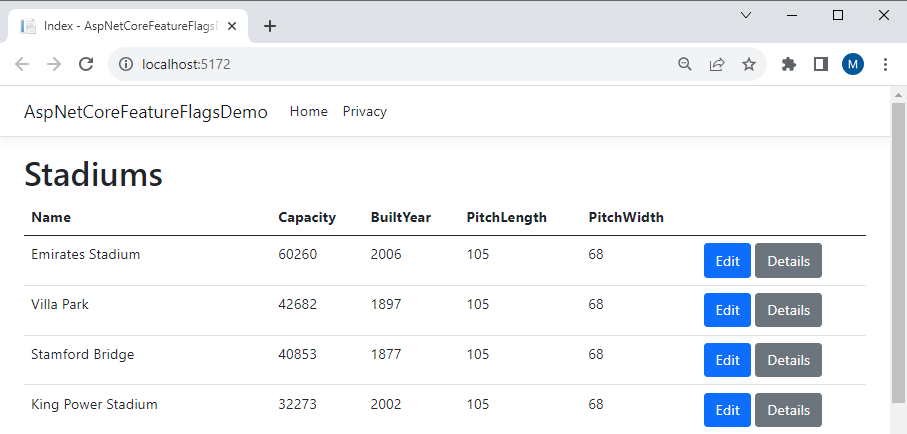
Let’s run our application now and you will see both the Create New and Delete buttons disappear because we disabled these features in the aspsettings.json file.
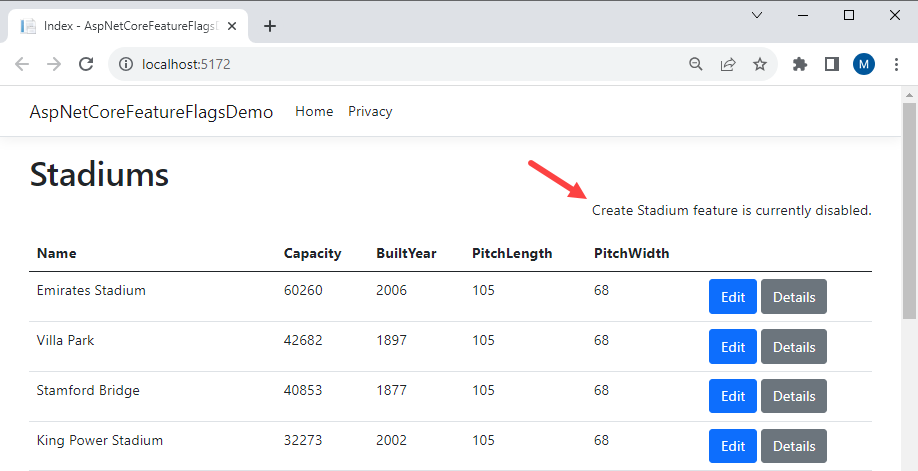
Sometimes, we want to display alternate content when a feature or set of features is disabled. We can do this by adding another feature tag helper with the negate=”true” attribute as follows.
<feature name="CreateStadium" negate="true">
   Create Stadium feature is currently disabled.
</feature>
If we run the application now, we will see the above message if the CreateStadium feature is disabled.
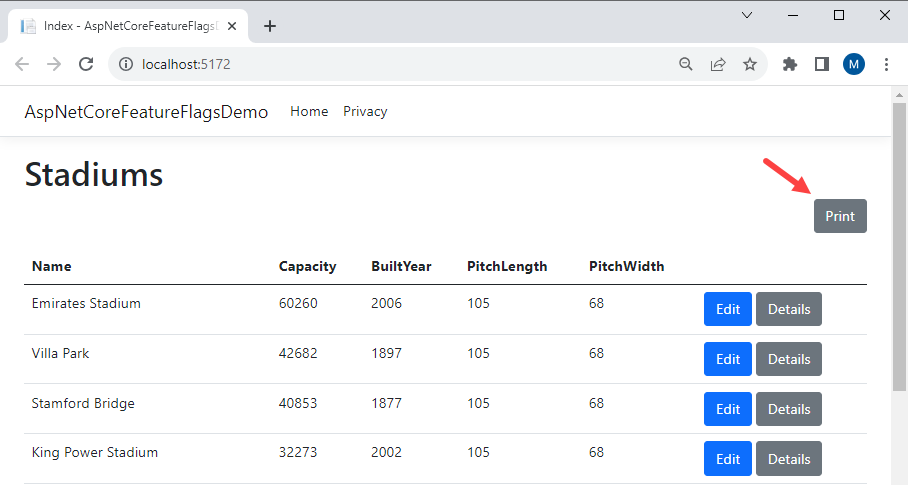
The feature tag helper also has a requirement attribute that allows us to control whether an ‘All’ or ‘Any’ feature in a list of features should be enabled to render the content within the feature tag. The following example demonstrates its usage where we want the Print feature to become available only if both CreateStadium and EditStadium features are enabled.
<feature name="CreateStadium, EditStadium" requirement="All">
   <a class="btn btn-secondary" asp-page="Print">Print</a>
</feature>
Using Feature Flags in Code
So far we have seen how to use the feature tag helpers and the attributes provided in the feature management package to control the rendering of HTML content based on the feature flags state. But what will we do if we have to enable/disable certain features or run certain code based on some feature’s state. The feature management library provides us the FeatureManager service which can be accessed using the IFeatureManager interface which can be injected in any service or controller using ASP.NET Core dependency injection.
For demonstration purpose, let’s first add a new feature StadiumList in the appsettings.json file as follows. We will use this feature to enable or disable whether the user can view the stadium’s list or not.
appsettings.json
"FeatureManagement":{
   "CreateStadium":false,
   "EditStadium":true,
   "DeleteStadium":false,
   "StadiumsList":false
}
To avoid spelling mistakes in feature names or to make it easier to access application features, we can also create a C# class in which we can define all features as string constants.
ApplicationFeatures.cs
public static class ApplicationFeatures
{
    public const string CreateStadium = "CreateStadium";
    public const string EditStadium = "EditStadium";
    public const string DeleteStadium = "DeleteStadium";
    public const string StadiumsList = "StadiumsList";
}
To access IFeatureManager in any controller or page, we can inject it in the constructor using the dependency injection.
private readonly IFeatureManager _featureManager;

public IndexModel(SportsDbContext context, IFeatureManager featureManager)
{
    _context = context;
    _featureManager = featureManager;
}
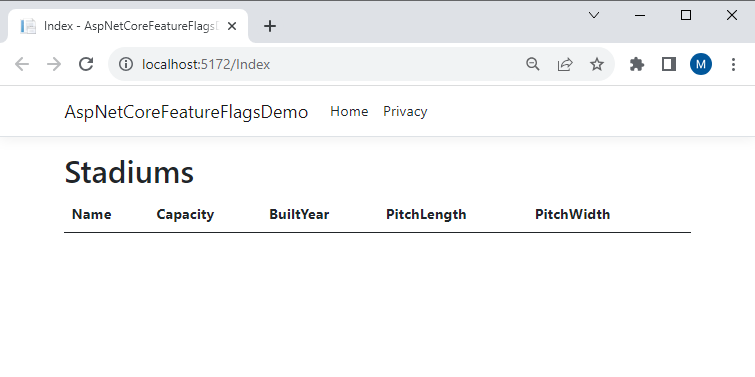
Once we have IFeatureManager available, we can use its IsEnabledAsync method to programmatically check if a certain feature is enabled or not. In the following example, we will only query and send the Stadiums list from the backend database if the StadiumList feature is enabled.
public async Task OnGetAsync()
{
    if (await _featureManager.IsEnabledAsync(ApplicationFeatures.StadiumsList))
    {
        if (_context.Stadiums != null)
        {
            Stadium = await _context.Stadiums.ToListAsync();
        }
    }
    else
    {
        Stadium = new List<Stadium>();
    }
}
If we run our application now, we won’t see the list of stadiums as the feature is disabled in the appsettings.json file.
Using Feature Flags with MVC Controllers and Actions
If we want to control the execution of a particular Action method or entire MVC Controller based on some feature, we can use the FeatureGate attribute. We can add this attribute to controller or action methods and if the feature is not enabled, it will show a 404 page.
The following examples show the usage of the FeatureGate attribute on an MVC controller or action.
[FeatureGate(ApplicationFeatures.StadiumsList)]
public class StadiumsController : Controller
{

}
[FeatureGate(ApplicationFeatures.StadiumsList)]
public IActionResult Index()
{
    return View();
}
FeatureGate attribute also allows us to configure multiple feature flags in the controller or action methods. The feature names must be comma-separated and we can also specify the condition for multiple features i.e. All (and) or Any (or) in the same way we provided above in the feature tag helper. The following examples show how to specify multiple feature flags in the FeatureGate attribute.
[FeatureGate(Microsoft.FeatureManagement.RequirementType.Any,
     ApplicationFeatures.StadiumsList,
     ApplicationFeatures.CreateStadium)]
public class StadiumsController : Controller
{

}
Adding Feature Specific Middleware
The feature management library can be used to add middleware that executes conditionally based on the feature state. If the feature is enabled/disabled during runtime, the middleware pipeline can be changed dynamically. Let’s add a new feature flag SomeThirdPartyFeature in the appsettings.json file.
"FeatureManagement":{
   "CreateStadium":false,
   "EditStadium":true,
   "DeleteStadium":false,
   "StadiumsList":true,
   "SomeThirdPartyFeature":true
}
Let’s say you have a custom middleware with the name SomeCustomMiddleware that you only want to add to the request pipeline if the SomeThirdPartyFeature feature is enabled. You can do this using the method UseMiddlewareForFeature.
app.UseMiddlewareForFeature<SomeCustomMiddleware>(ApplicationFeatures.SomeThirdPartyFeature);
If you need a capability to branch the entire application based on a feature.
app.UseForFeature(featureName, appBuilder =>
{
    appBuilder.UseMiddleware<T>();
});
Advance Feature Management using Feature Filters
Until now we just used the boolean (true or false) feature flags to determine whether the feature should be enabled or disabled. What if you want to enable/disable some features based on certain users, groups, percentage of requests, etc. You can achieve this by using some built-in feature filters that come with Microsoft.FeatureManagement package. Each of the built-in feature filters has its parameters. Let’s review some built-in feature filters.
Using Percentage Filter
The percentage filter provides the capability to enable a feature for the specified percentage of requests. i.e. a value of 50 will enable the feature for 50% of the requests and for the other 50% it will be disabled. This filter can be used when you are releasing a new feature but don’t want to enable it all at once i.e. you want to release a feature gradually. Initially, you keep the percentage small like 1-5% and after checking the results and response you can increase the percentage slowly. This percentage filter can also be used for randomized A/B testing.
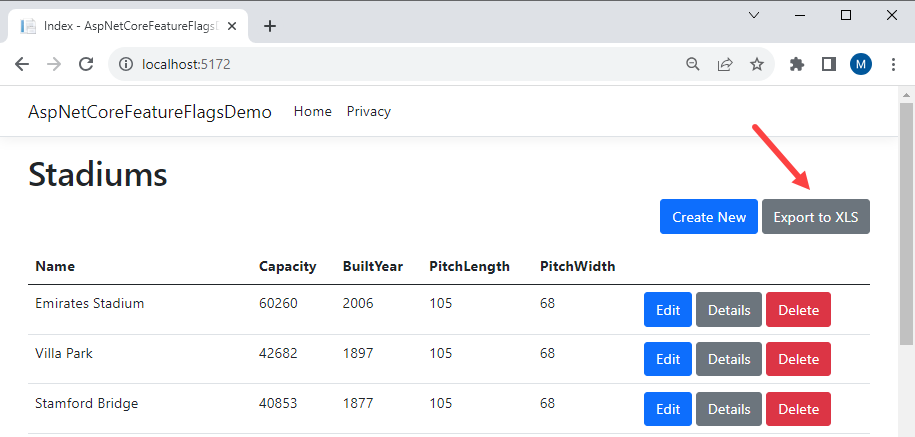
Let’s say we implemented a new feature to export the list of stadiums in Excel but we want to enable it for 10% users. We can configure a new feature flag ExportStadium in the appsettings.json file using the Percentage filter as follows.
"ExportStadium":{
   "EnabledFor":[
      {
         "Name":"Percentage",
         "Parameters":{
            "Value":10
         }
      }
   ]
}
We also need to register the PercentageFilter in the Program.cs file.
builder.Services.AddFeatureManagement()
    .AddFeatureFilter<PercentageFilter>();
Finally, we can use the feature tag helper to wrap the Export to XLS button as follows.
<feature name="ExportStadium">
   <a class="btn btn-secondary" asp-page="Export">Export to XLS</a>
</feature>
We can now run the application and once it is shown in the browser we can refresh the page multiple times and we will see that the Export to XLS button is not always available instead it’s visible for some requests and not visible for other requests.
Using Time Window Filter
This time window filter provides the capability to activate features based on time slots. If only End date is specified, the feature is assumed to be enabled up to that point. If you only specify the Start date, the feature is assumed to be always enabled from that point onward. This time window feature filter is useful for time-bound features i.e. features that should get enabled at a specific date time and be disabled at a specific date-time like weekends, black Friday or Christmas sales, etc.
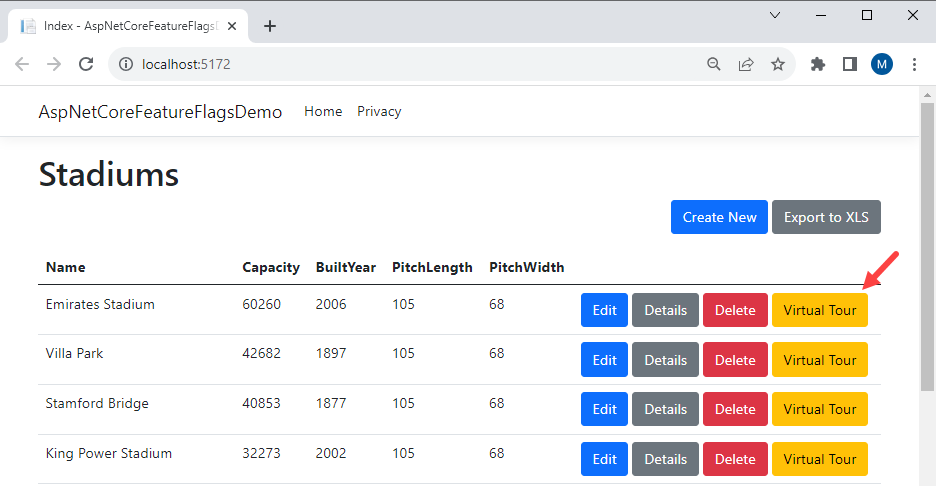
Let’s say we implemented a new feature that allows users to take a virtual tour of a football stadium but we want to enable this feature only during the Christmas holidays. We can configure a new feature flag StadiumVirtualTour in the appsettings.json file using the TimWindow filter as follows.
"StadiumVirtualTour":{
   "EnabledFor":[
      {
         "Name":"TimeWindow",
         "Parameters":{
            "Start":"26 Dec 2023 02:00:00 +00:00",
            "End":"29 Dec 2023 01:00:00 +00:00"
         }
      }
   ]
}
We can register the TimeWindowFilter in the Program.cs file in the same way we register PercentageFilter.
builder.Services.AddFeatureManagement()
    .AddFeatureFilter<PercentageFilter>()
    .AddFeatureFilter<TimeWindowFilter>();
Finally, we can use the feature tag helper to wrap the Virtual Tour button as follows.
<feature name="StadiumVirtualTour">
   <a class="btn btn-warning" asp-page="./VirtualTour" asp-route-id="@item.Id">
   Virtual Tour
   </a>
</feature>
Now if you run the application you will only see the Virtual Tour button during Christmas.
Using Targeting Filter
This filter provides the capability to enable a feature for a target audience. The filter parameters include an audience object that describes users, groups, excluded users/groups, and a default percentage of the user base that should have access to the feature.
Following the Targeting filter will enable the AdminFeature only for one user [email protected]
"AdminFeature":{
   "EnabledFor":[
      {
         "Name":"Targeting",
         "Parameters":{
            "Audience":{
               "Users":[
                  "[email protected]"
               ]
            }
         }
      }
   ]
}
The following example will configure BetaFeature in a way that 80% of users of Group1 and 40% of users of Group2 will be able to use this feature.
"BetaFeature":{
   "EnabledFor":[
      {
         "Name":"Targeting",
         "Parameters":{
            "Audience":{
               "Users":[

               ],
               "Groups":[
                  {
                     "Name":"Group1",
                     "RolloutPercentage":80
                  },
                  {
                     "Name":"Group2",
                     "RolloutPercentage":40
                  }
               ],
               "DefaultRolloutPercentage":20
            }
         }
      }
   ]
}
There are some other built-in feature filters as well that you can explore and use as per your requirements. You can read more about those filters here.
Conclusion
In a nutshell, feature flags provide a flexible and powerful set of tools to manage software releases, improve the development process, reduce risk, and improve user experience. However, they require careful planning, proper implementation, and ongoing maintenance to fully realize these benefits. I hope you have found this tutorial useful. The complete source code of our demo application is available on GitHub. If you have any comments or suggestions, please leave your comments below. Don’t forget to share this tutorial with your friends or community.

