Blazor apps are the collection of multiple Blazor components interacting with each other and we are also allowed to use child components inside other parent components. In real-world apps, it is a very common scenario to pass data or event information from one component to another component. Maybe you have a page in which user actions occurred in one component need to update some UI in other components. This type of communication is normally handled using an EventCallback delegate. In this tutorial, we will cover how to use EventCallback to communicate between a parent and a child component.
Following are the common steps involved to communicate from child component to parent component using EventCallback.
- Declare an EventCallback or EventCallback<T> delegate in child component
- Attach a callback method to child component’s EventCallback or EventCallback<T> in parent component
- Whenever a child component wants to communicate with the parent component, it invokes the parent component’s callback methods using one of the following methods
- InvokeAsync(Object) – if we are using EventCallback
- InvokeAsync(T) – if we are using EventCallback<T>
To understand the above steps, let’s create a simple To Do List example. First, create the following ToDo.cs class in the Data folder. It is a simple class that will store the Title and Minutes properties for each To Do Item. The Minutes property specifies how long a particular ToDo item will take to complete.
ToDo.cs
public class ToDo
{
    public string Title { get; set; }
    public int Minutes { get; set; }
}
Add the following ToDoList.razor component in the project and write the following code in it.
ToDoList.razor
@page "/todos"
@using BlazorEventHandlingDemo.Data

<div class="row">
    <div class="col"><h3>To Do List</h3></div>
    <div class="col"><h5 class="float-right">Total Minutes: @TotalMinutes</h5></div>
</div>

<br />
<table class="table">
    <tr>
        <th>Title</th>
        <th>Minutes</th>
        <th></th>
    </tr>
    @foreach (var todo in ToDos)
    {
        <ToDoItem Item="todo" />
    }
</table>

@code {

    public List<ToDo> ToDos { get; set; }
    public int TotalMinutes { get; set; }

    protected override void OnInitialized()
    {
        ToDos = new List<ToDo>()
        {
                new ToDo() { Title = "Analysis", Minutes = 40 },
                new ToDo() { Title = "Design", Minutes = 30 },
                new ToDo() { Title = "Implementation", Minutes = 75 },
                new ToDo() { Title = "Testing", Minutes = 40 }
        };

        UpdateTotalMinutes();
    }

    public void UpdateTotalMinutes()
    {
        TotalMinutes = ToDos.Sum(x => x.Minutes);
    }
}
In the above @code block, we declared two properties ToDos and TotalMinutes. The ToDos property will store the list of ToDo items and the TotalMinutes will store the sum of all ToDo Items minutes.
public List<ToDo> ToDos { get; set; }
public int TotalMinutes { get; set; }
Next, we are initializing our ToDos list with some ToDo item objects in one of the Blazor component life cycle methods called OnInitialized. We are also calling the UpdateTotalMinutes method that simply calculates the Sum of Minutes property of all ToDo objects in the ToDos list.
protected override void OnInitialized()
{
    ToDos = new List<ToDo>()
    {
            new ToDo() { Title = "Analysis", Minutes = 40 },
            new ToDo() { Title = "Design", Minutes = 30 },
            new ToDo() { Title = "Implementation", Minutes = 75 },
            new ToDo() { Title = "Testing", Minutes = 40 }
    };

    UpdateTotalMinutes();
}
The HTML code is also very straightforward. We are displaying the TotalMinutes property on top of the page with the page heading.
<h5 class="float-right">Total Minutes: @TotalMinutes</h5>
We are also generating an HTML table on the page and the following foreach loop iterates over the ToDos list and renders a child component called ToDoItem. We are also passing each ToDo object inside the child component using the Item property.
@foreach (var todo in ToDos)
{
    <ToDoItem Item="todo" />
}
Let’s create a child component ToDoItem.razor in the Shared folder and add the following code to it. The child component has an Item property which we are setting in the parent component inside foreach loop. The child component simply generates a table row using <tr> element and displays the Title and Minutes properties in table cells.
ToDoItem.razor
@using BlazorEventHandlingDemo.Data
<tr>
    <td>@Item.Title</td>
    <td>@Item.Minutes</td>
    <td>
       <button type="button" class="btn btn-success btn-sm float-right">
            + Add Minutes
        </button>
    </td>
</tr>

@code {
    [Parameter]
    public ToDo Item { get; set; }
}
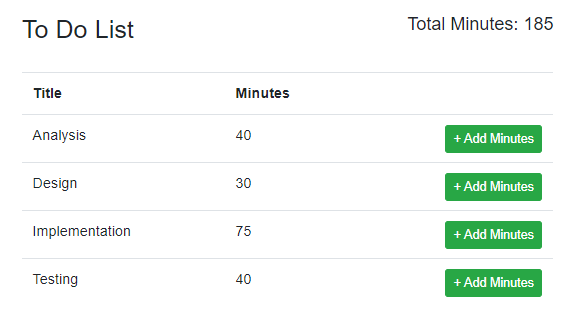
Run the app and you will see a page similar to the following.

If you will click Add Minutes button in the child component nothing will happen because we haven’t attached the click event with the Add Minutes button yet. Let’s update the Add Minutes button code and add the @onclick attribute that will call the AddMinute method.
<button type="button" class="btn btn-success btn-sm float-right" @onclick="AddMinute">
    + Add Minutes
</button>
The AddMinute event handler method will simply add 1 minute in the Minutes property every time user will click the Add Minutes button.
public async Task AddMinute(MouseEventArgs e)
{
    Item.Minutes += 1;
}
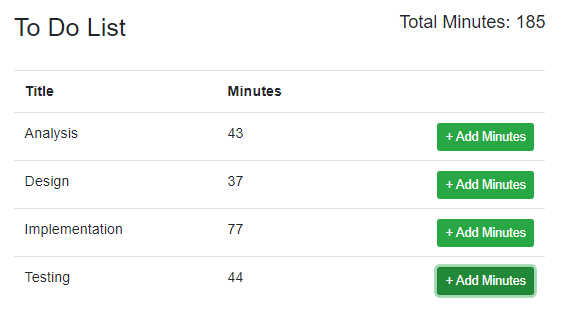
Run the app again and try to click Add Minutes buttons for each To Do item. You will notice that the minutes displayed with every To Do Item will start to increment but the Total Minutes property on the top will stay the same. This is because the TotalMinutes property is calculated in the parent component and the parent component has no idea that the Minutes are incrementing in the child components.

Let’s facilitate the child to parent communication in our example using the steps I mentioned above so that every time we add Minutes in the child component, we will be able to update the parent UI accordingly.
Step 1: Declare an EventCallback or EventCallback<T> delegate in child component
The first step is to declare the EventCallback<T> delegate in our child component. We are declaring a delegate OnMinutesAdded and using MouseEventArgs as T because this can provide us extra information about the button click event.
[Parameter]
public EventCallback<MouseEventArgs> OnMinutesAdded { get; set; }
Step 2: Attach a callback method to child component’s EventCallback or EventCallback<T> in parent component
In this step, we need to attach a callback method with the child component’s OnMinutesAdded EventCallback delegate we declared in Step 1 above.
<ToDoItem Item="todo" OnMinutesAdded="OnMinutesAddedHandler" />
The callback method we are using in this example is OnMinutesAddedHandler and this method simply calls the same UpdateTotalMinutes method that updates the TotalMinutes property.
public void OnMinutesAddedHandler(MouseEventArgs e)
{
    UpdateTotalMinutes();
}
Step 3: Whenever a child component wants to communicate with the parent component, it invokes the parent component’s callback method using InvokeAsync(Object) or InvokeAsync(T) methods.
In this step, we need to invoke the parent component callback method and the best place to do this is the AddMinute method because we want to update the parent component UI every time user clicks the Add Minute button.
public async Task AddMinute(MouseEventArgs e)
{
    Item.Minutes += 1;
    await OnMinutesAdded.InvokeAsync(e);
}
That’s all we need to facilitate communication from child component to parent component in Blazor. Following is the complete code of ToDoItem.razor child component.
ToDoItem.razor
@using BlazorEventHandlingDemo.Data
<tr>
    <td>@Item.Title</td>
    <td>@Item.Minutes</td>
    <td>
        <button type="button" class="btn btn-success btn-sm float-right" @onclick="AddMinute">
            + Add Minutes
        </button>
    </td>
</tr>

@code {

	[Parameter]
	public ToDo Item { get; set; }

	[Parameter]
	public EventCallback<MouseEventArgs> OnMinutesAdded { get; set; }

	public async Task AddMinute(MouseEventArgs e)
	{
		Item.Minutes += 1;
		await OnMinutesAdded.InvokeAsync(e);
	}
}
Following is the complete code of ToDoList.razor parent component
ToDoList.razor
@page "/todos"
@using BlazorEventHandlingDemo.Data

<div class="row">
    <div class="col"><h3>To Do List</h3></div>
    <div class="col"><h5 class="float-right">Total Minutes: @TotalCount</h5></div>
</div>

<br />
<table class="table">
    <tr>
        <th>Title</th>
        <th>Minutes</th>
        <th></th>
    </tr>
    @foreach (var todo in ToDos)
    {
        <ToDoItem Item="todo" OnMinutesAdded="OnMinutesAddedHandler" />
    }
</table>

@code {

    public List<ToDo> ToDos { get; set; }
    public int TotalCount { get; set; }

    protected override void OnInitialized()
    {
        ToDos = new List<ToDo>()
        {
                new ToDo() { Title = "Analysis", Minutes = 40 },
                new ToDo() { Title = "Design", Minutes = 30 },
                new ToDo() { Title = "Implementation", Minutes = 75 },
                new ToDo() { Title = "Testing", Minutes = 40 }
        };

        UpdateTotalMinutes();
    }

    public void UpdateTotalMinutes()
    {
        TotalCount = ToDos.Sum(x => x.Minutes);
    }

    public void OnMinutesAddedHandler(MouseEventArgs e)
    {
        UpdateTotalMinutes();
    }
}
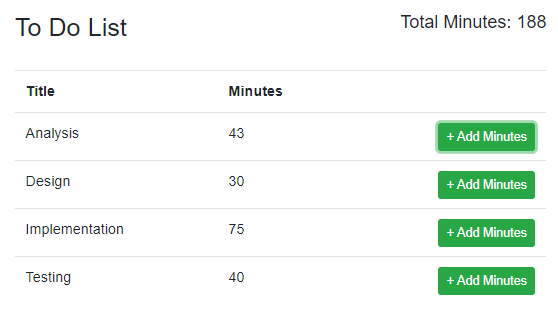
Run the application in the browser and try to add minutes in any ToDo item and you will notice that the parent component is automatically updating the Total Minutes in real-time.


Thank you very much for the clear explanation.
excellent breakdown of the concepts here. My only question is why not just simplify into a single function:
public void OnMinutesAddedHandler(MouseEventArgs e)
{
TotalCount = ToDos.Sum(x => x.Minutes);
}
The benefit of using UpdateTotalMinutes method is that it can be reused from multiple places.
See how I reused it in OnInitialized method as well.