
This tutorial is part of a serious of tutorials
- Part 1 – Setting up Ionic Development Environment and Creating Ionic Project using Ionic CLI
- Part 2 – Ionic App Themes and Styles and Customizing Ionic Themes and Colors
- Part 3 – Understanding Ionic Pages and Creating Ionic Pages using Ionic CLI
- Part 4 – Creating Food Recipes Page in Ionic
- Part 5 – Creating Food Recipe Detail Page in Ionic
This tutorial series will teach you how to build such hybrid mobile app using one of the most beautiful, free and open source front end mobile apps library called Ionic and a very popular web and mobile apps development framework made by Google called Angular.
In Part 4 of this tutorial series, we have created food recipes list page. That page was static in nature in the sense that user can view the food recipes but user can’t click any recipe to view its details. We will continue where we left in the last tutorial and will add list item click event in this tutorial.
Table of Contents
Handling Ionic List Item Click Event
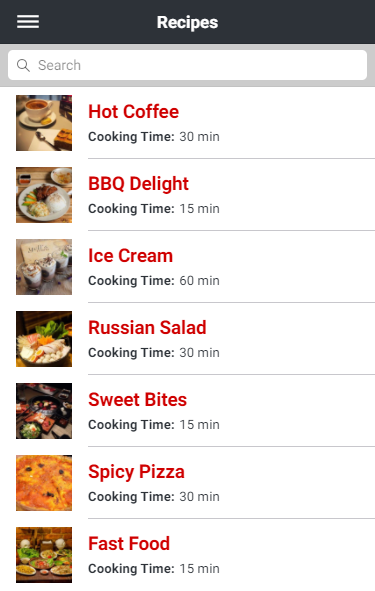
Our recipes page looks cool but it would be great if we can allow user to click a recipe from the list and go to recipe details page to view more full details about the recipe. Let’s implement this feature by adding a click event on the list item and navigating the user to RecipeDetailsPage which we will create shortly. Add a click event on ion-item component which will call onSelect function and pass the current recipe object as a parameter in the function.
<ion-item *ngFor="let recipe of recipes" (click)="onSelect(recipe)">
Next import the RecipeDetailPage page and implement the onSelect method in RecipesPage class in recipes.ts file. The push function will navigate user to the page specified as a first argument e.g. RecipeDetailPage. We can also pass data from current page to RecipeDetailPage as a second argument of the push function. In this case we are passing recipe object we received as a parameter of the onSelect function.
import { Component } from '@angular/core';
import { NavController, NavParams } from 'ionic-angular';
import { Recipe } from '../../models/recipe';
import { RecipesService } from '../../providers/recipes.service';
import { RecipeDetailPage } from '../recipe-detail/recipe-detail';

@Component({
  selector: 'page-recipes',
  templateUrl: 'recipes.html'
})
export class RecipesPage {

  recipes: Recipe[];

  constructor(public navCtrl: NavController, public navParams: NavParams,
    private recipesService: RecipesService) {

  }
  initializeRecipes(): void {
    this.recipes = this.recipesService.getRecipes();
  }

  ionViewDidLoad() {
    this.initializeRecipes();
  }

  onSelect(recipe: Recipe): void {
    this.navCtrl.push(RecipeDetailPage, {recipe: recipe});
  }

}
Creating Recipe Detail Page
Recipe detail page will display full detail of the selected recipe. Let create the page using the following Ionic CLI generate command. This command will automatically generate recipe-detail.ts, recipe-detail.scss and recipe-detail.html files in pages/recipe-detail folder.
ionic generate page recipe-detail
Recipe Detail Page (recipe-detail.ts)
RecipeDetailPage class is very simple class. It has a local variable recipe which is initialized in the constructor of the class from the recipe parameter we have passed from RecipesPage. Once the recipe variable is initialized, it will be available in recipe-detail.html file and we can use this variable to display recipe details on the page.
import { Component } from '@angular/core';
import { NavController, NavParams } from 'ionic-angular';
import { Recipe } from '../../models/recipe';

@Component({
  selector: 'page-recipe-detail',
  templateUrl: 'recipe-detail.html'
})
export class RecipeDetailPage {

  recipe: Recipe;

  constructor(public navCtrl: NavController, public navParams: NavParams)
  {
      this.recipe = this.navParams.get("recipe");
  }
}
Recipe Detail Page (recipe-detail.html)
The HTML code of the page is using many Ionic components to display recipe details in user friendly manner. First of all it display recipe name in the title bar of the Ionic page. Then it displays the recipe large image on top of the page. It is also using Ionic grid layout to display recipe servings, no of ingredients and total cooking time in three column layout. Finally, it iterates over the ingredients of the recipe and displays all ingredients in the Ionic list.
<ion-header>
    <ion-navbar>
        <button ion-button menuToggle>
      <ion-icon name="menu"></ion-icon>
    </button>
        <ion-title>{{ recipe.recipeName}}</ion-title>
    </ion-navbar>
</ion-header>
<ion-content>
    <img src="{{recipe.largeImageUrl}}" />
    <div class="recipe-details">
        <ion-grid>
            <ion-row>
                <ion-col>
                    <div class="recipe-ingredients-count">
                        <div>{{recipe.ingredients.length}}</div>
                        Ingredients
                    </div>
                </ion-col>
                <ion-col>
                     <div class="recipe-servings">
                        <div>{{recipe.numberOfServings}}</div>
                         Servings
                    </div>
                </ion-col>
                <ion-col>
                     <div class="recipe-time">
                        <div>{{recipe.totalTimeInSeconds / 60}}</div>
                         Minutes
                    </div>
                </ion-col>
            </ion-row>
        </ion-grid>
    </div>
    <ion-list>
        <ion-list-header class="ingredients-header">
            Ingredients
        </ion-list-header>
        <button ion-item *ngFor="let ingredient of recipe.ingredients">
            <ion-icon name="cafe" item-start></ion-icon>
            {{ingredient}}
        </button>
    </ion-list>
</ion-content>
Recipe Detail Page (recipe-detail.scss)
To make our recipe detail page more professional looking, add the following styles in recipe-detail.scss file.
page-recipe-detail{
    .content{
        background-color: color($colors, light, base);
    }
    .recipe-details{
       background-color: #fff;
    }
    .recipe-ingredients-count, .recipe-time, .recipe-servings{
        text-align: center;
    }
    .recipe-ingredients-count div, .recipe-time div, .recipe-servings div{
        font-size: 2.5rem;
        text-align: center;
        font-weight: bold;
    }
    .ingredients-header {
        position: relative;
        font-size: 1.7rem;
        letter-spacing: .1rem;
        font-weight: bold;
        color: color($colors, dark, base);
        border-top: none;
        background-color: color($colors, light, base);
        margin-bottom: 5px;
    }
}
app.module.ts
Do not forget to import and declare RecipeDetailPage component in app.module.ts file.
import { RecipeDetailPage } from '../pages/recipe-detail/recipe-detail';
…
declarations: [
    MyApp,
    HomePage,
    RecipesPage,
    AboutPage,
    FavoritesPage,
    SettingsPage,
    RecipeDetailPage
]

entryComponents: [
    MyApp,
    HomePage,
    RecipesPage,
    AboutPage,
    FavoritesPage,
    SettingsPage,
    RecipeDetailPage
]
Save all files and test the app in the browser. Navigate to the Recipes page and click any recipe from the list. You will see output similar to the following on the recipe detail page.

Implement Recipes Search Feature
Before I finish the tutorial, it would be nice if we can provide a search feature to the user so that they can quickly search the recipe they are looking for. Open the recipes.ts file and declare a variable named searchTerm in RecipesPage class. Next we need to implement searchRecipes function in the class. This function will reinitialize the recipes array by filtering the recipes matching with the searchTerm. The filtered recipes will automatically be displayed in recipes.html file as we are already iterating our the recipes array in the HTML code.
recipes.ts
import { Component } from '@angular/core';
import { NavController, NavParams } from 'ionic-angular';
import { Recipe } from '../../models/recipe';
import { RecipesService } from '../../providers/recipes.service';
import { RecipeDetailPage } from '../recipe-detail/recipe-detail';
@Component({
selector: 'page-recipes',
templateUrl: 'recipes.html'
})
export class RecipesPage {

  recipes: Recipe[];
  searchTerm: string = '';

  constructor(public navCtrl: NavController, public navParams: NavParams,
    private recipesService: RecipesService) {

  }

  initializeRecipes(): void {
    this.recipes = this.recipesService.getRecipes();
  }

  ionViewDidLoad() {
    this.initializeRecipes();
  }

  onSelect(recipe: Recipe): void {
    this.navCtrl.push(RecipeDetailPage, {recipe: recipe});
  }

  searchRecipes(){
      // Reset recipes array back to all of the items
      this.initializeRecipes();

      // if the search term is an empty string return all items
      if (!this.searchTerm) {
        return this.recipes;
      }

      // Filter recipes
      this.recipes = this.recipes.filter((item) => {
          return item.recipeName.toLowerCase().indexOf(this.searchTerm.toLowerCase()) > -1;
      });
    }
}
recipes.html
We will add Ionic search bar component in recipes.html file so that we can collect search term entered by the user. Notice how we have used Angular ngModel to bind the searchTerm variable with the search bar and how we are calling our searchRecipes function using ionInput event.
<ion-header>
  <ion-navbar>
    <button ion-button menuToggle>
      <ion-icon name="menu"></ion-icon>
    </button>
    <ion-title>Recipes</ion-title>
  </ion-navbar>
</ion-header>

<ion-content>

  <ion-list>

     <ion-searchbar [(ngModel)]="searchTerm" (ionInput)="searchRecipes()"></ion-searchbar>

    <ion-item *ngFor="let recipe of recipes" (click)="onSelect(recipe)">
      <ion-thumbnail item-left>
        <img src="{{recipe.thumbnailImageUrl}}" alt="{{recipe.recipeName}}" title="{{recipe.recipeName}}" />
      </ion-thumbnail>
      <h2 class="recipe-name">{{recipe.recipeName}}</h2>
      <span class="cooking-time">Cooking Time:</span>
      <span class="cooking-time-value">{{recipe.totalTimeInSeconds / 60}} min</span>
    </ion-item>

  </ion-list>

</ion-content>
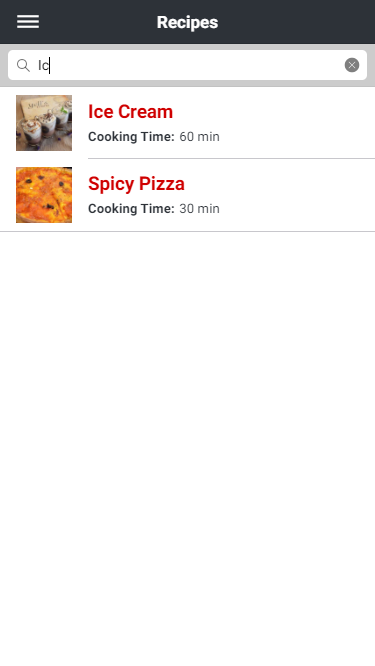
Save the files and preview the app in the browser. You will see the following output in the browser.
Enter some text or recipe name in the search field and you will notice that the recipes list is quickly displayed the recipes matched with your search term.
This is the final part of the Building a Food Recipes Mobile App with Ionic 3x and Angular 5 tutorial. I hope you have learned a great deal about developing hybrid mobile applications using Ionic and Angular. I will be writing more tutorials on Ionic, Angular as well as other web development technologies in the future so keep visiting my website in future.


how to implement favorite ?