
This tutorial is part of a serious of tutorials
- Part 1 – Setting up Ionic Development Environment and Creating Ionic Project using Ionic CLI
- Part 2 – Ionic App Themes and Styles and Customizing Ionic Themes and Colors
- Part 3 – Understanding Ionic Pages and Creating Ionic Pages using Ionic CLI
- Part 4 – Creating Food Recipes Page in Ionic
- Part 5 – Creating Food Recipe Detail Page in Ionic
This tutorial series will teach you how to build such hybrid mobile app using one of the most beautiful, free and open source front end mobile apps library called Ionic and a very popular web and mobile apps development framework made by Google called Angular.
Creating Food Recipes Page
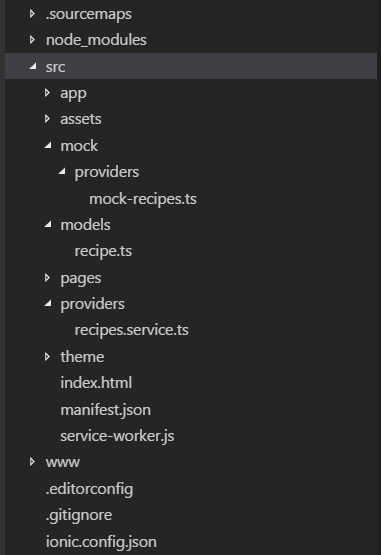
You may have noticed that our Recipes page is still showing the default list of items generated by the Angular CLI start command. It is now time to create a proper Recipes page that will show food recipes names, their cooking time and a photo. I will also show you how to create Recipe detail page later in this tutorial. Add a models folder in src directory to store all model classes of our project. Add a new file recipe.ts in models folder. This file will contain following TypeScript Recipe class that have few basic recipe properties in it.
Recipe class (recipe.ts)
export class Recipe{
    id: string;
    recipeName: string;
    thumbnailImageUrl: string;
    largeImageUrl: string;
    totalTimeInSeconds: number;
    rating: number;
    numberOfServings: number;
    ingredients: string[];
}
In real application, you can call a food recipe API such as Yummly to search and load real recipes. For this tutorial, I am adding a mock service to load and display test recipes from a constant RECIPES. Create a mocks folder in src directory. Inside the mocks folder add a providers folder.
Mocking recipes (mock-recipes.ts)
Add a new file mock-recipes.ts in providers folder and define the following RECIPES constant in it. The RECIPES constant will contain an array of sample recipes along with their basic properties and ingredients. For this tutorial, I have copied some sample recipe images in www/assets/imgs folder. Please keep in mind that the build process will copy all your files in www folder so that they can be loaded in the browser. This is why you need to copy images in www folder instead of src folder.
import { Recipe } from '../../models/recipe';

export const RECIPES: Recipe[] = [
{
    id: "hot-coffee",
    recipeName: 'Hot Coffee',
    thumbnailImageUrl: 'assets/imgs/r1_thumb.jpg',
    largeImageUrl: 'assets/imgs/r1.jpg',
    totalTimeInSeconds: 1800,
    rating: 4.44,
    numberOfServings: 6,
    ingredients: [
          "garlic cloves",
          "ground pepper",
          "diced tomatoes",
          "celery",
          "tomato juice",
          "salt",
          "cabbage",
          "bell peppers",
          "oregano",
          "carrots",
          "basil",
          "vegetable broth",
          "chili pepper flakes",
          "green beans",
          "onions",
          "onion soup mix"
      ]
  },
  {
    id: "bbq-delight",
    recipeName: 'BBQ Delight',
    thumbnailImageUrl: 'assets/imgs/r2_thumb.jpg',
    largeImageUrl: 'assets/imgs/r2.jpg',
    totalTimeInSeconds: 900,
    rating: 4,
    numberOfServings: 8,
    ingredients: [
          "lime juice",
          "pepper",
          "vegetable bouillon",
          "sesame oil",
          "salt",
          "carrots",
          "yellow onions",
          "red pepper",
          "garlic",
          "fish",
          "baby corn"
      ]
  },
  {
    id: "ice-cream",
    recipeName: 'Ice Cream',
    thumbnailImageUrl: 'assets/imgs/r3_thumb.jpg',
    largeImageUrl: 'assets/imgs/r3.jpg',
    totalTimeInSeconds: 3600,
    rating: 4.2,
    numberOfServings: 3,
    ingredients: [
          "chili powder",
          "chopped celery",
          "long grain rice",
          "kidney beans",
          "shredded cabbage",
          "red pepper",
          "carrot",
          "onion",
          "minced garlic"
      ]
  },
  {
    id: "russian-salad",
    recipeName: 'Russian Salad',
    thumbnailImageUrl: 'assets/imgs/r4_thumb.jpg',
    largeImageUrl: 'assets/imgs/r4.jpg',
    totalTimeInSeconds: 1800,
    rating: 5,
    numberOfServings: 7,
    ingredients: [
          "carrots",
          "cauliflower",
          "water",
          "onions",
          "garlic cloves",
          "pepper",
          "potatoes",
          "brussels sprouts",
          "salt"
      ]
  },
  {
    id: "sweet-bites",
    recipeName: 'Sweet Bites',
    thumbnailImageUrl: 'assets/imgs/r5_thumb.jpg',
    largeImageUrl: 'assets/imgs/r5.jpg',
    totalTimeInSeconds: 900,
    rating: 4.9,
    numberOfServings: 1,
    ingredients: [
          "salt",
          "onions",
          "broccoli",
          "celery",
          "carrots",
          "lentils",
          "green pepper",
          "tomato juice",
          "tomato puree"
      ]
  },
  {
    id: "spicy-pizza",
    recipeName: 'Spicy Pizza',
    thumbnailImageUrl: 'assets/imgs/r6_thumb.jpg',
    largeImageUrl: 'assets/imgs/r6.jpg',
    totalTimeInSeconds: 1800,
    rating: 4.5,
    numberOfServings: 5,
    ingredients: [
          "tomato paste",
          "water",
          "celery",
          "corn",
          "shredded cabbage",
          "green beans",
          "pepper"
      ]
  },
  {
    id: "fast-food",
    recipeName: 'Fast Food',
    thumbnailImageUrl: 'assets/imgs/r7_thumb.jpg',
    largeImageUrl: 'assets/imgs/r7.jpg',
    totalTimeInSeconds: 900,
    rating: 4.7,
    numberOfServings: 2,
    ingredients: [
          "bay leaves",
          "white onion",
          "tofu",
          "peppercorns",
          "diced tomatoes",
          "cabbage",
          "red wine"
    ]
  }
];
RecipesService (recipes.service.ts)
Next, we need to add a service that will fetch and provide mock recipes to our recipes page. Add a folder called providers in src directory and add a new file recipes.service.ts in providers folder. This service will import RECIPES constants from mock-recipes.ts file and will return the recipes data stored in the RECIPES constant from a function named getRecipes.
import { Injectable } from '@angular/core';
import { Recipe } from '../models/recipe';

import { RECIPES } from '../mock/providers/mock-recipes';

@Injectable()
export class RecipesService {

  getRecipes(): Recipe[] {
      return RECIPES;
  }

}
Your project should look similar to following after adding above folders and files.
app.module.ts
Import the newly created RecipesService in app.module.ts file and add the RecipesService in providers array so that it is available in our Recipes page
import { RecipesService } from '../providers/recipes.service';

providers: [
    StatusBar,
    SplashScreen,
    RecipesService,
    {provide: ErrorHandler, useClass: IonicErrorHandler}
]
Recipes page (recipes.ts)
Remove all Ionic CLI generated code from recipes.ts file and make sure it looks like the following code.
import { Component } from '@angular/core';
import { NavController, NavParams } from 'ionic-angular';

@Component({
  selector: 'page-recipes',
  templateUrl: 'recipes.html'
})
export class RecipesPage {

}
Import RecipesService on top of the file so that we can call getRecipes function on the page to load mock recipes. We also need to import Recipe class in order to create an array of Recipe objects.
import { Component } from '@angular/core';
import { NavController, NavParams } from 'ionic-angular';
import { Recipe } from '../../models/recipe';

import { RecipesService } from '../../providers/recipes.service';

@Component({
  selector: 'page-recipes',
  templateUrl: 'recipes.html'
})
export class RecipesPage {

  recipes: Recipe[];

  constructor(public navCtrl: NavController, public navParams: NavParams,
    private recipesService: RecipesService) {

  }

  initializeRecipes(): void {
    this.recipes = this.recipesService.getRecipes();
  }

  ionViewDidLoad() {
    this.initializeRecipes();
  }
}
In the above code, we injected the RecipesService in the constructor of the RecipesPage class. We used the instance of RecipesService in initializeRecipes function to call the getRecipes function and to initialize the local recipes array. We have called initializeRecipes function in ionViewDidLoad event function. This event is one of the many life cycle events exposed by NavController class. This event is fired when the Ionic page is loaded. This event is called only once per page so it is suitable to load the page setup data. You can find more about NavController events at following URL:
https://ionicframework.com/docs/api/navigation/NavController/
Recipes Page (recipes.html)
Once our recipes array is initialized by getRecipes function we need to iterate over the Recipes array and display all recipes in Ionic List component. Following html code is using Angular ngFor loop to iterate over the recipes array and displaying recipe name, cooking time and image on the page.
<ion-header>
  <ion-navbar>
    <button ion-button menuToggle>
      <ion-icon name="menu"></ion-icon>
    </button>
    <ion-title>Recipes</ion-title>
  </ion-navbar>
</ion-header>

<ion-content>
  <ion-list>
    <ion-item *ngFor="let recipe of recipes">

      <ion-thumbnail item-left>
        <img src="{{recipe.thumbnailImageUrl}}" alt="{{recipe.recipeName}}" title="{{recipe.recipeName}}" />
      </ion-thumbnail>

      <h2 class="recipe-name">{{recipe.recipeName}}</h2>
      <span class="cooking-time">Cooking Time:</span>

      <span class="cooking-time-value">{{recipe.totalTimeInSeconds / 60}} min</span>

    </ion-item>
  </ion-list>
</ion-content>
Recipes Page (recipes.scss)
Finally, we need to define some styles to make our Recipes page more attractive looking. Put the following code in recipes.scss file and preview the app in browser.
page-recipes {
    .recipe-name{
        color: color($colors, primary, base);
        font-weight: bold;
        font-size: 14pt;
    }
    .cooking-time{
        color: color($colors, dark, base);
        font-size: 10pt;
        font-weight: bold;
        display:inline;
    }
    .cooking-time-value{
        color: color($colors, dark, base);
        font-size: 10pt;
    }
}
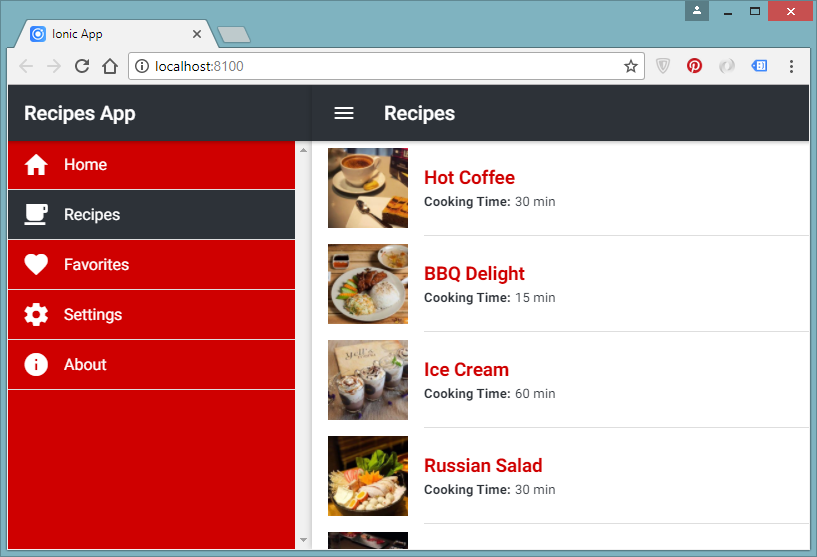
If you are following the tutorial and have no coding errors in your code, you will see the following Recipes page in the browser.
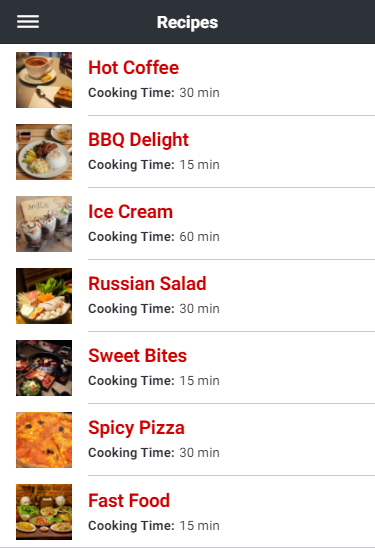
If you are curious to see how your app will look like in different devices and screen sizes, then you can use Toggle Device Toolbar option available in Chrome developer tools.
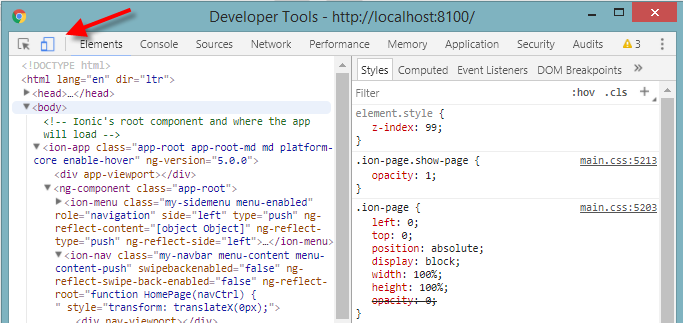
Clicking the above button will preview your app in device view. You can change the device to preview the app in multiple devices. You can also change orientation and zoom to check the responsiveness of your app.
In this tutorial, we have learned how to create recipes service which can provide recipes to the food recipes page. We have also learned how to create food recipes page and display recipes details along with recipes images. In part 5 of this tutorial series we will learn how to add click event to recipes list items and how to create recipe detail page.
This tutorial is part of a serious of tutorials
- Part 1 – Setting up Ionic Development Environment and Creating Ionic Project using Ionic CLI
- Part 2 – Ionic App Themes and Styles and Customizing Ionic Themes and Colors
- Part 3 – Understanding Ionic Pages and Creating Ionic Pages using Ionic CLI
- Part 4 – Creating Food Recipes Page in Ionic
- Part 5 – Creating Food Recipe Detail Page in Ionic


hello
i keep on getting this error on mock-recipe page Cannot find name ‘id’
what can i do
do you have a tutorial on using yummly api
hello
i keep on getting Cannot find name ‘id’ on the mock-recipe page.
also do you have a tutorial on using yummly api