
One of the most powerful features of AngularJS application is directive. A directive allows developers to extend the HTML and introduce new elements and attributes in the DOM. Directives allow developers to attach special behavior to the HTML elements. Developers can also use directives to transform the DOM. AngularJS provides many powerful directives out of the box such as ng-repeat, ng-show etc. but we often need to create custom directives specific to the application requirements. These custom directives can also be used across multiple applications if they are created as reusable components. This tutorial is a step by step guide of creating custom directives. I will implement multiple directives and demonstrate you the real world usage of these directives in AngularJS application.
The application I am going to build in this tutorial contains four directives. There is a header directive which will render the top header bar of the page. There is a toolbar directive which will display the page toolbar with some links. Then I will build a sidebar directive which will display list of brands fetched from the AngularJS service. Finally, I will implement a brand detail directive that will display the details of the selected brand in the sidebar. The final output of the application is shown below:

Let’s start the tutorial by creating an index.html file that will load JQuery, Bootstrap and AngularJS libraries along with our custom js and css files. The application will use the coding guidelines and best practices mentioned in John Papa’s AngularJS style guide.
Table of Contents
index.html
<!DOCTYPE html>
<html>
<head>
   <link rel="stylesheet" href="css/bootstrap.min.css" />
   <link rel="stylesheet" href="css/custom.css" />
</head>
<body>
   <script type="text/javascript" src="js/jquery.min.js"></script>
   <script type="text/javascript" src="js/bootstrap.min.js"></script>
   <script type="text/javascript" src="js/angular.min.js"></script>
   <script type="text/javascript" src="js/custom.js"></script>
</body>
</html>
app module
Create a file app.js that will define application level module
(function () {
   'use strict';
   angular.module('app', []);
})();
Save this file in the app folder and attach the app module with the body element using one of the most common build in AngularJS directive ng-app. The built in directive ng-app defines the container for the different parts of your app such as controllers, services, filters, directives, etc. Don’t forget to include the app.js file in index.html
<body ng-app="app">
   <script type="text/javascript" src="js/jquery.min.js"></script>
   <script type="text/javascript" src="js/bootstrap.min.js"></script>
   <script type="text/javascript" src="js/angular.min.js"></script>
   <script type="text/javascript" src="js/custom.js"></script>
   <script type="text/javascript" src="app/app.js"></script>
</body>
DemoController
We also need to create an application level controller so create a file demo.controller.js and save it in app/controllers folder. We will use this controller later on in this tutorial to demonstrate different aspects of the AngularJS application with respect to directives.
(function () {
   'use strict';
   angular.module('app')
      .controller('DemoController', DemoController);

   DemoController.$inject = ['$scope'];
   function DemoController($scope) {

   }
})();
Attach DemoController with a div element using another built-in AngularJS directive ng-controller and also include demo.controller.js file. The built in directive ng-app attaches a controller class to the view. This is a key aspect of how angular supports the principles behind the Model-View-Controller design pattern.
<body ng-app="app">
   <div class="container" ng-controller="DemoController as vm”>

   </div>
   <script type="text/javascript" src="js/jquery.min.js"></script>
   <script type="text/javascript" src="js/bootstrap.min.js"></script>
   <script type="text/javascript" src="js/angular.min.js"></script>
   <script type="text/javascript" src="js/custom.js"></script>
   <script type="text/javascript" src="app/app.js"></script>
   <script type="text/javascript" src="app/controllers/demo.controller.js"></script>
</body>
Before I start building my first directives I recommend that you create a folder named directives inside app folder. This folder can be used to store all application directives. I also recommend that you create a separate folder for each directive to place all directive related files such as controllers, templates etc. in one folder. This will help a lot when your application will grow in size of if multiple developers will start working on the same application in team environment.
myHeader directive
Create header.directive.js file inside app/directives/header folder and add following code to create myHeader directive. Much like controllers, directives are registered on modules. To register a directive, you use the module.directive function that takes the normalized directive name followed by a factory function. This factory function should return an object usually called directive description object with the different options to tell $compile service how the directive should behave when matched.
(function () {
   'use strict';

   angular.module('app')
       .directive('myHeader', myHeader);

   function myHeader() {
      var directive = {
          restrict: 'E',
          template: '<div class="header clearfix"><h3 class="text-muted">Header Directive</h3></div>
      };
      return directive;
   }
})();
The above directive can be invoked in the HTML as follows:
<body ng-app="app">
   <div class="container" ng-controller="DemoController as vm”>
      <my-header></my-header>
   </div>
   <script type="text/javascript" src="js/jquery.min.js"></script>
   <script type="text/javascript" src="js/bootstrap.min.js"></script>
   <script type="text/javascript" src="js/angular.min.js"></script>
   <script type="text/javascript" src="js/custom.js"></script>
   <script type="text/javascript" src="app/app.js"></script>
   <script type="text/javascript" src="app/controllers/demo.controller.js"></script>
   <script type="text/javascript" src="app/directives/header/header.directive.js"></script>
</body>
Notice that when we invoke it, the name of the directive is not the same as when we define it (myHeader vs. my-header). This is because Angular normalizes an element’s tag and attribute name to determine which elements match which directives. We typically refer to directives by their case-sensitive camelCase normalized name (e.g. ngModel). However, since HTML is case-insensitive, we refer to directives in the DOM by lower-case forms, typically using dash-delimited attributes on DOM elements (e.g. ng-model).
If you will run the html page in browser you will see the following output:

In our example’s directive description object, we’re setting two options: restrict and template.
restrict option
The restrict option is used to specify how a directive can be invoked on the page. The restrict option is typically set to:
- restrict: ‘A’ – only matches attribute name e.g. <div my-header></div>
- restrict: ‘E’ – only matches element name e.g. <my-header></my-header>
- restrict: ‘C’ – only matches class name e.g. <div class=”my-header”></div>
- restrict: ‘M’ – only matches comment e.g. <!– directive: my-header –>
The restrict option can specify multiple options, as well. If you want to support more than one ways to invoke the directive in HTML, you can specify multiple options as shown below:
//matches either attribute or element

restrict: 'AE'
template option
The template option allows you to add an inline HTML template that will be appended or replaced. This is useful when your template is small or if you are creating reusable directive and you don’t want to pass multiple files. In the example above we in-lined the value of the template option, but this will become annoying as the size of your template grows. It’s typically better to break it apart into its own HTML file and load it with the templateUrl option.
templateUrl option
If you have a fairly large HTML template to use in your custom directive or if you prefer to load a template over ajax, you can specify the templateUrl option, which will use ajax to pull the template. Although we haven’t used this option in the above myHeader directive but it can be used as follows:
templateUrl: 'app/header/my-header.html'
If you use browser developer tools to inspect the HTML generated by the above <my-header> directive you will notice that the template is appended within the opening and closing <my-header> elements.
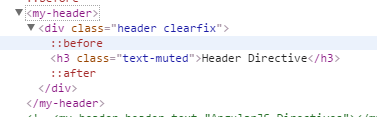
Sometimes it is better to replace the entire DOM object, rather than append the new template to it. AngularJS makes this easy to accomplish by simply adding replace option in the directive description object. Set the replace option to true, like so:
(function () {
   'use strict';
   angular.module('app')
      .directive('myHeader', myHeader); function myHeader() {

      var directive = {
         restrict: 'E',
         replace: true,
         template: '<div class="header clearfix"><h3 class="text-muted">Header Directive</h3></div>'
      };
      return directive;
   }
})();
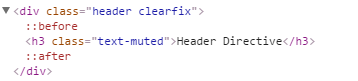
Using replace option will generate the following HTML in browser. Notice <my-header> element is totally replaced with the template HTML.
scope option
The default behavior of AngularJS directives is to share the scope that they are included in. This means they can much with the controller scope and cause unexpected behavior by changing the values of local scope variables. This behavior can be changed via the scope option in the directive definition object. The default value of scope option is false but you can set it to true that will create a new scope for the directive that acts like other child scopes and prototypically inherits from its parent scope. This means that although new scope is created but it will still participate in the normal controller-scope hierarchical relationship.
Isolated Scope
If you want to create reusable components and want to prevent a component to change your page state except for the models and data that you explicitly pass in you can create isolation scope. Isolation scope does not prototypically inherit from its parent scope and creates an entire new scope. This ensures that your directive does not mess with the existing scope. To create an isolate scope, simply pass an object back in the scope option:
scope: { }
Once you have created isolated scope, the directive has no access to any data outside its own scope and if you want to pass data from outer scope to directive’s inner scope you can add properties to local scope option for each isolated scope binding. AngularJS provides three different ways to create local variables within the scope object.
Text Binding (@ or @attr)
To pass simple data as text to the directive inner scope you can use the @ symbol with the property name. This is also referred as one-way binding which means that the changes from the controller scope will be reflected in the directive scope but if you modify the value in the directive scope, the controller scope variable will not get affected.
scope: {
   simpleText = ‘@simpleText’
}
These @attr attributes in the scope option of directives are normalized just like directive names. To bind to the attribute in<myHeader simple-text=”This is header”>, you’d specify a binding of @simpleText. For cases where the attribute name is the same as the value you want to bind to inside the directive’s scope, you can use this shorthand syntax:
scope: {
   simpleText = ‘@’
}
Two way binding (= or =attr)
In cases where you need to create a two-way binding between the outer scope and the directive’s isolate scope you can use the = symbol. If the parent model changes, just like in normal data-binding then the local property within directive will reflect the change.
scope: {
   customer= ‘=customer’
}
or
scope: {
   customer= ‘=’
}
Method binding (& or &attr)
Local scope property with & symbol allows the consumer of a directive to pass in a function that the directive can invoke. The method is pre-bound to the directive’s parent scope, and supports arguments. For example if the method is hello(name) in parent scope, then in order to execute the method from inside your directive, you must call $scope.hello({name:’world’})
scope: {
   onSend= ‘&onSend
}
or
scope: {
   onSend = ‘&’
}
Let’s add a local property headerText in our myHeader directive to pass the header text as string. This will allow us to use the same header on multiple pages and pass different header text as attribute of the custom directive.
(function () {
   'use strict';

   angular.module('app')
      .directive('myHeader', myHeader); function myHeader() {

   var directive = {
         restrict: 'E',
         replace: true,
         scope:{
            headerText: "@"
         },
         template: '<div class="header clearfix"><h3 class="text-muted">{{ headerText }}</h3></div>'
      };
     return directive;
  }
})();
Notice how the headerText property is used inside the directive template HTML to render the value of headerText property. The following HTML shows how we can use the new property as directive attribute:
<body ng-app="app">
    <div class="container" ng-controller="DemoController as vm”>
       <my-header header-text="AngularJS Directives"></my-header>
   </div>
   <script type="text/javascript" src="js/jquery.min.js"></script>
   <script type="text/javascript" src="js/bootstrap.min.js"></script>
   <script type="text/javascript" src="js/angular.min.js"></script>
   <script type="text/javascript" src="js/custom.js"></script>
   <script type="text/javascript" src="app/app.js"></script>
   <script type="text/javascript" src="app/controllers/demo.controller.js"></script>
   <script type="text/javascript" src="app/directives/header/header.directive.js"></script>
</body>
The following output will be generated in browser by running the above custom directive with header-text attribute value passed.

To demonstrate two-way binding let’s create another custom directive myToolbar. We will pass list of items to this directive using two way binding property and this directive will display a toolbar by iterating the items passed inside it. Let’s first revisit out DemoController to initialize the items we want to pass to myToolbar directive.
(function () {
   'use strict';
   angular.module('app')
      .controller('DemoController', DemoController);

   DemoController.$inject = ['$scope'];
   function DemoController($scope) {
      var vm = this;
      vm.toolbarItems = [
         { Text: "Products", Url: "http://www.example.com/products" },
         { Text: "Categories", Url: "http://www.example.com/categories" },
         { Text: "Brands", Url: "http://www.example.com/brands" }
      ];
   }
})();
myToolbar directive
Create toolbar.directive.js file inside app/directives/toolbar folder and add following code to create myToolbar directive
(function () {
   'use strict';
   angular.module('app')
      .directive('myToolbar', myToolbar);

   function myToolbar() {
      var directive = {
         restrict: 'E',
         replace: true,
         scope: {
            items: "="
         },
         templateUrl: 'app/directives/toolbar/toolbar.html'
      };
      return directive;
   }
})();
Notice a two-way binding property items is created within the scope option. We have also used templateUrl option this time to put the directive template in a separate file. Create an HTML file toolbar.html within app/directives/toolbar folder and put the following html in it.
<ul class="toolbar">
   <li><a href="/">Home</a></li>
   <li ng-repeat="item in items"><a ng-href="{{item.Url}}">{{item.Text}}</a></li>
</ul>
The above template is simply iterating the items using built-in AngularJS directive ng-repeat. It will generate a horizontal toolbar on the page with the list of items hyperlinked to the Url property of every item. Add the directive JavaScript file at the bottom of index.html file so that we can use the directive on the page.
<script type="text/javascript" src="app/directives/toolbar/toolbar.directive.js"></script>
Finally the directive can be used as follows
<body ng-app="app">
   <div class="container" ng-controller="DemoController as vm”>
      <my-header header-text="AngularJS Directives"></my-header>
      <my-toolbar items="vm.toolbarItems"></my-toolbar>
   </div>
   <script type="text/javascript" src="js/jquery.min.js"></script>
   <script type="text/javascript" src="js/bootstrap.min.js"></script>
   <script type="text/javascript" src="js/angular.min.js"></script>
   <script type="text/javascript" src="js/custom.js"></script> <script type="text/javascript" src="app/app.js"></script>
   <script type="text/javascript" src="app/controllers/demo.controller.js"></script>
   <script type="text/javascript" src="app/directives/header/header.directive.js"></script>
   <script type="text/javascript" src="app/directives/toolbar/toolbar.directive.js"></script>
</body>
The following output will be generated by running the index.html file in the browser:

Although myToolbar directive created above is quite reusable as it can render whatever items passed inside from the outside but it is still dependent on the outside environment for the data. What if a directive can fetch its own data from a controller or a backend service and can use that data to render its output. Our next custom directive mySidebar will demonstrate this concept in full detail. mySidebar directive will use its own controller to pass and render data within directive template. Furthermore the directive controller will pull data from a backend service to demonstrate a real world example where back end services provide data to front end application components such as controllers and directives.
mySidebar directive
Create sidebar.directive.js file inside app/directives/sidebar folder and add following code to create mySidebar directive
(function () {
   'use strict';
   angular.module('app')
      .directive('mySidebar', mySidebar);

   function mySidebar() {
      var directive = {
         restrict: 'E',
         replace: true,
         controller: 'SidebarController',
         controllerAs: 'sidebar',
         templateUrl: 'app/directives/sidebar/sidebar.html'
      };
      return directive;
   }
})();
controller option
The above directive is using controller option that will link the directive to its own controller normally called Directive Controller. The Directive Controller is defined within the context of one directive; but, it can be injected into other directives as a means to facilitate inter-directive communication. It is also important to remember that you cannot perform DOM manipulations in directive controller because the controller is instantiated before the pre-link phase and in this phase compile hasn’t linked the DOM elements yet. It is recommended to do DOM manipulations after the post-link phase.
controllerAs option
The above directive is also using controllerAs option which allows you to declare a reference variable to be used within the template to access the data and properties defined within the controller. Without controllerAs option you can still access properties and data but in that case you need to access property using the $scope and you can put yourself in trouble if you are using nested scopes and a property with the same name is declared in both parent and child scopes. Using controllerAs option will clear exactly from which scope the property is coming from.
To define a directive controller for our mySidebar directive, create a file sidebar.controller.js in app/directives/sidebar folder and put the following code in it
(function () {
   'use strict';
   angular.module('app')
      .controller('SidebarController', SidebarController);

   SidebarController.$inject = ['$rootScope', 'brandService'];
   function SidebarController($rootScope, brandService) {
      var vm = this;
      vm.sidebarItems = null;
      vm.activate = _activate;
      vm.selectBrand = _selectBrand;

      _activate();

      function _activate()
      {
         vm.sidebarItems = brandService.getAllBrands();
         $rootScope.selectedBrandId = vm.sidebarItems[0].Id;
      }

      function _selectBrand(brand)
      {
         $rootScope.selectedBrandId = brand.Id;
      }
   }
})();
The above controller has many important concepts which required further explanation. First, I am using dependency injection to inject a service “brandService” into the controller. This service will provide the list of brands to the controller so that the brand names can be rendered on the sidebar as hyperlinked items. In the above code we are calling getAllBrands() function of brandService in the _activate function to load data into controller local variable sidebarItems. We are also setting the value of another variable selectedBrandId with the brand Id of the first brand available in the sidebarItems.
Notice that the selectedBrandId property is not the local property within the controller. It is attached with the $rootScope so that it can be used by all the scopes of the application. We will use this property shortly when we will display the details of the selected brand on the page.
The above controller also has a local function selectBrand which will be called from the mySidebar directive template. This function will set the selectedBrandId to the brand Id of the brand passed in the function as a parameter. In short, every time user will click any item in the sidebar the selectedBrandId value will be updated to reflect the currently selected brand.
You may have guessed from the definition of the mySidebar directive above that we also need a template file for this directive so let’s create an HTML file sidebar.html in app/directives/sidebar folder and put the following code in it
<div class="col-lg-4 bg-lightGray">
   <h4>Sidebar</h4>
   <ul class="sidebar">
      <li ng-repeat="item in sidebar.sidebarItems" ng-class="{'selected': $root.selectedBrandId == item.Id}">
         <a href="javascript:void(0);" ng-click="sidebar.selectBrand(item)">{{item.Name}}</a>
      </li>
   </ul>
</div>
Notice how the controller properties are accessed within the template using the controllerAs reference variable sidebar. Even the controller function selectBrand is called using sidebar.selectBrand. Overall this template is straight forward as its using ng-repeat to render all the sidebar items as vertical sidebar menu and then passing each item to selectBrand function as parameter so that if user click the item the selectedBrandId property value can be updated within the selectBrand function. The template is also using a built-in AngularJS directive ng-class to highlight the selected brand. You can see another nice example of ng-class here.
brandService
To complete the above example, let’s create a brand.service.js file in app/services folder and put the following code in it
(function() {

    'use strict';
    angular.module('app')
       .factory('brandService', brandService);

    function brandService() {
       var service = {
           getAllBrands: _getAllBrands
       };

       function _getAllBrands () {
           return [
               { Id: 1, Name: "Nokia" },
               { Id: 2, Name: "Dell" },
               { Id: 3, Name: "Sony" },
               { Id: 4, Name: "HP" },
               { Id: 5, Name: "Apple" }
           ];
       }
       return service;
   }
})();
The brandService defined above has only single function getAllBrands which will return a list of brand objects to the mySidebar directive controller. This service can be injected into any other controller of the application to provide data. In a real world applications this service may have pulled the list of brands from a backend database using built in AngularJS $http or $resource services.
Let’s use our custom directive in index.html file. First you need to inject all the new JavaScript files at the bottom of the page and then you need to use mySidebar directive as shown below:
<!DOCTYPE html>
<html>
   <head>
   <link rel="stylesheet" href="css/bootstrap.min.css" />
   <link rel="stylesheet" href="css/custom.css" />
</head>
<body ng-app="app">
   <div class="container" ng-controller="DemoController as vm">
      <my-header header-text="AngularJS Directives"></my-header>
      <my-toolbar items="vm.toolbarItems"></my-toolbar>
   <div>
      <my-sidebar></my-sidebar>
   </div>
</div>

   <script type="text/javascript" src="js/jquery.min.js"></script>
   <script type="text/javascript" src="js/bootstrap.min.js"></script>
   <script type="text/javascript" src="js/angular.min.js"></script>
   <script type="text/javascript" src="js/custom.js"></script> <script type="text/javascript" src="app/app.js"></script>
   <script type="text/javascript" src="app/controllers/demo.controller.js"></script>
   <script type="text/javascript" src="app/services/brand.service.js"></script>
   <script type="text/javascript" src="app/directives/header/header.directive.js"></script>
   <script type="text/javascript" src="app/directives/toolbar/toolbar.directive.js"></script>
   <script type="text/javascript" src="app/directives/sidebar/sidebar.controller.js"></script>
   <script type="text/javascript" src="app/directives/sidebar/sidebar.directive.js"></script>

</body>
</html>
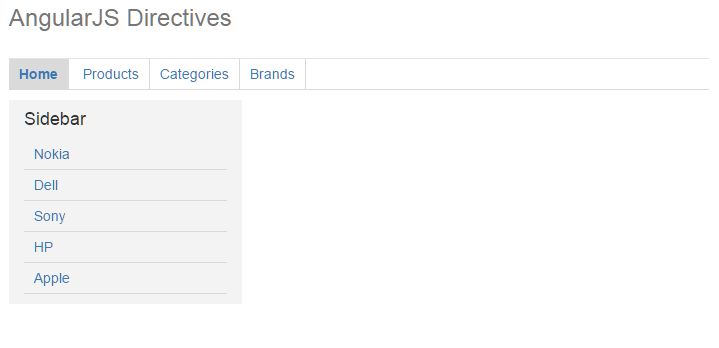
The following output will be generated by running the index.html file in the browser. If your output is different than the output shown below then don’t forget to download the source code of this tutorial and check the custom.css file for all the styles defined within the file.
Let’s finish our tutorial by creating another custom directive that will display the details of the selected brand on the page. This technique will also show you how one directive can update its contents based on the changes occurred in some other directive.
brandDetail directive
Create brand.detail.directive.js file inside app/directives/brand-detail folder and add following code to create brandDetail directive.
(function () {
   'use strict';
   angular.module('app')
      .directive('brandDetail', brandDetail);

   function brandDetail() {
      var directive = {
         restrict: 'E',
         replace: true,
         controller: 'BrandDetailController',
         controllerAs: 'brandDetail',
         templateUrl: 'app/directives/brand-detail/brand-detail.html'
      };
      return directive;
   }
})();
The above directive is pretty straight forward and using all the same options we used in other custom directives in this tutorial. The directive required BrandDetailController which is implemented as follows:
(function () {
   'use strict';
   angular.module('app')
      .controller('BrandDetailController', BrandDetailController);

   BrandDetailController.$inject = ['$rootScope', 'brandService'];
   function BrandDetailController($rootScope, brandService) {
      var vm = this;
      vm.brand = null;
      vm.activate = _activate;
      _activate();

      function _activate()
      {
         $rootScope.$watch("selectedBrandId", _loadBrand);
      }
      function _loadBrand()
      {
         vm.brand = brandService.getBrand($rootScope.selectedBrandId);
      }
   }
})();
The important line in the above code is how we have added a watcher with the rootScope to watch for any change in the selectedBrandId property. If you remember we are changing the value of selectedBrandId property in the SideBarController based on user selection. As soon as the property will change in the SideBarController, the watcher defined in BrandDetailController will execute _loadBrand function. The _loadBrand function can call getBrand function defined in brandService to load brand details. In read world application the getBrand function can load brand details from a backend database but to keep the example simple I put some hard coded details in getBrand function.
(function() {
   'use strict';
   angular.module('app')
      .factory('brandService', brandService);

   function brandService() {
      var service = {
         getAllBrands: _getAllBrands,
         getBrand: _getBrand
      };

      function _getAllBrands () {
         return [
            { Id: 1, Name: "Nokia" },
            { Id: 2, Name: "Dell" },
            { Id: 3, Name: "Sony" },
            { Id: 4, Name: "HP" },
           { Id: 5, Name: "Apple" }
        ];
      }

      function _getBrand (id) {
         if(id == 1)
            return { Id: 1, Name: "Nokia", Website: "http://www.nokia.com" };
         else if(id == 2)
            return { Id: 2, Name: "Dell", Website: "http://www.dell.com" };
         else if(id == 3)
            return { Id: 3, Name: "Sony", Website: "http://www.sony.com" };
         else if(id == 4)
            return { Id: 4, Name: "HP", Website: "http://www.hp.com" };
         else if(id == 5)
            return { Id: 5, Name: "Apple", Website: "http://www.apple.com" };
      }
      return service;
   }
})();
We also required a template for brandDetail directive which is given below:
<div class="col-lg-8">
   <h4>Brand Detail</h4>
   <dl class="dl-horizontal">
      <dt>Id:</dt>
      <dd>{{ brandDetail.brand.Id }} </dd>
      <dt>Name:</dt>
      <dd>{{ brandDetail.brand.Name }} </dd>
      <dt>Website:</dt>
      <dd>{{ brandDetail.brand.Website }} </dd>
   </dl>
</div>
Finally we need to use directive in index.html file. Also don’t forget to include the directive related files at the bottom of index.html file. Here is the complete index.html file.
<!DOCTYPE html>
<html>
   <head>
   <link rel="stylesheet" href="css/bootstrap.min.css" />
   <link rel="stylesheet" href="css/custom.css" />
</head>
<body ng-app="app">
   <div class="container" ng-controller="DemoController as vm">
      <my-header header-text="AngularJS Directives"></my-header>
      <my-toolbar items="vm.toolbarItems"></my-toolbar>
   <div>
      <my-sidebar></my-sidebar>
      <brand-detail></brand-detail>
   </div>
</div>

   <script type="text/javascript" src="js/jquery.min.js"></script>
   <script type="text/javascript" src="js/bootstrap.min.js"></script>
   <script type="text/javascript" src="js/angular.min.js"></script>
   <script type="text/javascript" src="js/custom.js"></script> <script type="text/javascript" src="app/app.js"></script>
   <script type="text/javascript" src="app/controllers/demo.controller.js"></script>
   <script type="text/javascript" src="app/services/brand.service.js"></script>
   <script type="text/javascript" src="app/directives/header/header.directive.js"></script>
   <script type="text/javascript" src="app/directives/toolbar/toolbar.directive.js"></script>
   <script type="text/javascript" src="app/directives/sidebar/sidebar.controller.js"></script>
   <script type="text/javascript" src="app/directives/sidebar/sidebar.directive.js"></script>
   <script type="text/javascript" src="app/directives/brand-detail/brand.detail.controller.js"></script>
   <script type="text/javascript" src="app/directives/brand-detail/brand.detail.directive.js"></script>

</body>
</html>
The following output will be generated by running the index.html file in the browser.

I hope I have given you enough examples of creating custom AngularJS directives and their usage in the real world applications. There are lot more things to cover when creating custom directives in AngularJS. Hopefully, I will be posting some more tutorials related to this topic soon. If you have trouble following the tutorial or if you want to experiment with the code then you can download the entire source code of this tutorial using the Download Source button above.
