This tutorial is part of a serious of tutorials
- Part 1 – Setting up Ionic Development Environment and Creating Ionic Project using Ionic CLI
- Part 2 – Ionic App Themes and Styles and Customizing Ionic Themes and Colors
- Part 3 – Understanding Ionic Pages and Creating Ionic Pages using Ionic CLI
- Part 4 – Creating Food Recipes Page in Ionic
- Part 5 – Creating Food Recipe Detail Page in Ionic
This tutorial series will teach you how to build such hybrid mobile app using one of the most beautiful, free and open source front end mobile apps library called Ionic and a very popular web and mobile apps development framework made by Google called Angular.
Table of Contents
Ionic app Themes and Styles
Ionic apps support themes by default. The easiest way to change app theme is to update the $colors map in src/theme/variables.scss file.
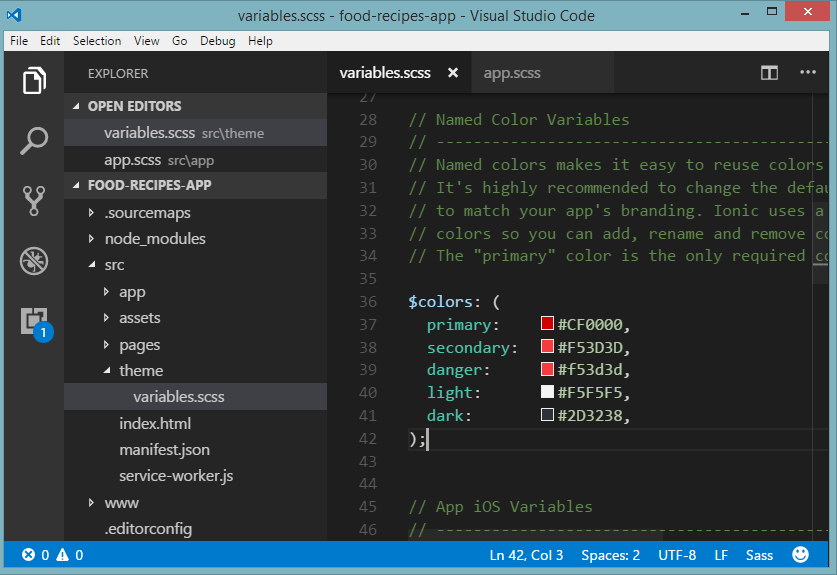
The fastest way to change the theme of your Ionic app is to set a new value for primary, since Ionic uses the primary color by default to style most components. Colors can be removed from the map if they aren’t being used, but primary should not be removed.
$colors: (
  primary:    #CF0000,
  secondary:  #F53D3D,
  danger:     #f53d3d,
  light:      #F5F5F5,
  dark:       #2D3238,
);
You can also add custom colors in the $colors map
$colors: (
  primary:    #CF0000,
  secondary:  #F53D3D,
  danger:     #f53d3d,
  light:      #F5F5F5,
  dark:       #2D3238,
  twitter:    #55acee
);
Ionic makes the $colors keys available as a property to many components. For example, to use our twitter color, add the key as a property:
<button ion-button color="twitter">Twitter Button</button>
You can also use the color function to access any of the $colors in your custom styles:
my-custom-component {
    background: color($colors, twitter, base);
}
The color function will look up the right color based on the map and the compile output would be similar to the following:
my-custom-component {
    background: #55acee;
}
Sass Variables
If you are not familiar with Sass then you may have found $colors map declaration little confusing. I will recommend you to learn more about Sass language here. Sass is the most mature, stable, and powerful professional grade CSS extension language in the world. One of its features is to declare Sass variables once and use it in multiple places. Variables begin with dollar signs and are set like CSS properties. You can change the value of the variable in one place, and all instances where it is used will be changed, too. For example, if you wanted to set the same height for two different selectors, you could create a variable called $control-height:
$control-height: 40px;
Then, you can use this variable in multiple places.
.header {
    height: $control-height;
}

.sub-header {
    height: $control-height;
}
When translated to CSS, it becomes the following:
.header {
    height: 40px;
}
.sub-header {
    height: 40px;
}
This is extremely useful if you later decide to change the controls height, you only have to update the $control-height variable in one place. Sass variables go hand in hand with Ionic. You can modify the Sass variables directly, so that they update entire app quickly and the CSS file that gets generated has the customization you want.
Customizing app Sidebar
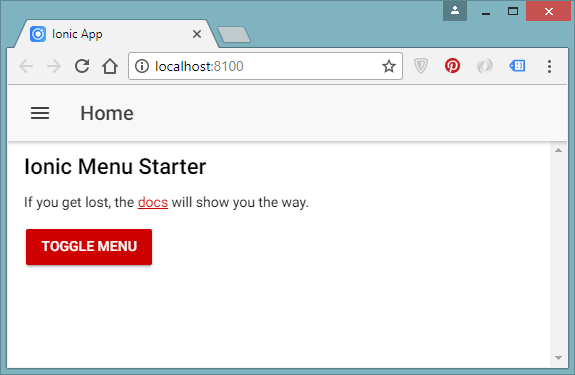
It is time to customize the side bar of our app. Open the app.components.ts file map from src/app folder and you will see the following array of pages declared MyApp component.
pages: Array<{title: string, component: any}>;
You will also notice the following definition of pages array. Every page has a title and a component associated with it. Ionic uses this pages array to create side bar navigation in Ionic apps.
this.pages = [
    { title: 'Home', component: HomePage },
    { title: 'List', component: ListPage }
];
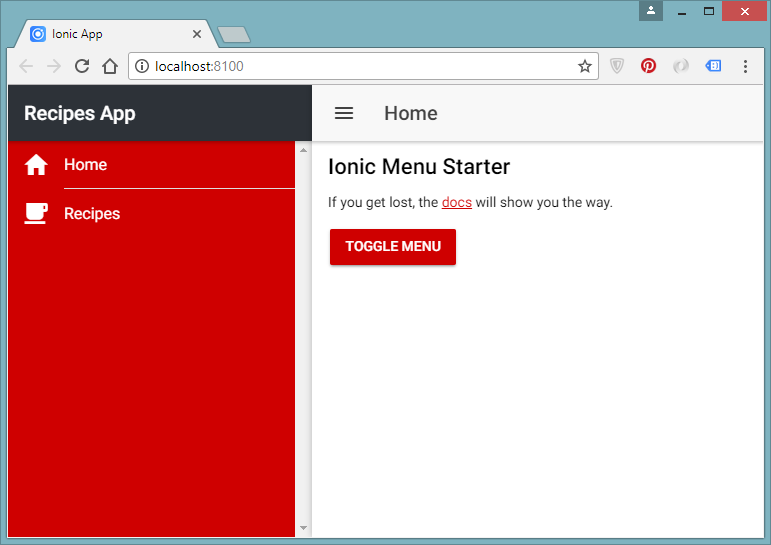
Rename the List page title to Recipes and save the file and you will notice that your updated title will automatically be displaced in the app sidebar in browser.
this.pages = [
    { title: 'Home', icon:'md-home', component: HomePage },
    { title: 'Recipes', icon:'md-cafe',component: ListPage }
];
You can also change the app title by opening the app.html file from src/app folder and updated the value shown in the ion-title element. To change the appearance of the side bar you need to associate a class e.g. my-sidemenu to it. Notice how the Angular ngFor loop is used to iterate over the array of pages we have seen above.
<ion-menu [content]="content" type="push" side="left" class="my-sidemenu">
  <ion-header>
    <ion-toolbar>
      <ion-title>Recipes App</ion-title>
    </ion-toolbar>
  </ion-header>
  <ion-content>
    <ion-list>
      <button menuClose ion-item *ngFor="let p of pages" (click)="openPage(p)">
        {{p.title}}
      </button>
    </ion-list>
  </ion-content>
</ion-menu>
Finally, you need to define few styles to customize the look and feel of app sidebar. Open the app.scss file from src/app folder and define following styles in it.
.my-sidemenu .content{
    background-color: #CF0000;
}
.my-sidemenu .toolbar .toolbar-background {
    background-color: #2D3238;
}
.my-sidemenu .toolbar .toolbar-title {
    color: #FFFFFF;
}
.my-sidemenu .content .list {
    background-color: transparent;
}
.my-sidemenu .content .list .item {
    background-color: transparent;
    color: #FFFFFF;
}
.my-sidemenu .content .list .item .item-inner {
    margin-left: 8px;
}
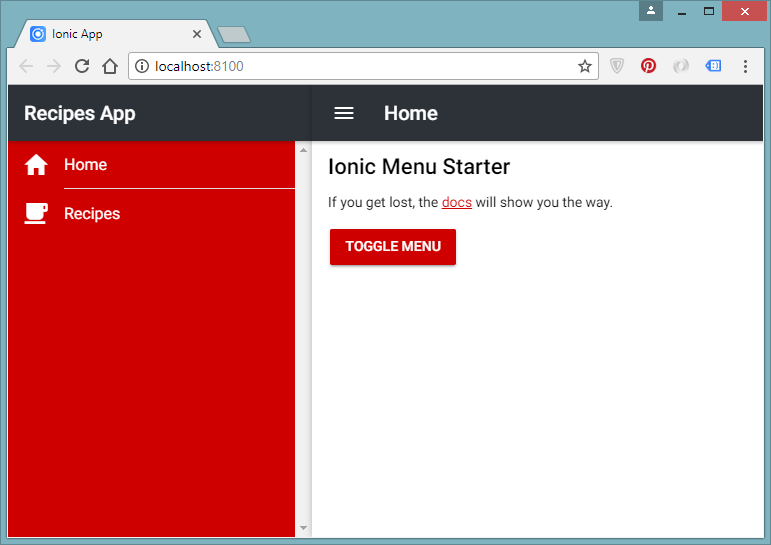
After above changes, our food recipes app will look like the following screenshot.
Customizing app Navbar
It is time to customize our food recipes app navigation bar. Open the app.html file from src/app folder and add a class my-navbar to the ion-nav component.
<ion-nav [root]="rootPage" #content swipeBackEnabled="false" class="my-navbar"></ion-nav>
Define the following styles in app.scss file to customize the navigation bar.
.my-navbar .toolbar .toolbar-background {
    background-color: #2D3238;
}
.my-navbar .toolbar-content .toolbar-title {
    color: #FFFFFF;
}
.my-navbar .toolbar .icon {
    color: #FFFFFF;
}
.my-navbar .back-button-text{
    color: #FFFFFF;
}
In this part of the tutorial series, you have learned how to use Themes and Styles in Ionic Apps. You have also learned about customizing sidebar and navbar of Ionic app. In Part 3, we will learn how to create pages in Ionic apps and how to provide navigation of newly created pages.
This tutorial is part of a serious of tutorials
- Part 1 – Setting up Ionic Development Environment and Creating Ionic Project using Ionic CLI
- Part 2 – Ionic App Themes and Styles and Customizing Ionic Themes and Colors
- Part 3 – Understanding Ionic Pages and Creating Ionic Pages using Ionic CLI
- Part 4 – Creating Food Recipes Page in Ionic
- Part 5 – Creating Food Recipe Detail Page in Ionic


Thank you, Waqas.
how to implement favorite ?
Great tutorial! I’m wondering if you’re planning on implementing code to populate the additional pages we created? The about page is obviously straight forward, but what about the favourites? How might you go about building something like that?