
In object-oriented programming (OOP), the programs often consist of many classes. Developers distribute the business logic and application functionality among these classes. The more classes we have, the more communication is required between those classes and sometimes this increased the complexity of the application. The programs become harder to read and maintain because any change may affect the code in several other dependent classes. To solve this problem, we normally use a design pattern called the Mediator Design Pattern. In this post, I will give you an in-depth overview of the Mediator pattern with some real-world examples. I will also show you how to implement the Mediator pattern yourself or using a very famous MediatR library.
Table of Contents
What is the Mediator Pattern?
The Mediator Pattern is considered to be a behavioral pattern and it defines how the objects can communicate with each other. It was first introduced in the famous book “Design Patterns: Elements of Reusable Object-Oriented Software” back in 1994 but became more popular in recent years.
According to Wikipedia:
With the mediator pattern, communication between objects is encapsulated within a mediator object. Objects no longer communicate directly with each other, but instead, communicate through the mediator. This reduces the dependencies between communicating objects, thereby reducing coupling.
Wikipedia
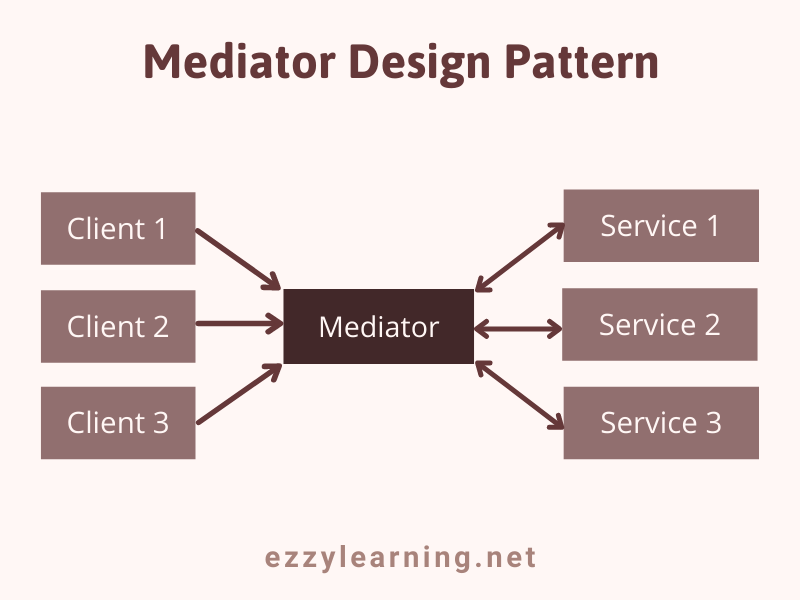
Mediator pattern reduces the tight coupling between a set of interacting objects thus make it easy for developers to change the functionality of the objects independently. Objects don’t call other objects directly but delegate their interaction to a mediator object. This mediator object then handles the communication and interactions between objects.
A real-world example of the Mediator pattern is the traffic control room at airports. If all flights will have to interact with each other for finding which flight is going to land next, it will create a big mess. Rather flights only send their status to the mediator (control room).

Setting up an ASP.NET Core Project
Let’s assume that you have an online e-commerce application that shows a catalog of products to the user. Every product has Add To Basket button that allows users to add different products to their shopping basket. When the user click Add To Basket button, you pass the selected product Id to some backend service or controller that need to perform the following three tasks:
- Fetch the product details from some backend service or database
- Add the product to the shopping basket
- Send an email notification to the customer
We will create a demo application that will simulate the above scenario and then we will see how we can use the Mediator pattern in this real-world example. Create a new ASP.NET Core MVC project and define the following Product class in the Models folder.
Product.cs
public class Product
{
    public int Id { get; set; }
    public string Name { get; set; }
    public decimal Price { get; set; }
}
Next, we will create three services to handle the three requirements mentioned above. Of course I will not be implementing these services with actual code as the purpose of this post is to show you how to implement Mediator pattern and how to handle communication between different objects.
The first service ProductService will fetch the product from some backend database. It has just one method GetProduct(int id) that takes product id as a parameter and returns the product matching that id.
IProductService.cs
public interface IProductService
{
    Product GetProduct(int id);
}
For the demonstration purpose, let’s just return a fake product from the GetProduct method.
ProductService.cs
public class ProductService : IProductService
{
    public Product GetProduct(int id)
    {
        // In real world application you will fetch Product from database

        return new Product(){ Id = id, Name = "Dell Laptop", Price = 800 };
    }
}
The next service will add the product we fetched in the above method to the shopping basket. Create the following ShoppingService with a method AddToBasket(Product product) that takes the product object as a parameter.
IShoppingService.cs
public interface IShoppingService
{
    void AddToBasket(Product product);
}
ShoppingService.cs
public class ShoppingService : IShoppingService
{
    public void AddToBasket(Product product)
    {
        // Implement the code to add the product to a basket.
    }
}
Finally, we need our third service called NotificationService that has a single SendNotification(Product product) method to send product details to the customer in an email.
INotificationService.cs
public interface INotificationService
{
    void SendNotification(Product product);
}
NotificationService.cs
public class NotificationService : INotificationService
{
    public void SendNotification(Product product)
    {
        // Implement the code to send an email notification
        // to customer with the product details
    }
}
Register all three services in the ConfigureServices method of the Startup.cs file so that you can inject them in Controllers and other classes using Dependency Injection. If you want to learn more about Dependency Injection then read my Step by Step Guide to ASP.NET Core Dependency Injection.
Startup.cs
public void ConfigureServices(IServiceCollection services)
{
    services.AddControllersWithViews();

    services.AddScoped<INotificationService, NotificationService>();
    services.AddScoped<IShoppingService, ShoppingService>();
    services.AddScoped<IProductService, ProductService>();
}
To use the above services in a controller let’s create the following ShoppingController in the Controllers folder. Inject all three services in the constructor as shown below.
ShoppingController.cs
public class ShoppingController : Controller
{
    private readonly IProductService _productService;
    private readonly INotificationService _notificationService;
    private readonly IShoppingService _shoppingService;

    public ShoppingController(
        IProductService productService,
        INotificationService notificationService,
        IShoppingService shoppingService)
    {
        _productService = productService;
        _notificationService = notificationService;
        _shoppingService = shoppingService;
    }
}
Next, create the following AddToBasket action method that takes product id as a parameter. Notice, how the methods of all three services are called one after another in the action method to fulfill the three requirements mentioned above.
[HttpPost]
public IActionResult AddToBasket(int id)
{
    // Fetch Product from Database
    var product = _productService.GetProduct(id);

    // Add Product to Basket
    _shoppingService.AddToBasket(product);

    // Send Notification to User
    _notificationService.SendNotification(product);

    return View();
}
We implemented all the business requirements without using Mediator pattern and you can easily see that the controller is interacting with too many services. It has dependencies on all three services and if one service method will change you have to change the code of above controller. This is the problem the Mediator pattern solves as it reduces this coupling and dependencies with a mediator object. Let’s implement the Mediator pattern next to see how it can reduce the above dependencies.
Implementing Mediator Pattern in ASP.NET Core
It doesn’t matter you are implementing Mediator Pattern in an existing application or you are starting from scratch, the steps remain pretty much the same. You may only need to change the order in which these steps are implemented. There are two ways you can implement Mediator Pattern. You can either write your implementation which I will show you next or you can use some third-party library such as MediatR. I will show you both techniques in this post. In this section, we will roll our own implementation of the Mediator Pattern.
Create a new interface IShoppingMediator with a single method Handle(int id).
IShoppingMediator.cs
public interface IShoppingMediator
{
    void Handle(int id);
}
Next, create a class ShoppingMediator that will implement the above interface. The implementation of the class may look familiar to you. We are injecting the same three services in the class and calling the methods of those services in the Handle method.
ShoppingMediator.cs
public class ShoppingMediator : IShoppingMediator
{
    private readonly IProductService _productService;
    private readonly INotificationService _notificationService;
    private readonly IShoppingService _shoppingService;

    public ShoppingMediator(
        IProductService productService,
        INotificationService notificationService,
        IShoppingService shoppingService)
    {
        _productService = productService;
        _notificationService = notificationService;
        _shoppingService = shoppingService;
    }

    public void Handle(int id)
    {
        // Fetch Product from Database
        var product = _productService.GetProduct(id);

        // Add Product to Basket
        _shoppingService.AddToBasket(product);

        // Send Notification to User
        _notificationService.SendNotification(product);
    }
}
Register the ShoppingMediator in Startup.cs file to make sure that you can inject the mediator into your controllers.
Startup.cs
public void ConfigureServices(IServiceCollection services)
{
    services.AddControllersWithViews();

    services.AddScoped<INotificationService, NotificationService>();
    services.AddScoped<IShoppingService, ShoppingService>();
    services.AddScoped<IProductService, ProductService>();

    services.AddScoped<IShoppingMediator, ShoppingMediator>();
}
Now as we have moved all the code from ShoppingController to ShoppingMediator, the ShoppingController code can be simplified. We simply need to inject the ShoppingMediator class in the controller and call the Handle method from the AddToBasket action method.
ShoppingController.cs
public class ShoppingController : Controller
{
    private readonly IShoppingMediator _shoppingMediator;

    public ShoppingController(IShoppingMediator shoppingMediator)
    {
        _shoppingMediator = shoppingMediator;
    }

    [HttpPost]
    public IActionResult AddToBasket(int id)
    {
        _shoppingMediator.Handle(id);

        return View();
    }
}
The ShoppingController has no dependency on those three services. The controller just needs to use the ShoppingMediator class and if the code in any of those three services will change, the controller code will stay the same because it is not tightly coupled with those services. It doesn’t even need to know how those services are called because that responsibility is now shifted to the Mediator class.
Implementing Mediator Pattern using MediatR
MediatR is one of the most popular libraries that has a simple, in-process implementation of Mediator pattern with no dependencies. It supports request, response, commands, queries, notifications, and events and has both synchronous and asynchronous methods to dispatch messages between objects.
There are two flavors of requests in MediatR – ones that return a value, and ones that do not:
- IRequest<T> – the request returns a value
- IRequest – the request does not return a value
Each request type has its own handler interface, as well as some helper base classes:
- IRequestHandler<T, U> – implement this and return Task<U>
- RequestHandler<T, U> – inherit this and return U
For requests without return values:
- IRequestHandler<T> – implement this and you will return Task<Unit>.
- AsyncRequestHandler<T> – inherit this and you will return Task.
- RequestHandler<T> – inherit this and you will return nothing (void).
You can download and install the MediatR library via the NuGet package manager. If you are using ASP.NET Core, then you can also install the MediatR.Extensions.Microsoft.DependencyInjection package that will allow you to register all handlers of the project in Startup.cs file using an extension method called AddMediatR(Assembly).
Startup.cs
public void ConfigureServices(IServiceCollection services)
{
    services.AddControllersWithViews();

    services.AddScoped<INotificationService, NotificationService>();
    services.AddScoped<IShoppingService, ShoppingService>();
    services.AddScoped<IProductService, ProductService>();

    services.AddMediatR(typeof(Startup));
}
Once the MediatR library is configured using the AddMediatR method shown above, we are now ready to use the MediatR library using the following two steps:
- We need to create a custom request class that implements either IRequest or IRequest<T>
- We need to create a customer request handler by implementing one of the interfaces mentioned above and need to add all our login in this customer request handler.
Let’s use the MediatR library in the same shopping cart example we implemented above. First, create the following ShoppingBasketRequest class that inherits IRequest interface.
ShoppingBasketRequest.cs
public class ShoppingBasketRequest: IRequest
{
    public int ProductId { get; set; }
}
Next, create the following ShoppingBasketRequestHandler class by inheriting the RequestHandler<T> class and pass the ShoppingBasketRequest object as T. We also need to override the Handle method that will contain all the code we want this method to run for us.
public class ShoppingBasketRequestHandler : RequestHandler<ShoppingBasketRequest>
{
    private readonly IProductService _productService;
    private readonly INotificationService _notificationService;
    private readonly IShoppingService _shoppingService;

    public ShoppingBasketRequestHandler(
        IProductService productService,
        INotificationService notificationService,
        IShoppingService shoppingService)
    {
        _productService = productService;
        _notificationService = notificationService;
        _shoppingService = shoppingService;
    }

    protected override void Handle(ShoppingBasketRequest request)
    {
        // Fetch Product from Database
        var product = _productService.GetProduct(request.ProductId);

        // Add Product To Basket
        _shoppingService.AddToBasket(product);

        // Send Notification to User
        _notificationService.SendNotification(product);
    }
}
The above code is very similar to the code we wrote above when we implemented our own implementation of the Mediator pattern. We are injecting the same three services and calling the same methods inside the Handle method.
To use the above Request in our ShoppingController, we need to inject the IMediator interface in the constructor of the controller. We can then call the Send method and pass the ShoppingBasketRequest object as the parameter. The mediator will then automatically call the Handle method above.
ShoppingController.cs
public class ShoppingController : Controller
{
    protected readonly IMediator _mediator;

    public ShoppingController(IMediator mediator)
    {
        _mediator = mediator;
    }

    [HttpPost]
    public IActionResult AddToBasket(int id)
    {
        _mediator.Send(new ShoppingBasketRequest() { ProductId = id });

        return View();
    }
}
Summary
I am sure you now have a basic idea of what the Mediator pattern is and how to implement it either yourself or using the MedaitR library. I tried my best to explain everything using a real-world shopping cart example so that you understand the concept more quickly and relate it with the similar problem you are facing in your project. If you want to know more about the MediatR library, then you can read the following wiki site.


Thanks very much for this tutorial its very helpful i think also you should update it for example the methods to configure mediatR is
builder.Services.AddMediatR(cfg => cfg.RegisterServicesFromAssembly(Assembly.GetExecutingAssembly()));
But thakns again
I agree with you that that the syntax I am showing in my post is now old. Actually, the AddMediatR extension method needs an assembly to scan so it can register all the handlers and mediator types. In previous versions of .NET we used the typeof(Startup) to point to the assembly. In .NET 6, there is only Program.cs file so we need to change this syntax to the one you mentioned. Thanks.
I recently watched https://youtu.be/FDtPLhOpdQ8 which is very helpful to talk about Mediator Design Pattern in C#
I was also about to ask what zia ul murtaza just asked. Basically what’s difference between custom implementation and mediatR library. Or what are benefits
Mediator pattern keep the objects clean as they don’t have too many dependencies on each other. Controllers execute in presentation (web) layer and mediator can be implemented in the business layer to handle communication with other components/services. Any change require in any service will only force us to change the mediator code and presentation layer will stay untouched. Without mediator, we will keep on changing our controllers and their dependencies.
Hi Waqas,
Thank you for making the learning really easy.
based on above writing I assume that handler classes are managed by the mediatR library internally and based on the requesting class it detects what handler should handle the request.