
ASP.NET Core introduced a new feature “Tag Helpers” that allows us to change and enhance our existing HTML markup using server-side C# code. We normally add tag helpers in our Razor Views and Razor Engine then process them to generate and render the HTML returned from the server. This allows us to use all the power and cool features of C# in HTML. Tag Helpers are also easy to read and understand by designers and development tools. ASP.NET Core is shipped with many built-in Tag Helpers such as Cache, Anchor, Form, Label, etc. and we can also create our own custom tag helpers and use them in a similar manner as we use built-in Tag Helpers. In this tutorial, I will explain the difference between the Tag Helpers vs HTML Helpers vs View Components. I will also explain how to use ASP.NET Core built-in Tag Helpers in your projects.
Table of Contents
Tag Helpers vs HTML Helpers
Many developers think that Tag Helpers are similar to HTML Helpers. It is somewhat true in a sense that many HTML helpers have their equivalent Tag Helpers but there are some differences.
| Tag Helpers | HTML Helpers |
|---|---|
Tag Helpers are attached to HTML elements inside Razor views and they help us in writing cleaner and easier to read markup. Here is an example of a Label Tag Helper used as an HTML element<label asp-for="Email"></label>Here is an example of tag helpers asp-controller and asp-action, which are attached to the existing HTML form element as attributes and enhanced the functionality of HTML form from the server-side C# code. <form asp-controller="Account" asp-action="Register" method="post"> | HTML Helpers are invoked as methods as you can see below where we are calling a Label method to generate Label using HTML Helper@Html.Label("FullName", "Full Name:", new {@class="user-name"})Similarly to generate HTML forms we use the method BeginForm. @using (Html.BeginForm(…)){ |
Tag Helpers provide an HTML friendly development experience Mostly Razor markup using Tag Helpers looks like standard HTML. Front-end designers conversant with HTML/CSS/JavaScript can edit Razor without learning C# or Razor syntax.<cache vary-by-user="true"></cache> Or <img src="~/images/logo.png" asp-append-version="true" />
| HTML helpers do not provide an HTML friendly development experience. Front end designers need to learn C# and Razor syntax in order to use HTML Helpers. For example, if a designer will see a code similar to below in the HTML file, he needs to understand what is the meaning of the new operator, how to use lambda expressions =>, and so on.@Html.TextBoxFor(m => p.Name, |
Visual Studio provides rich intelligence support for Tag Helpers. Visual studio also gives a different color to Tag Helpers as compared to normal HTML elements such as h1, img, etc.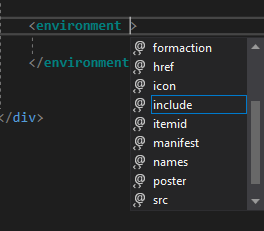 | Visual Studio do not provide a good IntelliSense support when writing HTML Helpers because in most cases the parameters or settings you pass to HTML helpers are simple Strings e.g. “FullName” and “Full Name:” shown below:@Html.Label("FullName", "Full Name:", new {@class="user-name"}) |
Tag Helpers vs View Components
If you are not familiar with View Components, you can read my post related to View Components. Tag Helpers and View Components have many similarities. They both support Dependency Injection and they both have support to execute code synchronously or asynchronously, however, there are still some differences between them.
| Tag Helpers | View Components |
|---|---|
| TagHelpers don’t have a lifecycle like we have in Controller actions or View Components. When a razor view runs, any TagHelper gets compiled into the output and the HTML is returned. Tag Helpers enables you to work alongside existing HTML and create or introduce new HTML elements and attributes which either modify the page contents or add new behavior to existing HTML elements. | View Components are like a mini, lightweight Controller with no Model Binding support. They expose many methods and properties, which already exist in Controllers. View Components support dependency injection just like controllers. |
When you create Tag Helper, you inherit from TagHelper classpublic class ProductTagHelper : TagHelper | When you create View Components, you inherit from ViewComponent classpublic class ProductViewComponent : ViewComponent |
| Tag Helpers can add new HTML as well as alter the existing HTML elements in the Razor View. | View Components do not alter a Razor View’s HTML. They just add to it. |
Tag Helpers can be called with a simple HTML like syntax. No Razor syntax required to invoke/call Tag Helpers.<my-colorful-heading></my-colorful-heading>
| To invoke/use a View Components in Razor View, we normally use Invoke or InvokeAsync methods of Component class.@await Component.InvokeAsync(“Widget”)Note: For ASP.NET Core 1.1 and higher, you can also invoke a View Components as a Tag Helper. <vc:widget></vc:widget> |
Using Tag Helpers in Razor Views
When we create a new ASP.NET Core MVC Web application, the following line is automatically added in the project Views/_ViewImports.cshtml file.
@addTagHelper *, Microsoft.AspNetCore.Mvc.TagHelpers
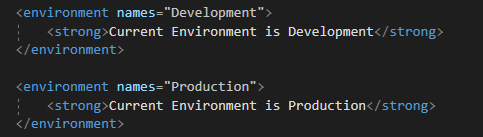
This line is using @addTagHelper directive that can be used to register a specific or all Tag Helpers in all your views. Here is an example of using Environment Tag Helper in the default Index View of Home Controller.

As our current project environment is set as “Development” so only the first Tag Helper will render the output as shown below:

There are two parameters for @addTagHelper directive. The first parameter specifies which Tag Helper we want to load in Views and the second parameter specifies the fully qualified name of the assembly that contains the tags. The above line is using wildcard (” * “) to register all Tag Helpers but we can also register a specific Tag Helper e.g. Microsoft.AspNetCore.Mvc.TagHelpers.AnchorTagHelper as follows:
@addTagHelper Microsoft.AspNetCore.Mvc.TagHelpers.AnchorTagHelper, Microsoft.AspNetCore.Mvc.TagHelpers
As soon as you will build the project with the above line, you will notice that Visual Studio is not recognizing the above environment tag and also not giving the environment element a Teal color. This is because we explicitly register only the Anchor Tag Helper in our Views/_ViewImports.cshtml file.
We also have @removeTagHelper directive available that can be used to remove specific Tag Helpers from all the views available in the current folder. For example, if you have a Views/_ViewImports.cshtml and Views/Account/_ViewImports.cshtml files and you have registered all TagHelpers in Views/_ViewImports.cshtml file you can remove some of those tags from all the views available in the Account folder by using the following @removeTagHelper directive within Views/Account/_ViewImports.cshtml file.
@removeTagHelper Microsoft.AspNetCore.Mvc.TagHelpers.AnchorTagHelper, Microsoft.AspNetCore.Mvc.TagHelpers
Built-in ASP.NET Core Tag Helpers
ASP.NET Core shipped with many built-in Tag Helpers available in Microsoft.AspNetCore.Mvc.TagHelpers library. Some built-in Tag Helpers are related to validations and others are related to Forms. Let’s review some of the built-in Tag Helpers in detail.
Label Tag Helper
Label Tag Helper is an alternate of Html.LabelFor HTML Tag Helper to generate the <label> element in HTML. It can also generate the descriptive label value automatically using the Display attribute attached to the property attached to the label. Here is an example of using Label Tag Helper.
Let’s say you have a following class with a property FullName
public class SimpleViewModel
{
   [Required]
   [Display(Name = "Full Name")]
   public string FullName { get; set; }
}
You can use the Label Tag Helper with the above property as follows:
<form asp-controller="Account" asp-action="Register" method="post">
        <label asp-for="FullName"></label>
       <input asp-for="FullName" /> <br />
</form>
The following HTML is generated for the element:
<label for="FullName">Full Name</label>
You can see that we are writing a lot less markup and code is also very easy to read. The FullName property is strongly typed in asp-for attribute of the Label Tag Helper.
Another advantage of using Tag Helpers is that they made developers more productive. Let’s say you are using the above “FullName” property in many forms of your application and one day you decided to change the forms label from “Full Name” to “Your Full Name”, you just have to change the Display attribute [Display(Name = “Your Full Name”)] and Label Tag Helper will automatically update in all the forms of your application.
Input Tag Helper
The Input Tag Helper binds an <input> HTML element to a model expression in your razor view.
<input asp-for="<Expression Name>">
Let’s say you have a model class with following properties
[Required]
[EmailAddress]
[Display(Name = "Email Address")]
public string Email { get; set; }

[Required]
[DataType(DataType.Password)]
public string Password { get; set; }
You can bind these properties with the HTML element as follows:
<form asp-controller="Account" asp-action="Register" method="post">
   Email:
   <input asp-for="Email" />
   <br />
   Password:
   <input asp-for="Password" />
   <br />
   <button type="submit">Register</button>
</form>
The code above generates the following HTML:
<form method="post" action="/Account/Register">
   Email:
   <input type="email"
      data-val="true"
      data-val-email="The Email Address field is not a valid e-mail address."
      data-val-required="The Email Address field is required."
      id="Email" name="Email" value="" />
   <br />
   Password:
   <input type="password"
      data-val="true"
      data-val-required="The Password field is required."
      id="Password" name="Password" />
   <br />
   <button type="submit">Register</button>
   <input name="__RequestVerificationToken" type="hidden" value="<removed for brevity>" />
</form>
You can see from the above generated HTML that Input Tag Helper is a powerful tag helper because it is generating a lot of HTML markup which we were normally used to write manually in our Razor Views in the past. Input Tag Helper has the following features:
- It generates id and name attributes matching with the asp-for expression name e.g. Email
- It automatically set the correct HTML type attribute based on the DataType data annotation attribute e.g. [DataType(DataType.Password)]
- It automatically generates HTML 5 validation attributes using the data annotations applied to model properties. e.g. data-val-required
- It provides a strong typing feature which means if the name of the model property changes, you will get the compile-time error in Razor Views.
More detail information about the Input Tag Helper can be found here.
Textarea Tag Helper
The Textarea Tag Helper is very similar to Input Tag Helper and it generates id, name, and data validation attributes from the model. It generates HTML <textarea> element in Razor Views and supports strong typing just like Input Tag Helper.
Let’s say you have a following property in your model class
[MinLength(5)]
[MaxLength(1024)]
public string Description { get; set; }
We can use above property with Textarea Tag Helper as follows
<textarea asp-for="Description"></textarea>
Above Tag Helper will generate following HTML output
<textarea data-val="true"
   data-val-maxlength="The field Description must be a string or array type with a maximum length of ‘1024’."
   data-val-maxlength-max="1024"
   data-val-minlength="The field Description must be a string or array type with a minimum length of ‘5’."
   data-val-minlength-min="5"
   id="Description" name="Description">
  </textarea>
Select Tag Helper
The Select Tag Helper generates an HTML select element with associated option elements. It is an alternate of HTML Helper functions Html.DropDownListFor and Html.ListBoxFor. Its most common attributes are asp-for which specify the model property name to bind and asp-items which specifies the option elements.
To use Select Tag Helper, you can create a model with the following two properties.
public class UserInfo
{
	public string Color { get; set; }

	public List<SelectListItem> Colors { get; } = new List<SelectListItem>
	{
		new SelectListItem { Value = "1", Text = "Red" },
		new SelectListItem { Value = "2", Text = "Green" },
		new SelectListItem { Value = "3", Text = "Blue"  },
	};
}
You can initialize the model in MVC controller and pass the model to Razor View as follows:
using System;

public IActionResult Index()
{
	var model = new UserInfo();
	model.Color = "1";

	return View(model);
}
Finally you can use the Select Tag Helper as follows:
<select asp-for="Color" asp-items="Model.Colors"></select>
The following HTML markup will be generated using the above Select Tag Helper
<select id="Color" name="Color">
   <option selected="selected" value="1">Red</option>
   <option value="2">Green</option>
   <option value="3">Blue</option>
</select>
Form Tag Helper
The Form Tag Helper is useful for generating HTML forms in your Razor Views.
<form asp-controller="Account" asp-action="Register" method="post">
    <!-- Input and Submit elements -->
</form>
The Form Tag Helper above generates the following HTML:
<form method="post" action="/Demo/Register">
    <!-- Input and Submit elements -->
    <input name="__RequestVerificationToken" type="hidden" value="<removed for brevity>">
</form>
The Form Tag Helper has following features:
- It generates HTML <form> element and automatically set the action attribute matching with some MVC controller action or named route.
- It generates a hidden Request Verification Token element to prevent cross-site request forgery attacks.
More detail about the Form Tag Helper can be found here.
Anchor Tag Helper
The standard HTML <a> element is a very simple tag and it only works in client-side HTML. The Anchor Tag Helper enhances the standard <a> tag and provides many new attributes. An asp-controller attribute assigns an MVC controller with the element and it is useful for generating URLs pointing to that particular MVC controller. An asp-action attribute associate a particular MVC action with the <a> element and used to generate the URL for the <a> href attribute. Here are a few examples of Anchar Tag Helper.
| Anchor Tag Helper | Generated HTML Output |
|---|---|
<a asp-controller="Product" asp-action="Index">Products List</a> | <a href=”/Product”>Products List</a>
|
<a asp-controller="Product" asp-action="Tags">Products Tags</a> | <a href=”/Product/Tags”>Products List</a> |
Anchor Tag Helper has so many other attributes and full detail about these attributes is available here.
Image Tag Helper
The Image Tag Helper enhances the built-in HTML <img> element and provides an additional feature called cache-busting. A cache-busting is a technique we use to solve browser caching issue by appending a unique version with the image files URLs. Every time, this unique version is changed, the browser ignores the locally cached version of the image and try to retrieve the updated/new version of the image from the server. Image Tag Helper has a property called asp-append-version that can be used to support the cache-busting feature.
<img src="~/images/logo.jpg" asp-append-version="true">
Above Image Tag Helper will produce the following HTML markup. Note the unique hashed string append after the image URL
<img src="/images/logo.jpg?v=Kl_dqr9NVtnMdsM2MUg4qthUnWZm5T1fCEimBPWDNgM">
Summary
In this tutorial, I tried to cover only a few built-in Tag Helpers. ASP.NET Core is shipped with many more useful Tag Helpers which can make you more productive. If you want to explore the full list of built-in Tag Helpers then you can visit Microsoft official docs here.


