
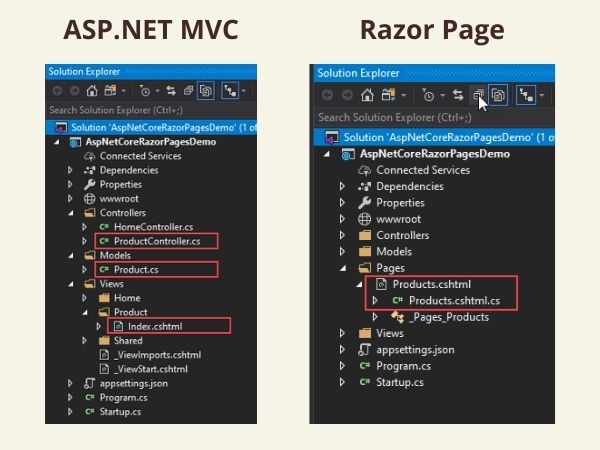
If you have been developing web applications using ASP.NET MVC then you will agree with me that to create a simple page, you have to create a Controller class, an Action method, a Model class, a Razor View and optionally a custom Route and all of this seems too much ceremony for a simple page. To make matters worse, you will typically create a Controller class inside the Controllers folder, a Model object inside the Models folder, and a Razor View inside the Views folder and you need to jump from one folder to another inside your Visual Studio solution explorer all day long. Microsoft introduced a new programming model in ASP.NET Core 2.0 called Razor Pages that reduced all this ceremony and simplified the process of implementing page focus scenarios. In this tutorial, I will cover the Razor Pages in detail and hopefully, if you will follow along with me, you will be able to use Razor Pages in your applications with more confidence.
Table of Contents
What is Razor Page?
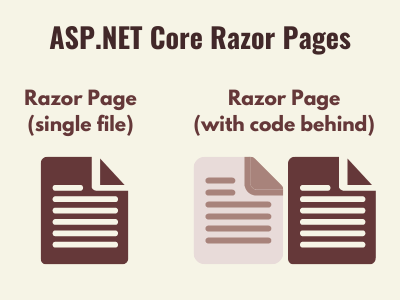
Razor Pages are self-contained files similar to PHP files, XAML controls, or ASP.NET Web Forms and as compared to MVC, they follow a different approach of building web pages using ASP.NET Core. They allow developers to mix HTML and server-side C# directly within a single file without the need of creating Controllers, View Models, etc. These pages can coexist with traditional MVC and Web API controllers within the same project and can be used for scenarios where you need to build simple pages without too much logic in them. Ideal candidates can be About Us, Contact Us, and Site Map pages. If you are not a big fan of mixing HTML and C# in a single file or your page logic is becoming more complex, then you are also allowed to put your C# code in a separate file attached to Razor Page. This is an almost similar idea as we had in ASP.NET Web Forms in the past where we were adding all the C# code in a code-behind file.
Razor Pages vs MVC
ASP.NET MVC applications are based on the traditional Model-View-Controller (MVC) pattern that requires you to put all your code inside Controllers, build Models inside controllers, and then pass these models to Views where we can render or use them as per our requirement. In most cases, you will end up creating multiple files (related to one page or feature) in different folders, and navigating from one file to another to implement a feature on a certain page will make you less productive. It doesn’t mean that you need to dump MVC totally and migrate your complete application to Razor Pages. Razor Pages are good for simple page-centric scenarios only and you still have to stick to the MVC pattern if you are building complex pages with a lot of functionality.
Another common practice you may have noticed in MVC applications is a grouping of similar actions in almost all of your controllers. The number of these actions also increases as your applications grow and I have seen examples where people have almost 100+ actions inside a single controller. A typical AccountController normally has the following actions.
| Action Methods | HTTP Methods |
|---|---|
| Register | GET |
| Register | POST |
| Login | GET |
| Login | POST |
| ForgotPassword | GET |
| ForgotPassword | POST |
You can easily see in the above AccountController that a single page e.g. Login Page normally requires two actions with different HTTP verbs GET and POST. These actions are also highly coupled in the sense that most of the time they require similar initialization logic, same View Model, and even the same Razor View. Razor Pages allows you to group both GET and POST methods (called page handlers in Razor Pages terminology) in a single page code-behind class and you are also allowed to create additional handlers as per your requirement.
Some of the common differences between MVC and Razor Pages are following:
| MVC | Razor Pages |
|---|---|
MVC Controllers are inherited from a Controller class.public class HomeController : Controller | Razor Pages Page Model (code behind) class is inherited from PageModel class.public class HomePageModel : PageModel |
| When Razor Views are used with Controllers, they don’t have @page directive in them | When Razor Views are used as Razor Pages, they need to have @page directive in them. |
| In MVC pattern, we normally create a separate View Model class and then pass that class from Controller to Razor View | In Razor Views, we don’t have to create separate View Models. We can create properties inside the Page Model class and can use the Page Model class as a mini Controller and View Model at the same time. |
| Razor Pages are good candidates when your content is structured around the idea of an actual page and you don’t want to use a full MVC framework for simple pages such as Contact Us, About Us, etc. | MVC Controllers are more suitable for heavy lifting and more complex tasks such as product catalogs and database related tasks. |
Getting Started with Razor Pages
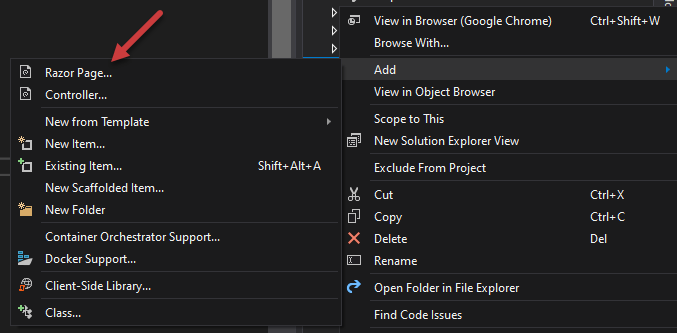
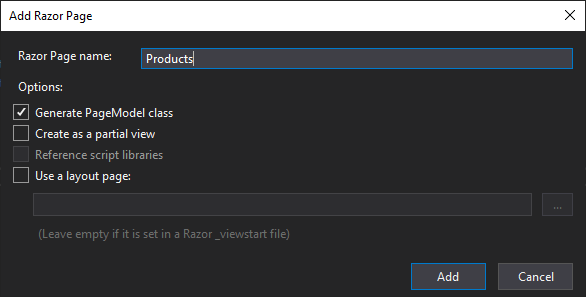
Razor Pages are physical .cshtml files and to create Razor Page you need to create a Pages folder inside your project. This is by convention but if you want to create a folder with some other name then you have to tell ASP.NET where the Razor Pages are located. If you are using Visual Studio 2019, then you simply need to right-click on the Pages folder inside your solution explorer and choose Razor Pages… option from the context menu.
You will be asked to provide a name with some other options that will allow you to generate a Page Model (code behind) class with your page, specify the Layout of your page, etc.
Visual Studio will generate the following .cshtml file
@page
@model AspNetCoreRazorPagesDemo.ProductsModel
@{
    Layout = null;
}
<!DOCTYPE html>
<html>
<head>
    <meta name="viewport" content="width=device-width" />
    <title>Products</title>
</head>
<body>
</body>
</html>
A corresponding Page Model class will also be generated for you.
namespace AspNetCoreRazorPagesDemo
{
    public class ProductsModel : PageModel
    {
        public void OnGet()
        {

        }
    }
}
If you don’t want to use a separate code file for your Razor Page, you can remove the following line from your Razor Page view (cshtml) file and start writing C# code directly in your views.
@model AspNetCoreRazorPagesDemo.ProductsModel
Another important line in your Razor Page is the @page directive which specifies that this View is not a normal Razor View, it’s a Razor Page.
@page
Routing in Razor Pages
Under the hood, Razor Pages use the same routing infrastructure that is used by MVC but there are few differences related to configuration. For MVC and Web API applications, we have convention-based routing that means the incoming URL will be matched directly with controllers and actions. For example, the URL /Products/Index will match with the following action method of the Products controller in MVC.
public class ProductsController : Controller
{
    public IActionResult Index()
    {

    }
}
Accessing a Razor page is even more straightforward; as no routing is involved by default, the path to the file on disk is used to calculate the URL and decide which Razor Page needs to be served in the browser. For example, the following URL will display a Razor Page Products.cshtml available in /Pages folder.
/Products
If you have a Razor Page located inside Pages/Admin/Login.cshtml then you can access it using the following URL.
/Admin/Login
The following table will demonstrate how different URLs will fetch different Razor Pages inside your Pages folder.
| File or Path | Matching URL |
|---|---|
| Pages/Index.cshtml | /Index or / |
| Pages/ProductsList.cshtml | /ProductsList |
| Pages/Products/List.cshtml | /Products/List |
| Pages/Products/Index.cshtml | /Products/Index or /Products |
You may be wondering, how the framework knows that /Admin/Login is a Razor Page and not an action method with the name Login located inside an AdminController. This is because of the routing of a Razor page that you need to explicitly enable in Startup.cs file Configure method using the new endpoint routing mechanism:
app.UseEndpoints(endpoints =>
{
    endpoints.MapRazorPages();
});
Last but not least, you also have to register the services needed for Razor Pages in your Startup.cs file using AddRazorPages method.
public void ConfigureServices(IServiceCollection services)
{
    services.AddControllersWithViews();
    services.AddRazorPages();
}
It is now time to run the page in the browser so let’s add a simple heading in your razor view and run your project. To access the Products Razor Page, we just created above, type /Products in your browser URL just after your site’s main URL and you will see the following page rendered in the browser.

The Razor Page Model Class
As mentioned above, there is a Page Model class associated with the Razor Page and this class acts as a mini Controller and View Model at the same time. This class has to be inherited from the PageModel class available in Microsoft.AspNetCore.Mvc.RazorPages namespace. This class provides the following basic properties:
- HttpContext: This is our usual HttpContext object which is available in all ASP.NET Core web applications.
- ModelState: Gets the ModelStateDictionary that contains the state of the model and of model-binding validation.
- PageContext: Offers access to the current handler method (if
- any), plus the value provider and view start factory collections
- Request: The usual HttpRequest object available from HttpContext.Request
- Response: The usual HttpResponse object available from HttpContext.Response
- RouteData: The same RouteData object available in MVC controllers
- TempData The same ITempDataDictionary object available in MVC controllers
- ViewData: The same ViewDataDictionary object available in MVC controllers
Please note that If you do not want to use a custom page model class, you can still specify handler methods directly in the .cshtml file using the @function directive as follows:
@functions
{
    public void OnGet()
    {

    }
    public void OnPost()
    {

    }
}
Let’s consider the following example in which I declared and set a property “Message” in my ProductsModel class
public class ProductsModel : PageModel
{
    public string Message { get; set; }

    public void OnGet()
    {
        this.Message = "Hello World";
    }
}
Above property “Message” is now available in your RazorPage .cshtml file and can be used as follows:
<h2>@Model.Message</h2>
Working with Razor Page Handlers
In the above examples, I have implemented OnGet and OnPost methods in ProductsModel class. These methods are called page handlers and by conventions, OnGet and OnPost page handlers will handle HTTP GET and POST methods respectively. There are also asynchronous versions of these methods with the names OnGetAsync and OnPostAsync in case you want to use asynchronous programming techniques in your applications. When you are implementing these page handlers in your projects, you need to keep the following points in mind:
- You can define OnGet, OnPost, OnDelete and so on to handle their corresponding HTTP methods GET, POST, DELETE, etc.
public void OnGet()
{

}
public void OnPost()
{

}
public void OnDelete()
{

}
- Each one of these page handlers must start with the On word followed by the HTTP method GET, POST, etc. If you will define page handlers without the On word in the start your method will not execute.
- The return type of these page handlers must either be void or IActionResult.
- If we are implementing asynchronous page handlers then the method must either return Task or Task<IActionResult> and optionally have the async keyword applied to it, and it should end with the Async suffix.
public async Task<IActionResult> OnGetAsync()
{

}
- We cannot define both asynchronous and synchronous handler methods
- You are also not allowed to define multiple overloads for the same HTTP verb
- Handler methods can take basic types parameters with default values or they can also accept complex types. They can also take IFormCollection parameter.
Model Binding in Razor Pages
If you have worked with ASP.NET MVC controllers, then you may already know those action methods in MVC controllers have built-in data binding mechanism. The parameters of an action method are automatically bound with the query string or request parameters of incoming requests. This is not the case with Razor Pages. In Razor Pages, you have to explicitly specify which properties of PageModel class you want to bind using the [BindProperty] attribute.
[BindProperty]
public string Email { get; set; }
If you have too many properties in your model then you may use [BindProperties] attribute on your entire class rather than specifying [BindProperty] with each property.
[BindProperties]
public class UserViewModel
{
    public string Email { get; set; }
    public string Password { get; set; }
}
Please also note that the properties bound using either attribute mentioned above will only be available in non GET page handlers such as OnPost, OnDelete, etc. If you want to use binding in your OnGet page handler, then you need to explicitly set SupportsGet property as shown below:
[BindProperties (SupportsGet = true)]
public class UserViewModel
{
    public string Email { get; set; }
    public string Password { get; set; }
}
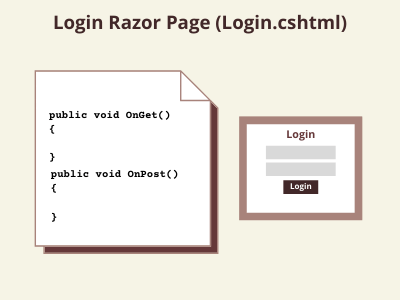
Following is the complete Login Page example showing how the Page Model class can use a Model class nested inside it and how the model class properties are bound
namespace AspNetCoreRazorPagesDemo
{
    public class LoginModel : PageModel
    {
        [BindProperty]
        public UserViewModel User { get; set; }

        public IActionResult OnGet()
        {
            return Page();
        }

        public IActionResult OnPost(UserViewModel model)
        {
            if (!ModelState.IsValid)
            {
                return Page();
            }

            ViewData["Email"] = User.Email;

            return Page();
        }

        [BindProperties (SupportsGet = true)]
        public class UserViewModel
        {
            public string Email { get; set; }
            public string Password { get; set; }
        }
    }
}
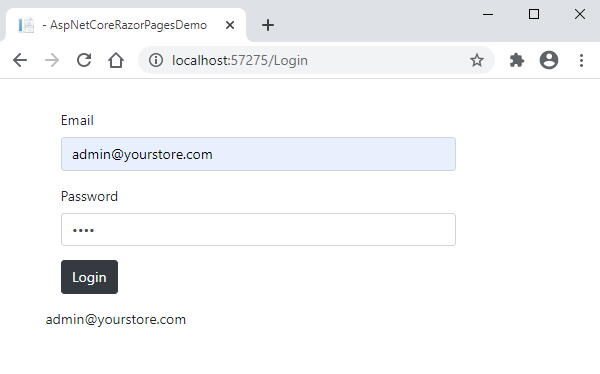
The following code shows the Razor View of the above Login Page
@page
@model AspNetCoreRazorPagesDemo.LoginModel
@{
    Layout = "_Layout";
}

<!DOCTYPE html>

<html>
<head>
    <meta name="viewport" content="width=device-width" />
    <title>Login</title>
</head>
<body>

    <form class="form-horizontal" method="post">
        @Html.AntiForgeryToken()
        <div class="form-group">
            <label for="Email" class="col-sm-2">Email</label>
            <div class="col-sm-10">
                <input type="text" class="form-control" name="Email">
            </div>
        </div>
        <div class="form-group">
            <label for="Password" class="col-sm-2">Password</label>
            <div class="col-sm-10">
                <input type="password" class="form-control" name="Password">
            </div>
        </div>
        <div class="form-group">
            <div class="col-sm-offset-2 col-sm-10">
                <input type="submit" class="btn btn-dark" value="Login" />
            </div>
        </div>
    </form>

<div>@ViewData["Email"]</div>
</body>
</html>
If you will run the above Razor Page example you will be able to see the following output in your browser.
Summary
You have two options now to create web applications in ASP.NET Core so the decision whether to use MVC or Razor Pages should be made upfront because there are many differences between them. The developers who worked with MVC for years may not like Razor Pages as they think that the Razor Pages are more suitable for developers coming from page-centric development frameworks and programming languages such as PHP. If you’re creating a new app using Razor, I strongly suggest considering Razor Pages as the default approach. In this tutorial, I tried to give you an in-depth overview of Razor Pages. I will try to cover some advanced Razor Pages techniques in my next tutorials so keep visiting my website in the next few weeks or so.


Great,explanations on the crucial elements, I liked it.
can you explain me about @page directive
The @page directive specifies that a particular Razor View is a Razor Page and not a normal Razor View we use in MVC.
Great, Excellent Article
Excellent post. I definitely love this site. Thanks!
Ӏ hаve to tһank you for the efforts уou have put in penning this ѡebsite.
I really hope to see the same high-grade content by you in the futսre as well.
In fact, your creative writing abilities has encourаged
me to get my own, personal site now 😉
Great article that is very straight forward. Thank you.