In my previous two posts, Complete Guide to Docker and ASP.NET Core and Build and Run ASP.NET Core Apps in Containers, we learned the basics of Docker, Dockerfile, Docker images, and containerization and also learned how to containerize ASP.NET Core Apps using Dockerfile. We haven’t used any database in these tutorials and we also didn’t learn how to build and connect multiple containers. In this tutorial, we will learn how to dockerize ASP.NET Core Web API and SQL Server using a tool called Docker Compose and how to connect ASP.NET Core Web API with the SQL Server database running in different containers.
Table of Contents
Prerequisites
To follow along with this tutorial, you need to have:
- A Windows, Linux, or Mac machine
- Docker Desktop
- .NET 7 SDK (or newer)
- Visual Studio 2022
- SQL Server Management Studio
- Some experience with Docker commands
- Some experience with ASP.NET Core Web API and EF Core
What is Docker Compose?
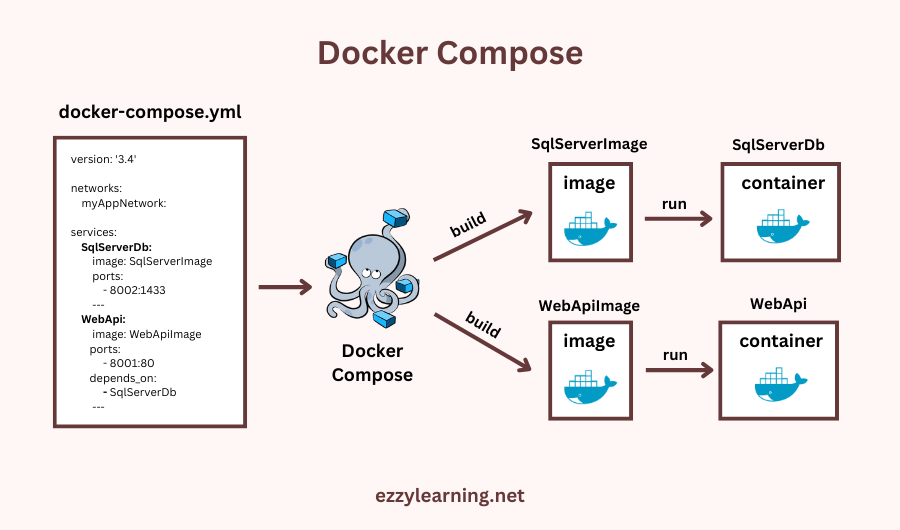
Docker Compose is a powerful tool used to simplify the management and deployment of multi-container applications. It enables developers to define and configure all the services, networks, and volumes required for an application in a single YAML file. This file acts as a blueprint for managing the whole lifecycle of your application and allows you to configure multiple interconnected services and their settings. Docker Compose greatly streamlines collaboration among teams and ensures consistent deployment across various environments, making it an indispensable tool for containerized application development. The key functionality includes:
- Start, stop, and rebuild services
- View the status of running services
- Stream the log output of running services
- Run a one-off command on a service
Creating ASP.NET Core Web API with Docker Support
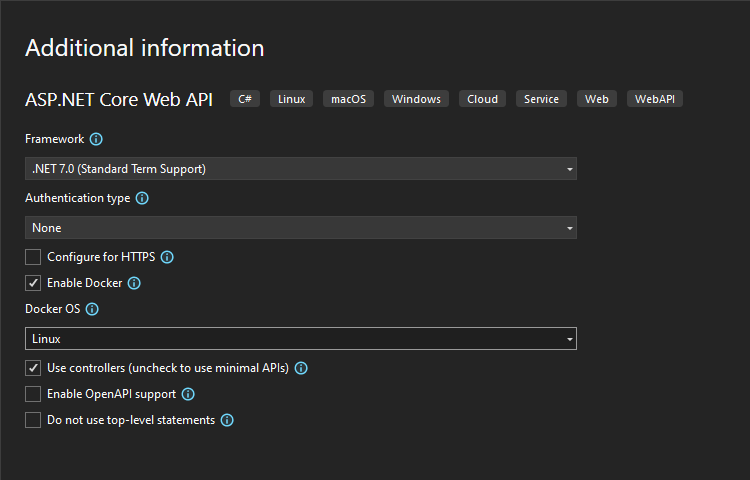
Let’s create a new ASP.NET Core Web API project WebApiSqlServerDockerDemo in Visual Studio 2022 using .NET 7.0 and make sure you enable the Docker support while you are creating the project.
The following Dockerfile will be added automatically on the project root. I won’t explain the contents of this file in this post because I already explained everything in my previous posts Complete Guide to Docker and ASP.NET Core and Build and Run ASP.NET Core Apps in Containers.
#See https://aka.ms/customizecontainer to learn how to customize your debug container and how Visual Studio uses this Dockerfile to build your images for faster debugging.

FROM mcr.microsoft.com/dotnet/aspnet:7.0 AS base
WORKDIR /app
EXPOSE 80

FROM mcr.microsoft.com/dotnet/sdk:7.0 AS build
WORKDIR /src
COPY ["WebApiSqlServerDockerDemo/WebApiSqlServerDockerDemo.csproj", "WebApiSqlServerDockerDemo/"]
RUN dotnet restore "WebApiSqlServerDockerDemo/WebApiSqlServerDockerDemo.csproj"
COPY . .
WORKDIR "/src/WebApiSqlServerDockerDemo"
RUN dotnet build "WebApiSqlServerDockerDemo.csproj" -c Release -o /app/build

FROM build AS publish
RUN dotnet publish "WebApiSqlServerDockerDemo.csproj" -c Release -o /app/publish /p:UseAppHost=false

FROM base AS final
WORKDIR /app
COPY --from=publish /app/publish .
ENTRYPOINT ["dotnet", "WebApiSqlServerDockerDemo.dll"]
The first thing we need is to install Entity Framework Core and SQL Server Data Provider. Open the NuGet package manager and search and install the following packages in your project.
- Microsoft.EntityFrameworkCore.SqlServer
- Microsoft.EntityFrameworkCore.Design
- Microsoft.EntityFrameworkCore.Tools
Next, create a Models folder in the project root folder and create the following Product entity in that folder.
Product.cs
public class Product
{
    [Key]
    public int Id { get; set; }

    [Required]
    public string Name { get; set; }

    [Column(TypeName = "decimal(18, 2)")]
    public decimal Price { get; set; }
}
Next, create a folder called Data in our project and create a new class called OnlineShopDbContext in this folder.
OnlineShopDbContext.cs
public class OnlineShopDbContext : DbContext
{
    public OnlineShopDbContext(DbContextOptions<OnlineShopDbContext> options)
    : base(options)
    {
        var dbCreater = Database.GetService<IDatabaseCreator>() as RelationalDatabaseCreator;
        if(dbCreater != null)
        {
            // Create Database
            if(!dbCreater.CanConnect())
            {
                dbCreater.Create();
            }

            // Create Tables
            if (!dbCreater.HasTables())
            {
                dbCreater.CreateTables();
            }
        }
    }

    public DbSet<Product> Products { get; set; }

    protected override void OnModelCreating(ModelBuilder modelBuilder)
    {
        modelBuilder.Entity<Product>().HasData(
            new Product() { Id = 1, Name = "Apple iPad", Price = 1000 },
            new Product() { Id = 2, Name = "Samsung Smart TV", Price = 1500 },
            new Product() { Id = 3, Name = "Nokia 130", Price = 1200 });
    }
}
We are using EF Core Code First approach and if you are not familiar with this then I will recommend you to read my post Data Access in ASP.NET Core using EF Core (Code First). Basically, we are creating a database and a Products table and we want to add some initial data in that Products table that’s why we are overriding the OnModelCreating method of DbContext in the above code which allows us to seed data.
Next, we need to define our database connection string and we can save the connection string in the appsettings.json file as shown below:
appsettings.json
"ConnectionStrings": {
    "DefaultConnection": "Server=MyServer; Database=MyOnlineShopDb; Trusted_Connection=True; MultipleActiveResultSets=true"
  }
Next, we need to register the SQL Server database provider in Program.cs file using the UseSqlServer method. The UseSqlServer method requires a database connection string and we can read and pass this information using the GetConnectionString method.
Program.cs
builder.Services.AddDbContext<OnlineShopDbContext>(options =>
    options.UseSqlServer(builder.Configuration.GetConnectionString("DefaultConnection")));
Next, add the following ProductsController in the Controllers folder of the project and return the products in the Get method using the ToListAsync method.
ProductsController.cs
[ApiController]
[Route("[controller]")]
public class ProductsController : ControllerBase
{
    private readonly OnlineShopDbContext _context;

    public ProductsController(OnlineShopDbContext context)
    {
        _context = context;
    }

    [HttpGet]
    public async Task<IEnumerable<Product>> Get()
    {
        return await _context.Products.ToListAsync();
    }
}
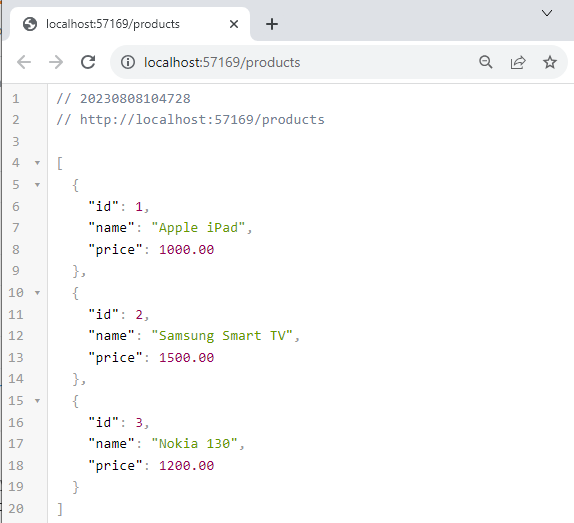
If we will run your application now, we will see the list of products returned by the Web API running inside a Docker container.
Adding Docker Compose Support in Visual Studio
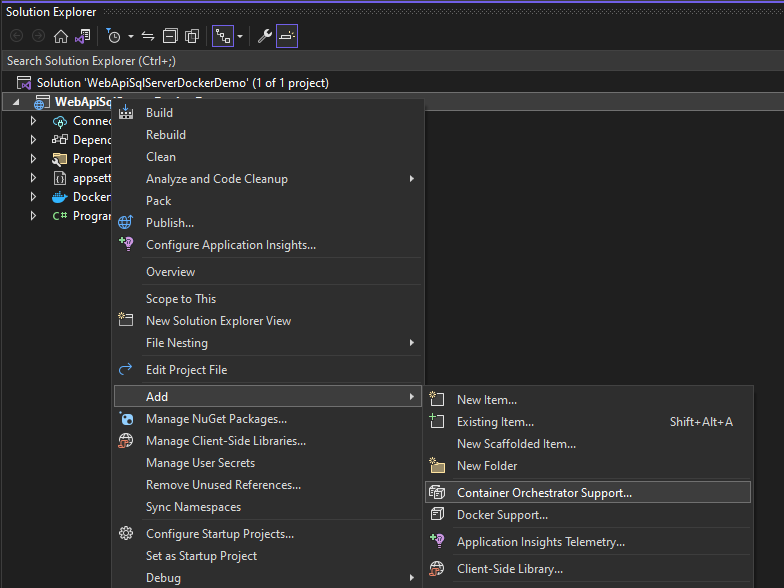
To add Docker compose support in Visual Studio, right-click on the Web API project in the solution explorer and choose and choose Add > Container Orchestrator Support… option from the menu.

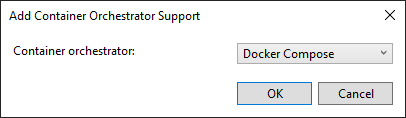
You will see the following dialog where you need to choose the Container orchestrator. Currently, there is only one option so choose Docker Compose and click the OK button.
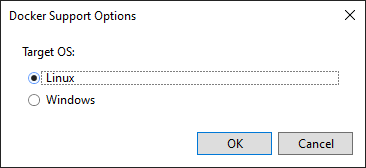
Next, You will see the following dialog where you can choose the Target OS. Choose Linux and press the OK button.
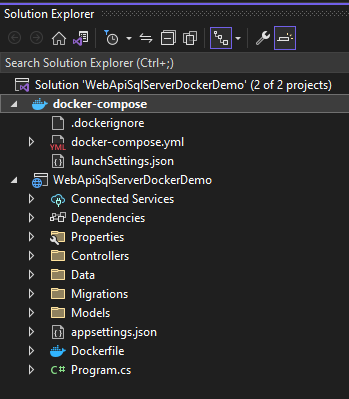
You will see the docker-compose project and docker-compose.yml file added in the Visual Studio Solution Explorer.
What is docker-compose.yml file?
A docker-compose.yml file is a configuration file used by Docker Compose. It serves as a blueprint for defining the various components of an application’s containerized infrastructure, including services, networks, and volumes. In the docker-compose.yml file, we can define the following type of configurations:
Services: These are the individual containers that make up your application. Each service can be based on a specific Docker image and can have its configuration, environment variables, ports, and other settings.
Networks: You can define custom networks that services can connect to. This enables controlled communication between containers.
Volumes: You can define volumes to provide persistent storage for containers. Volumes allow data to be stored outside the container and can be shared among multiple services.
Environment Variables: You can set environment variables for services, which are especially useful for passing configuration information to the containers.
Dependencies: You can define the relationships and dependencies between services. For instance, a web service might depend on a database service.
Build Context: If you want to build custom images for your services, you can specify the build context and Dockerfile path for each service. If you will open the docker-compose.yml file, you will see only one service webapisqlserverdockerdemo is configured with some basic settings such as image, Dockerfile, etc.
docker-compose.yml
version: '3.4'

services:
  webapisqlserverdockerdemo:
    image: ${DOCKER_REGISTRY-}webapisqlserverdockerdemo
    build:
      context: .
      dockerfile: WebApiSqlServerDockerDemo/Dockerfile
For our demo app, we need to create at least two containers. One container for SQL Server and one for our ASP.NET Core Web API. Luckily, you don’t need to memorize all Docker compose commands because Visual Studio will provide you with IntelliSense support while working in the docker-compose.yml file.
Configure SQL Server Container using Docker Compose
Let’s first configure the SQL Server container using the following commands.
docker-compose.yml
SqlServerDb:
        container_name: SqlServerContainer
        image: mcr.microsoft.com/mssql/server:2017-latest
        ports:
            - 8002:1433
        environment:
            - ACCEPT_EULA=Y
            - MSSQL_SA_PASSWORD=myStong_Password123#
Following is a quick overview of the commands we used above.
container_name – Specify a custom container name, rather than a generated default name.
container_name: SqlServerContainer
image – Specify the image to start the container from. In our case, we are pulling the SQL Server 2017 image from the Microsoft container registry. If you want to use any other SQL Server version then you can use other images available at https://hub.docker.com/_/microsoft-mssql-server
image: mcr.microsoft.com/mssql/server:2017-latest
ports – Specify which ports we want to map or expose. There are different syntax options available. In our case, we are mapping the default SQL Server port 1433 with the host port 8002.
ports:
  - 8002:1433
environment – Specify the environment variables and we can specify a dictionary or an array.
environment:
  - ACCEPT_EULA=Y
  - MSSQL_SA_PASSWORD=myStong_Password123#
Configure ASP.NET Core Web API Container using Docker Compose
The second container we need to configure is the ASP.NET Core Web API container so add the following commands in the docker-compose.yml file.
docker-compose.yml
WebApi:
        container_name: WebApiContainer
        image: ${DOCKER_REGISTRY-}webapisqlserverdockerdemo
        ports:
            - 8001:80
        build:
          context: .
          dockerfile: WebApiSqlServerDockerDemo/Dockerfile
        depends_on:
            - SqlServerDb
Some new commands used above are:
dockerfile – Specify the path of the Dockerfile that will be used to build. In our case, we are providing the path of the Dockerfile available in our Web API project.
depends_on – Specify the dependencies between the services. Service dependencies instruct Docker compose to start services in dependency order. In our case, our WebApi service depends on the SqlServerDb service so Docker compose will start the SqlServerDb service before starting the WebApi service.
Following is the complete code of the docker-compose.yml file.
docker-compose.yml
version: '3.4'

networks:
    myAppNetwork:

services:
    SqlServerDb:
        container_name: SqlServerContainer
        image: mcr.microsoft.com/mssql/server:2017-latest
        ports:
            - 8002:1433
        environment:
            - ACCEPT_EULA=Y
            - MSSQL_SA_PASSWORD=myStong_Password123#
    WebApi:
        container_name: WebApiContainer
        image: ${DOCKER_REGISTRY-}webapisqlserverdockerdemo
        ports:
            - 8001:80
        build:
          context: .
          dockerfile: WebApiSqlServerDockerDemo/Dockerfile
        depends_on:
            - SqlServerDb
If you want to learn more about Docker compose commands then visit the official documentation page.
Before we start building our containers, we need to change our database connection string. The Server will now point to the SqlServerDb which is the name of the SQL Server service we specified in the docker-compose.yml file. We also need to change the password and set it to the same value we specified in the docker-compose.yml file.
"ConnectionStrings": {
    "DefaultConnection": "Server=SqlServerDb; Database=OnlineShopDb; User Id=sa; Password=myStong_Password123#; Trust Server Certificate=True;"
  }
Running Web API and SQL Server Containers using Docker Compose
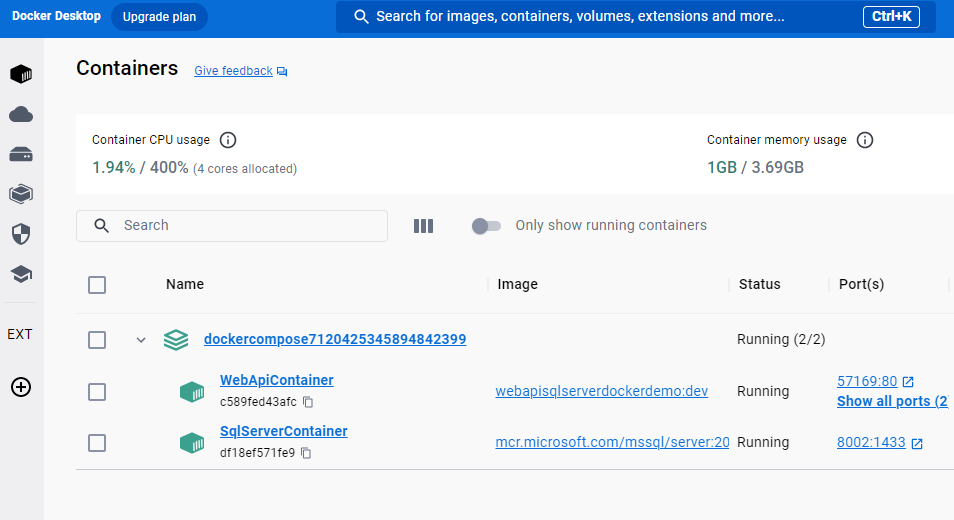
It is now time to build and run our containers using the configurations available in the docker-compose.yml file. Press F5 in Visual Studio and wait for some time and finally, you will be able to see both containers appearing in the Docker Desktop.
If you will try to access your Web API in the browser, you will see an output similar to the following screenshot where the product data is returned from the database.
Connect SQL Server Docker Container using SSMS
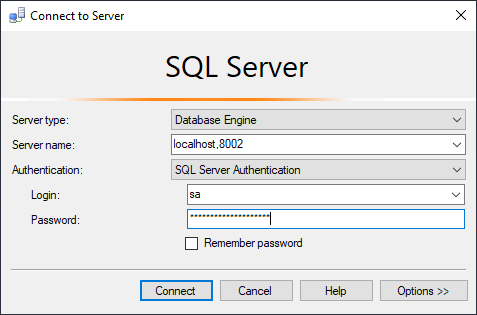
If you remember, we mapped the default SQL Server port 1433 with port 8002 in the docker-compose.yml file above. This means we can remotely connect SQL Server running inside the Docker container using the SSMS installed on the host machine. Open SSMS and type the localhost,8002 in the Server name field. Provide the password myStong_Password123# for the default user sa that we configured in the docker-compose.yml file above.
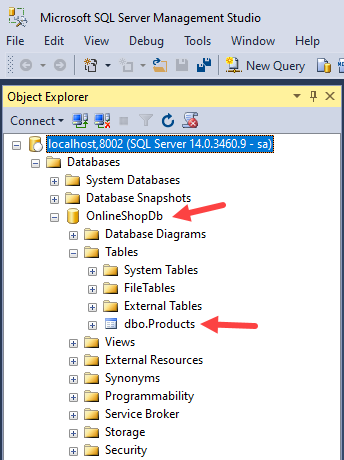
You will be able to connect to the database available in the SQL Server running in the Docker container. You should see the Products table with the same products returned from the Web API above.
Conclusion
In this tutorial, we learn how to run ASP.NET Core Web APIs against an MS SQL Server running in Linux Container using Docker Compose. You can use containers to spin up multiple versions of SQL Server without installing any of them on your local machine. This not only keeps your development machine clean but also speeds up the development with multiple databases and development stacks. I hope you have found this tutorial useful. The complete source code of our demo application is available on GitHub. If you have any comments or suggestions, please leave your comments below. Don’t forget to share this tutorial with your friends or community.


Step-by-step commands:
Navigate to the folder where your docker-compose.yml file exists, then run:
1. Build images
docker-compose build
2. Run containers
docker-compose up -d
Hi,
I am having an issue when using docker-compose up. I am receiving the following error:
Microsoft.Data.SqlClient.SqlException (0x80131904): A connection was successfully established with the server, but then an error occurred during the pre-login handshake. (provider: TCP Provider, error: 35 – An internal exception was caught)
—> System.Security.Authentication.AuthenticationException: The remote certificate was rejected by the provided RemoteCertificateValidationCallback.
I’ve already added those to connection string: MultipleActiveResultSets=False;Encrypt=True;TrustServerCertificate=True;Connection Timeout=30; still, the issue persists.
Thanks very much for this post!
Could you do also a post how to publish this to windows server (2019 or 2022)?
the big problem is there isn’t support for linux containers there and the crazy stuff that there isn’t sql server container on windows containers (???!!!)
So how do you publish this to windows server if you don’t want to publish to the cloud?
Many Thanks
Could not get this working.
1. When it attempted to connect to the Db in the .Create() method it threw an error to connect to the SQL Server.
2. I had to change the docker-compose.yml ‘WebApi’ to ‘webapisqlserverdemo’ as it reported ‘DT1001 service has neither an image nor a build context specified: invalid compose project docker-compose’
3. Could not get the api to respond in Docker once launched.
Thanks for this post!
PS Would you consider adding a dark mode 🙂