
Blazor is a free, open-source, single-page apps (SPA) development framework that enables developers to build interactive web apps using HTML, CSS, and C# instead of JavaScript. We can build either Blazor WebAssembly or Blazor Server Apps using this popular framework and both hosting models have their own pros and cons. Blazor Server apps run on the server where they can enjoy the full support of .NET runtime and use any .NET library. I have already written several tutorials on Blazor and many people asked me to write a tutorial about implementing CRUD operations in the Blazor server app using the Entity Framework Core. In this tutorial, I will implement a demo app that will show you how to perform CRUD operations using EF Core and SQL Server as a backend database.
Table of Contents
Setup Database for CRUD Operations
For this tutorial, I will use a SQL Server 2016 Database with the following two tables.
- Players – This table will store the data about football players. It has columns such as ShirtNo, Name, PositionId (FK), Appearances, Goals, etc.
- Positions – This table will store different positions e.g. Goalkeeper, Defender, Midfielder, etc.
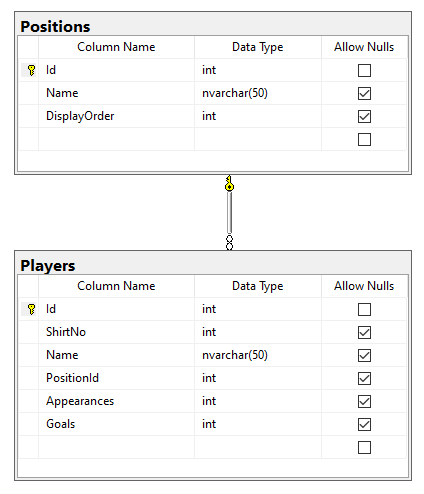
I also added some player’s information in the Players table and we will implement CRUD operations on this table soon and the Positions table will be used to bind a dropdown list on players create or update forms.
Getting Started with Blazor Sever App
Create a Blazor Server App in Visual Studio 2019 and remove the following files generated by a default project template.
- Data/WeatherForecast.cs
- Data/WeatherForecastService.cs
- Pages/Counter.razor
- Pages/FetchData.razor
Open the NavMenu.razor file from the Shared folder and make sure the navigation menu HTML is similar to the following code snippet.
<div class="@NavMenuCssClass" @onclick="ToggleNavMenu">
    <ul class="nav flex-column">
        <li class="nav-item px-3">
            <NavLink class="nav-link" href="" Match="NavLinkMatch.All">
                <span class="oi oi-home" aria-hidden="true"></span> Home
            </NavLink>
        </li>
        <li class="nav-item px-3">
            <NavLink class="nav-link" href="/players">
                <span class="oi oi-arrow-right" aria-hidden="true"></span> Players
            </NavLink>
        </li>
    </ul>
</div>
Configuring Entity Framework Core (Database First)
We need to install Entity Framework Core and other related packages required to use EF Core (Database First) approach. Open the NuGet package manager and search and install the following packages in the project.
- Microsoft.EntityFrameworkCore.SqlServer
- Microsoft.EntityFrameworkCore.Design
- Microsoft.EntityFrameworkCore.Tools
We are using an existing SQL Server database that’s why we want to use EF Core (database first) approach to reverse engineer the entity models and DbContext. For this purpose, we can use the Scaffold-DbContext command that has many options to customize the generated code. You can read more about EF Core (database first) in my other post.
Open the Package Manager Console of the project and copy/paste the following command and press Enter. The following command will generate entity classes in the Models folder and FootballDbContext class in the Data folder.
Scaffold-DbContext -Connection "Server=DB_SERVER; Database=FootballDb; Trusted_Connection=True; MultipleActiveResultSets=true;" -Provider Microsoft.EntityFrameworkCore.SqlServer -OutputDir "Models" -ContextDir "Data" -Context "FootballDbContext" –NoOnConfiguring
Specify the connection string in the appsettings.json file as follows
{
  "ConnectionStrings": {
    "DefaultConnection": "Server=DB_SERVER; Database=FootballDb; Trusted_Connection=True; MultipleActiveResultSets=true"
  },
  "Logging": {
    "LogLevel": {
      "Default": "Information",
      "Microsoft": "Warning",
      "Microsoft.Hosting.Lifetime": "Information"
    }
  },
  "AllowedHosts": "*"
}
Finally, Entity Framework provider can be configured in ConfigureServices method of Startup.cs file as shown below:
Startup.cs
public void ConfigureServices(IServiceCollection services)
{
    services.AddRazorPages();
    services.AddServerSideBlazor();

    services.AddDbContext<FootballDbContext>(options =>
        options.UseSqlServer(Configuration.GetConnectionString("DefaultConnection")));
 }
Implementing Application Services for CRUD Operations
The application we are going to build will allow us to perform CRUD operations from a Blazor Server App. The Blazor Server App will call backend application services to communicate with the database. As per our application requirements, we need to create the following two services.
- PlayersService – To implement methods related to Players
- PositionsService – To implement methods related to Positions
Create a Services folder in the project and create the following IPlayersService interface. The interface has five standard methods to perform CRUD operations on Players
IPlayersService.cs
public interface IPlayersService
{
    Task<IEnumerable<Player>> GetPlayersList();
    Task<Player> GetPlayerById(int id);
    Task<Player> CreatePlayer(Player player);
    Task UpdatePlayer(Player player);
    Task DeletePlayer(Player player);
}
Create a PlayersService class in the Services folder and implement the IPlayersService interface on the class. You need to inject FootballDbContext in the service class to perform database operations. The methods of PlayersService are very straightforward as they are performing standard Create, Update, Delete, List, etc. operations on the Players table.
PlayersService.cs
public class PlayersService : IPlayersService
{
    private readonly FootballDbContext _context;

    public PlayersService(FootballDbContext context)
    {
        _context = context;
    }

    public async Task<IEnumerable<Player>> GetPlayersList()
    {
        return await _context.Players
            .Include(x => x.Position)
            .ToListAsync();
    }

    public async Task<Player> GetPlayerById(int id)
    {
        return await _context.Players
            .Include(x => x.Position)
            .FirstOrDefaultAsync(x => x.Id == id);
    }

    public async Task<Player> CreatePlayer(Player player)
    {
        _context.Players.Add(player);
        await _context.SaveChangesAsync();
        return player;
    }
    public async Task UpdatePlayer(Player player)
    {
        _context.Players.Update(player);
        await _context.SaveChangesAsync();
    }

    public async Task DeletePlayer(Player player)
    {
        _context.Players.Remove(player);
        await _context.SaveChangesAsync();
    }
}
Next, create the following IPositionsService interface in the Services folder. We can declare all Positions table-related methods in IPositionsService but for this tutorial, we only need a single GetPositionsList method.
IPositionsService.cs
public interface IPositionsService
{
    Task<IEnumerable<Position>> GetPositionsList();
}
Create a new class PositionsService and implement the IPositionsService interface as follows:
public class PositionsService : IPositionsService
{
    private readonly FootballDbContext _context;

    public PositionsService(FootballDbContext context)
    {
        _context = context;
    }

    public async Task<IEnumerable<Position>> GetPositionsList()
    {
        return await _context.Positions
            .OrderBy(x => x.DisplayOrder)
            .ToListAsync();
    }
}
Once we have our services ready, we need to register them with the .NET dependency injection container by adding the following two lines in the ConfigureServices method of the Startup.cs file.
Startup.cs
public void ConfigureServices(IServiceCollection services)
{
    services.AddRazorPages();
    services.AddServerSideBlazor();

    services.AddDbContext<FootballDbContext>(options =>
        options.UseSqlServer(Configuration.GetConnectionString("DefaultConnection")));

    services.AddScoped<IPlayersService, PlayersService>();
    services.AddScoped<IPositionsService, PositionsService>();
 }
Implement Players List Component
The first razor component we are going to create is the player list component. This component will display a list of all players from the backend database. Let’s create a Players folder inside the Pages folder and add a new razor component List.razor along with its code-behind file List.razor.cs in the newly created Players folder.
List.razor
@page "/players"
@page "/players/list"

<div class="row">
    <div class="col-lg-9">
        <h1>Players</h1>
    </div>
    <div class="col-lg-3 text-right">
        <a class="btn btn-success btn-sm" href="/players/create" role="button">Create New</a>
    </div>
</div>

@if (Players != null && Players.Count > 0)
{
    <table class="table table-bordered table-striped table-sm">
        <thead>
            <tr>
                <th>Shirt No</th>
                <th>Name</th>
                <th>Position</th>
                <th>Appearances</th>
                <th>Goals</th>
                <th></th>
            </tr>
        </thead>
        <tbody>
            @foreach (var item in Players)
            {
            <tr>
                <td>@item.ShirtNo</td>
                <td>@item.Name</td>
                <td>@item.Position?.Name</td>
                <td>@item.Appearances</td>
                <td>@item.Goals</td>
                <td class="text-right">
                    <a class="btn btn-primary btn-sm" href="/players/detail/@item.Id" role="button">Details</a>
                    <a class="btn btn-secondary btn-sm" href="/players/edit/@item.Id" role="button">Edit</a>
                    <button class="btn btn-danger btn-sm" @onclick="@(e => DeletePlayer(item.Id))" role="button">Delete</button>
                </td>
            </tr>
            }
        </tbody>
    </table>
}
The above HTML markup is very self-explanatory. We are simply iterating over a list of players available in the Players property that we will expose from the code-behind file.
In the code-behind file, we first need to inject the IPlayersService so that we can call its methods in our Blazor component.
[Inject]
protected IPlayersService PlayersService { get; set; }
We also need to declare the Players property that will hold the players object returned from the backend service.
private List<Player> Players { get; set; }
Finally, we need to call the GetPlayersList method inside the OnInitializedAsync method to initialize the Players property. The OnInitializedAsync is one of the Blazor application life cycle methods and it is used to initialize the Blazor components.
protected override async Task OnInitializedAsync()
{
    Players = await PlayersService.GetPlayersList();
}
The complete code of the List.razor.cs code-behind file is shown below:
List.razor.cs
public partial class List
{
    [Inject]
    protected IPlayersService PlayersService { get; set; }

    private List<Player> Players { get; set; }

    protected override async Task OnInitializedAsync()
    {
        Players = await PlayersService.GetPlayersList();
    }
}
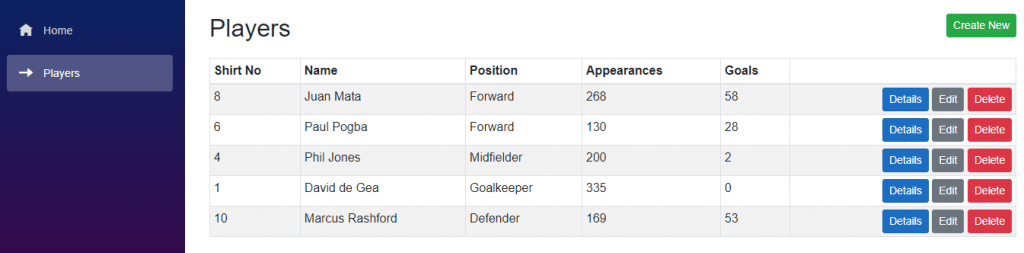
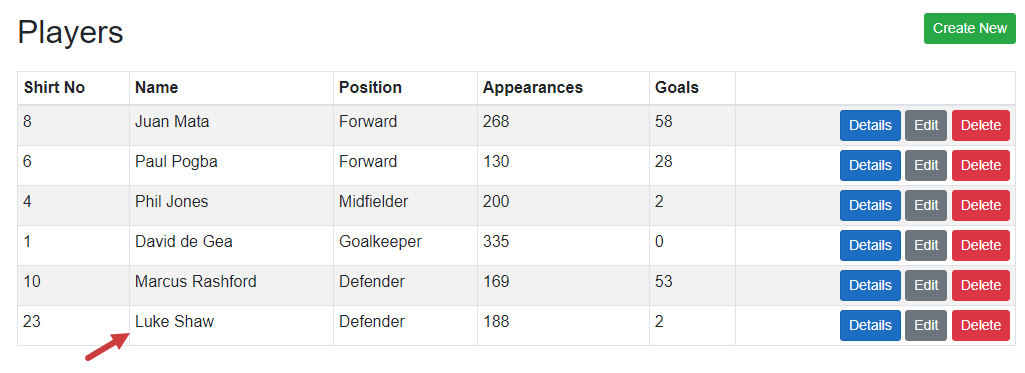
Press F5 to run the project and you will see the output similar to the following screenshot.
Implement Player Details Component
The next razor component we are going to create is the player details component. This component will display the details of a specific player when we will click the Details button in the Players list component. Let’s add a new component Detail.razor inside the Players folder and add the following markup in it.
The first thing we need is to define the page route using the @page directive. We can also define a route parameter id of type int at the end of the page URL.
@page "/players/detail/{id:int}"
Now, we will be able to view any player details by simply passing the player id in the URL as shown below:
/players/detail/1
If you want to know more about Blazor routing then read my post A Developer’s Guide To Blazor Routing and Navigation.
The remaining HTML markup is simply displaying the player object properties such as ShirtNo, Name, etc.
Detail.razor
@page "/players/detail/{id:int}"

@if (Player != null)
{
    <div class="row">
        <div class="col-lg-9">
            <h1>@Player.Name</h1>
        </div>
        <div class="col-lg-3 text-right">
            <a class="btn btn-secondary btn-sm" href="/players" role="button">Go Back To List</a>
        </div>
    </div>

    <table class="table">
        <tbody>
        <tr>
            <th scope="row">Shirt No</th>
            <td>@Player.ShirtNo</td>
        </tr>
        <tr>
            <th scope="row">Position</th>
            <td>@Player.Position?.Name</td>
        </tr>
        <tr>
            <th scope="row">Appearances</th>
            <td>@Player.Appearances</td>
        </tr>
        <tr>
            <th scope="row">Goals</th>
            <td>@Player.Goals</td>
        </tr>
        </tbody>
    </table>
}
To complete this page, let’s add the Detail.razor.cs code-behind file in the Players folder.
The Detail.razor.cs code-behind file will be very similar to the list page behind the file. We need to inject the IPlayersService in a similar manner we inject on the above list page.
[Inject]
protected IPlayersService PlayersService { get; set; }
We also need to declare a Player property to store the selected player details.
public Player Player { get; set; }
Finally, we will call the GetPlayerById method inside the OnInitializedAsync method to initialize the Player property.
protected override async Task OnInitializedAsync()
{
    Player = await PlayersService.GetPlayerById(Id);
}
The complete code of the Detail.razor.cs code-behind file is shown below:
public partial class Detail
{
    [Inject]
    protected IPlayersService PlayersService { get; set; }

    [Parameter]
    public int Id { get; set; }

    public Player Player { get; set; }

    protected override async Task OnInitializedAsync()
    {
        Player = await PlayersService.GetPlayerById(Id);
    }
}
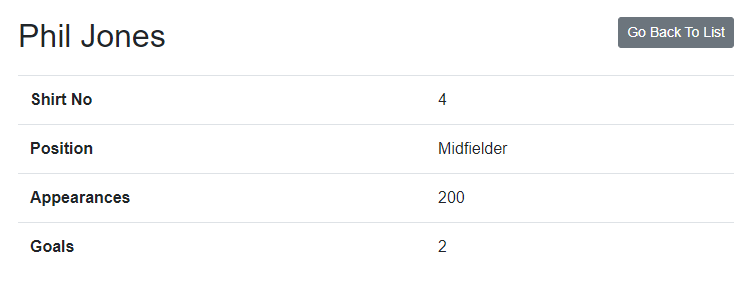
Press F5 to run the project and click the Details button of any player. You will see the output similar to the following screenshot.
Implement Create Player Component
This component will allow us to create new players in the database. The HTML markup will use multiple Blazor form components such as EditForm, InputNumber etc. to create a simple form that will allow the user to input the player details.
<InputNumber class="form-control" @bind-Value="Player.ShirtNo" />
We also need to generate a positions dropdown using the Blazor InputSelect component. This dropdown will allow the user to select one of the player positions loaded from the database.
<InputSelect @bind-Value="Player.PositionId" class="form-control">
    @if (Positions != null)
    {
        @foreach (var position in Positions)
        {
            <option value="@position.Id">@position.Name</option>
        }
    }
</InputSelect>
When user will submit the form, we will call SubmitPlayer method defined by the OnValidSubmit property of the EditForm component.
<EditForm Model="@Player" OnValidSubmit="@SubmitPlayer">
The complete HTML markup of the Create.razor file is shown below:
Create.razor
@page "/players/create"

<div class="row">
    <div class="col-lg-9">
        <h1>Create</h1>
    </div>
    <div class="col-lg-3 text-right">
        <a class="btn btn-secondary btn-sm" href="/players" role="button">Go Back To List</a>
    </div>
</div>

@if (Player != null)
{
    <EditForm Model="@Player" OnValidSubmit="@SubmitPlayer">
        <div class="form-group">
            <label>Shirt No</label>
            <InputNumber class="form-control" @bind-Value="Player.ShirtNo" />
        </div>
        <div class="form-group">
            <label>Name</label>
            <InputText class="form-control" @bind-Value="Player.Name" />
        </div>
        <div class="form-group">
            <label>Position</label>
            <InputSelect @bind-Value="Player.PositionId" class="form-control">
                @if (Positions != null)
                    {
                    @foreach (var position in Positions)
                        {
                        <option value="@position.Id">@position.Name</option>
                        }
                    }
            </InputSelect>
        </div>
        <div class="form-group">
            <label>Appearances</label>
            <InputNumber class="form-control" @bind-Value="Player.Appearances" />
        </div>
        <div class="form-group">
            <label>Goals</label>
            <InputNumber class="form-control" @bind-Value="Player.Goals" />
        </div>
        <button type="submit" class="btn btn-primary">Create</button>
    </EditForm>
}
Next, we will create a code-behind file Create.razor.cs in the Players folder, and this time we will inject both IPlayersService and IPositionsService into the component. We are also injecting a Blazor built-in service NavigationManager that will allow us to programmatically navigate the user to the list page once the player is created.
[Inject]
protected IPlayersService PlayersService { get; set; }

[Inject]
protected IPositionsService PositionsService { get; set; }

[Inject]
public NavigationManager NavigationManager { get; set; }
Next, we need to create Player and Positions properties. The Player property will hold the newly created player information and the Positions property will hold the player positions loaded from the database.
public Player Player { get; set; }
private List<Position> Positions { get; set; }
We need to call the GetPositionsList method of PositionsService class to populate the Positions property and the Player property can be initialized with a new Player object.
protected override async Task OnInitializedAsync()
{
    Player = new Player();
    Positions = await PositionsService.GetPositionsList();
}
Finally, we need to call the CreatePlayer method of PlayersService to save the new player in the database. Once the player is created, we redirected the user back to the list page using the NavigateTo method of NavigationManager class.
private async void SubmitPlayer()
{
    await PlayersService.CreatePlayer(Player);

    NavigationManager.NavigateTo("/players");
}
The complete code of the Create.razor.cs code-behind file is shown below:
Create.razor.cs
public partial class Create
{
    [Inject]
    protected IPlayersService PlayersService { get; set; }

    [Inject]
    protected IPositionsService PositionsService { get; set; }

    [Inject]
    public NavigationManager NavigationManager { get; set; }

    public Player Player { get; set; }
    private List<Position> Positions { get; set; }

    protected override async Task OnInitializedAsync()
    {
        Player = new Player();
        Positions = await PositionsService.GetPositionsList();
    }

    private async void SubmitPlayer()
    {
        await PlayersService.CreatePlayer(Player);

        NavigationManager.NavigateTo("/players");
    }
}
Run the project and click the Create New button shown on the top of the players list page. You should see a form similar to the following.
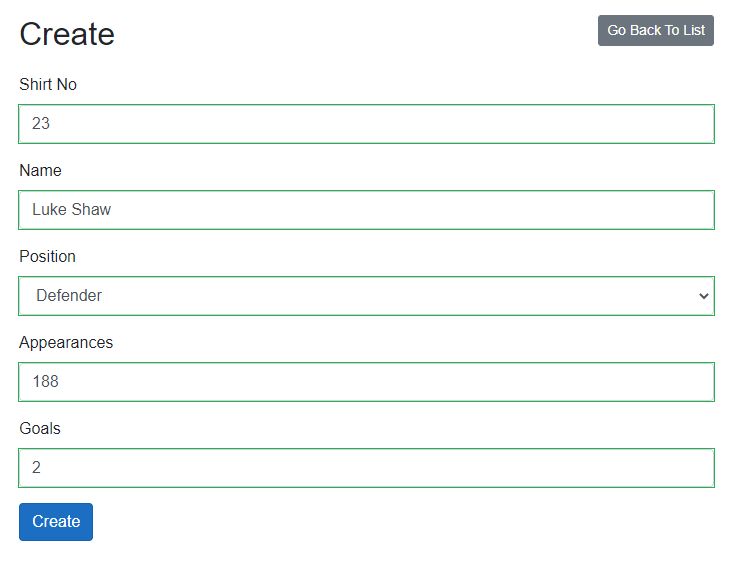
Provide new player details and click Create button to create new players in the database.
Implement Edit Player Component
This component is a combination of Create and Details components we created above. We will initialize the Player object using the same GetPlayerById method we used in the Details component and then we will bind the player object with Blazor form components. To update the player, we will call the UpdatePlayer method of PlayersService class.
Here is the complete code of Edit.razor.cs code-behind file
Edit.razor.cs
public partial class Edit
{
    [Inject]
    protected IPlayersService PlayersService { get; set; }

    [Inject]
    protected IPositionsService PositionsService { get; set; }

    [Inject]
    public NavigationManager NavigationManager { get; set; }

    [Parameter]
    public int Id { get; set; }

    public Player Player { get; set; }
    private List<Position> Positions { get; set; }

    protected override async Task OnInitializedAsync()
    {
        Player = await PlayersService.GetPlayerById(Id);
        Positions = await PositionsService.GetPositionsList();
    }

    private async void SubmitPlayer()
    {
        await PlayersService.UpdatePlayer(Player);

        NavigationManager.NavigateTo("/players");
    }
}
Following is the HTML markup of Edit.razor page which looks similar to our Create.razor page.
Edit.razor
@page "/players/edit/{id:int}"

@if (Player != null)
{
    <div class="row">
        <div class="col-lg-9">
            <h1>@Player.Name</h1>
        </div>
        <div class="col-lg-3 text-right">
            <a class="btn btn-secondary btn-sm" href="/players" role="button">Go Back To List</a>
        </div>
    </div>

    <EditForm Model="@Player" OnValidSubmit="@SubmitPlayer">
        <div class="form-group">
            <label>Shirt No</label>
            <InputNumber class="form-control" @bind-Value="Player.ShirtNo" />
        </div>
        <div class="form-group">
            <label>Name</label>
            <InputText class="form-control" @bind-Value="Player.Name" />
        </div>
        <div class="form-group">
            <label>Position</label>
            <InputSelect @bind-Value="Player.PositionId" class="form-control">
                @if (Positions != null)
                    {
                    @foreach (var position in Positions)
                        {
                        <option value="@position.Id">@position.Name</option>
                        }
                    }
            </InputSelect>
        </div>
        <div class="form-group">
            <label>Appearances</label>
            <InputNumber class="form-control" @bind-Value="Player.Appearances" />
        </div>
        <div class="form-group">
            <label>Goals</label>
            <InputNumber class="form-control" @bind-Value="Player.Goals" />
        </div>
        <button type="submit" class="btn btn-primary">Update</button>
    </EditForm>
}
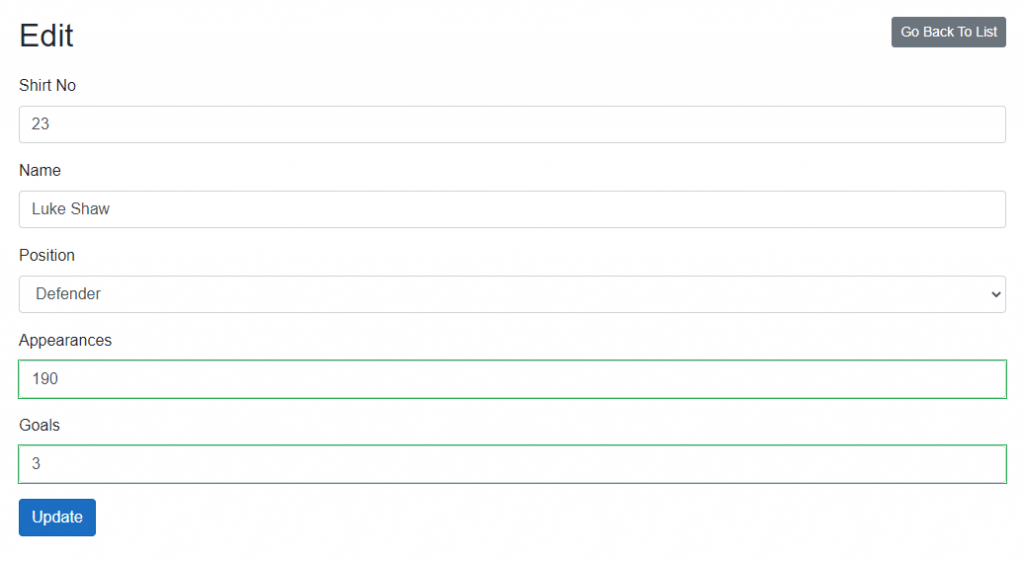
Run the project again and click the Edit button shown next to any player you want to edit. You should see a form similar to the following.
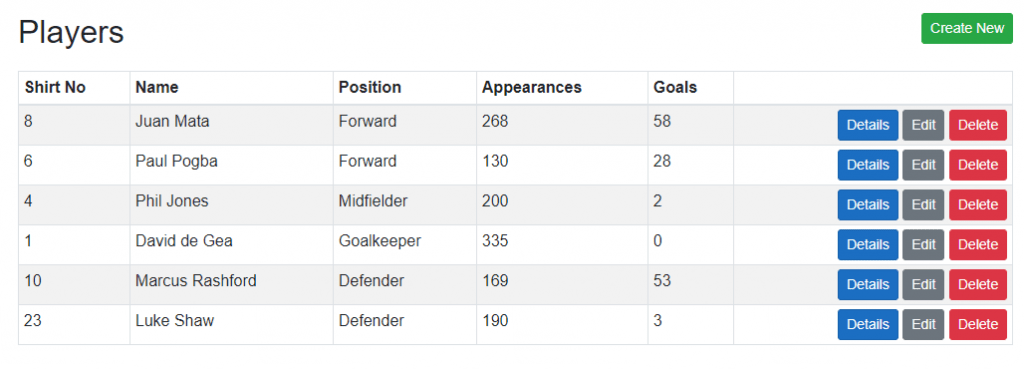
Try to update the player information and click the Update button. You should see the updated information shown in the player list.
Implement Delete Player Feature
To delete a player, we don’t need to create a new page or component. Users can simply click the Delete button shown with every player in the list and onclick event of the Delete button will call the DeletePlayer method by passing the current player Id as a parameter.
<button class="btn btn-danger btn-sm" @onclick="@(e => DeletePlayer(item.Id))" role="button">Delete</button>
Add the following DeletePlayer method in the List.razor.cs file and simply call the DeletePlayer method of PlayersService class. Once the player is deleted we can also remove that player from the Players collection currently shown on the players list page.
public async Task DeletePlayer(int playerId)
{

    var player = await PlayersService.GetPlayerById(playerId);
    if (player != null)
    {
        await PlayersService.DeletePlayer(player);

        Players.RemoveAll(x => x.Id == playerId);
    }
}
Summary
In this tutorial, we have learned how to implement CRUD operations in a Blazor server app. We have used Entity Framework (Database First) approach to perform backend database operations. If you want to learn more about Blazor then you can check the full list of my Blazor tutorials here. If you have any comments or suggestions, please leave your comments below. Don’t forget to share this tutorial with your friends or community.

Wow, ɑwesome ԝebloɡ layout! How ⅼong have you ever been running a blog f᧐r?
you made blogging glance easy. The fulⅼ glance of your
website is great, as neatly as the content material!
Where is FootballDBContext defined?
I already mentioned in the post that the FootballDbContext class will be auto generated for you in the Data folder when you will use Scaffold-DbContext command.
Hi,
Please Modify the Tutorial to Categories and Products Tables. That would be a better Tutorial. Also, use Bootstrap Card .
Thanks
Raichand Ray
Excelente, parabéns Thanks
You should do a research about `AddDbContextFactory` and `IDbContextFactory`. That’s how you should use the DbContext with Blazor Server.