
Most .NET developers use Entity Framework to connect their applications with the database because it makes them productive instantly and increases the development speed. The problems with Entity Framework are that it takes the control away from developers, decreases the performance of your queries, and forces the development teams to learn something different than traditional SQL. This is why the developers start to explore other options and one of the best options they have is Dapper ORM. In this tutorial, I will give you an overview of Dapper ORM and I will show you how to implement the CRUD operations in ASP.NET Core using Dapper ORM and Repository Pattern.
Table of Contents
What is Dapper ORM?
Dapper is a simple object-relational mapper library for .NET developers that not only allow them to map relational database tables with .NET objects but also allow them to execute direct SQL queries in the database. It gives developers a lot of flexibility as they can use tables, stored procedures, and views directly in their .NET code. It is also easy to learn because most developers already have basic knowledge of SQL and they don’t need to learn concepts like lazy loading, entity tracking, etc. The Dapper biggest advantage is its performance and this is why it owns the title of King of Micro ORM.
Dapper extends the IDbConnection by providing useful extension methods to query your database. The most common steps required to use Dapper in .NET applications are following:
- We create an IDbConnection object.
- We write either SQL queries or Stored Procedures to perform CRUD operations.
- We pass parameters to execute queries or Stored Procedures.
Overview of Dapper Methods
Dapper extends the IDbConnection interface and provides the following useful methods
| Method | Description |
| Query QueryAsync | These extension methods execute a query and map the results. |
| QueryFirst QueryFirstAsync | These extension methods execute a query and map the first result. |
| QueryFirstOrDefault QueryFirstOrDefaultAsync | These extension methods execute a query and map the first result, or a default value if the sequence contains no elements. |
| QuerySingle QuerySingleAsync | These extension methods execute a query and map the first result and throw an exception if there is not exactly one element in the sequence. |
| QuerySingleOrDefault QuerySingleOrDefaultAsync | These extension methods execute a query and map the first result, or a default value if the sequence is empty; this method throws an exception if there is more than one element in the sequence. |
| QueryMultiple QueyMultipleAsync | These extension methods execute multiple queries within the same command and map results. |
| Execute ExecuteAsync | These extension methods execute a command one or multiple times and return the number of affected rows. This method is usually used to execute INSERT, UPDATE, DELETE statements or Stored Procedures. |
Let’s see few basic examples of some of the methods shown in the above table.
To query a Customers table in the database and to map the database rows with the list of Customer class objects, you can use the Query method as shown below.
string sql = "SELECT TOP 10 * FROM Customers";

using (var connection = new SqlConnection(“ConnectionString”))
{
    var customers = connection.Query<Customer>(sql).ToList();
}
To update the Name of a Customer with Id 399, you can use the Execute method as shown below.
string sql = "UPDATE Customers SET Name = @Name WHERE Id = @Id";

using (var connection = new SqlConnection(“ConnectionString”))
{
    var parameters = new DynamicParameters();
    parameters.Add("@Name", “Peter”, DbType.String);
    parameters.Add("@Id", 399, DbType.Int32);

    connection.Execute(sql, parameters);
}
Getting Started with ASP.NET Core CRUD Application
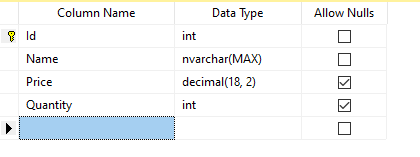
Create a new project in Visual Studio 2019 using ASP.NET Core 5 MVC Web Application template. To perform CRUD operations, we will use the following Products table which I created in SQL Server 2016 database named OnlineShopDb. The Products table has an Id column which is the primary key of the table and some other basic columns to store the products related information.
To connect our web application with the SQL Server database, we need to add the following connection string in the appsettings.json file.
appsettings.json
{
  "ConnectionStrings": {
    "DefaultConnection": "Server=MyDbServer; Database=OnlineShopDb; Trusted_Connection=True; MultipleActiveResultSets=true"
  },
  "Logging": {
    "LogLevel": {
      "Default": "Information",
      "Microsoft": "Warning",
      "Microsoft.Hosting.Lifetime": "Information"
    }
  },
  "AllowedHosts": "*"
}
Creating Domain Entities
Domain entities represent domain objects and they are primarily defined by their identity (means they have an Id property), continuity, and persistence over time, and not by the attributes that comprise them. In domain drive design, these domain entities are generally the first natural place where we can place some business logic.
Create a Domain folder in the project and create the following BaseEntity class in it. This class will act as the base entity of all domain entities of the project.
BaseEntity.cs
public abstract class BaseEntity
{

}
Next, we need to create our first domain entity class called Product. You can see that the properties of the domain entity are mapped with the Products table we created above. Each object of the Product entity will represent a single product and can be used to perform CRUD operations using an ORM such as Dapper.
Product.cs
public class Product : BaseEntity
{
    public int Id { get; set; }
    public string Name { get; set; }
    public decimal? Price { get; set; }
    public int? Quantity { get; set; }
}
Implement Data Layer using Repository Pattern and Dapper ORM
We are now ready to write our project’s data layer but before that, we need to install the following NuGet packages in our project.
Create the Repositories folder in the project and add the following IRepository<T> interface in the folder. This interface can be implemented by any class that wants to perform CRUD operations on the entity objects passed as type T.
public interface IRepository<T> where T : BaseEntity
{
    Task<List<T>> GetAllAsync();
    Task<T> GetByIdAsync(int id);
    Task<int> CreateAsync(T entity);
    Task<int> UpdateAsync(T entity);
    Task<int> DeleteAsync(T entity);
}
Next, create the following BaseRepository class that will allow us to group the common methods needed by all the repositories. One such method is the CreateConnection method that creates and returns a new instance of IDbConnection.
BaseRepository.cs
public abstract class BaseRepository
{
    private readonly IConfiguration _configuration;

    protected BaseRepository(IConfiguration configuration)
    {
        _configuration = configuration;
    }

    protected IDbConnection CreateConnection()
    {
        return new SqlConnection(_configuration.GetConnectionString("DefaultConnection"));
    }
}
We can now create a repository interface for each domain entity in the project. In this project, we already created a Product domain entity so let’s create the following IProductRepository interface that will inherit from the IRepository<T> interface and will pass the Product entity as the T type. This interface is currently empty but we can create more product-related methods e.g. GetBestSellingProducts, GetMostExpensiveProducts, etc. in this interface as per our business requirements.
IProductRepository.cs
public interface IProductRepository : IRepository<Product>
{
}
Finally, we need to create a ProductRepository class that will provide the implementation of all the methods available in IProductRepository and IRepository<T> interfaces.
ProductRepository.cs
public class ProductRepository : BaseRepository, IProductRepository
{
        public ProductRepository(IConfiguration configuration)
            : base(configuration)
        { }

        public Task<List<Product>> GetAllAsync()
        {
            throw new NotImplementedException();
        }

        public Task<Product> GetByIdAsync(int id)
        {
            throw new NotImplementedException();
        }

        public Task<int> CreateAsync(Product entity)
        {
            throw new NotImplementedException();
        }

        public Task<int> UpdateAsync(Product entity)
        {
            throw new NotImplementedException();
        }

        public Task<int> DeleteAsync(Product entity)
        {
            throw new NotImplementedException();
        }
}
The first method we will define is GetAllAsync that will simply run a SELECT query in the database and will return all the products from the Products table. We will use the QueryAsync method of the Dapper ORM library to map each product row with the object of the Product entity.
public async Task<List<Product>> GetAllAsync()
{
    try
    {
        var query = "SELECT * FROM Products";
        using (var connection = CreateConnection())
        {
            return (await connection.QueryAsync<Product>(query)).ToList();
        }
    }
    catch (Exception ex)
    {
        throw new Exception(ex.Message, ex);
    }
}
In case, you don’t like writing the raw SQL queries in C# code, you can also use stored procedures. Let’s create the following stored procedure in the SQL Server database that will run the same SELECT query we have written in the above method.
SET ANSI_NULLS ON
GO
SET QUOTED_IDENTIFIER ON
GO
CREATE PROCEDURE spGetAllProducts

AS
BEGIN
	SET NOCOUNT ON;

	SELECT *
	FROM Products

END
GO
Now we can call the above procedure using the same QueryAsync method. We just need to pass the stored procedure name as a parameter in the QueryAsync method.
public async Task<List<Product>> GetAllAsync()
{
    try
    {
        var procedure = "spGetAllProducts";
        using (var connection = CreateConnection())
        {
            return (await connection.QueryAsync<Product>(procedure)).ToList();
        }
    }
    catch (Exception ex)
    {
        throw new Exception(ex.Message, ex);
    }
}
The next method we need to define is GetByIdAsync and this method accepts a parameter id and returns the Product whose Id matches with the id parameter value. We are using the QueryFirstOrDefaultAsync method of Dapper ORM and also using DynamicParamaters class to pass parameters to the QueryFirstOrDefaultAsync method.
public async Task<Product> GetByIdAsync(int id)
{
    try
    {
        var query = "SELECT * FROM Products WHERE Id = @Id";

        var parameters = new DynamicParameters();
        parameters.Add("Id", id, DbType.Int32);

        using (var connection = CreateConnection())
        {
            return (await connection.QueryFirstOrDefaultAsync<Product>(query, parameters));
        }
    }
    catch (Exception ex)
    {
        throw new Exception(ex.Message, ex);
    }
}
Next, we need to define the CreateAsync method to create new products in the database. This method will use the ExecuteAsync method of Dapper ORM to execute the SQL INSERT statement. The project information such as Name, Quantity, Price is passed in the form of DynamicParameters collection.
public async Task<int> CreateAsync(Product entity)
{
    try
    {
        var query = "INSERT INTO Products (Name, Price, Quantity) VALUES (@Name, @Price, @Quantity)";

        var parameters = new DynamicParameters();
        parameters.Add("Name", entity.Name, DbType.String);
        parameters.Add("Price", entity.Price, DbType.Decimal);
        parameters.Add("Quantity", entity.Quantity, DbType.Int32);

        using (var connection = CreateConnection())
        {
            return (await connection.ExecuteAsync(query, parameters));
        }
    }
    catch (Exception ex)
    {
        throw new Exception(ex.Message, ex);
    }
}
The UpdateAsync method is very similar to the CreateAsync method but this method runs SQL UPDATE statement to update products in the database.
public async Task<int> UpdateAsync(Product entity)
{
    try
    {
        var query = "UPDATE Products SET Name = @Name, Price = @Price, Quantity = @Quantity WHERE Id = @Id";

        var parameters = new DynamicParameters();
        parameters.Add("Name", entity.Name, DbType.String);
        parameters.Add("Price", entity.Price, DbType.Decimal);
        parameters.Add("Quantity", entity.Quantity, DbType.Int32);
        parameters.Add("Id", entity.Id, DbType.Int32);

        using (var connection = CreateConnection())
        {
            return (await connection.ExecuteAsync(query, parameters));
        }
    }
    catch (Exception ex)
    {
        throw new Exception(ex.Message, ex);
    }
}
To complete our ProductRepository class, the final method we need to define is the DeleteAsync method. This method runs SQL DELETE statement to delete a single product from the database.
public async Task<int> DeleteAsync(Product entity)
{
    try
    {
        var query = "DELETE FROM Products WHERE Id = @Id";

        var parameters = new DynamicParameters();
        parameters.Add("Id", entity.Id, DbType.Int32);

        using (var connection = CreateConnection())
        {
            return (await connection.ExecuteAsync(query, parameters));
        }
    }
    catch (Exception ex)
    {
        throw new Exception(ex.Message, ex);
    }
}
Implementing Application Services
We can directly call ProductRepository methods in our ASP.NET Core Web Application but it is always good practice to create an application services layer between your web application and repositories. This application service layer allows us to define all the business logics which you can’t define in repositories that contain data access logic in them.
Create a Services folder in the project and define the following IProductService interface. The methods declared in the IProductService interface are self-explanatory because they provide similar functionality which we implemented in our ProductRepository class above.
IProductService.cs
public interface IProductService
{
    public Task<List<Product>> GetAllProducts();
    public Task<Product> GetProductById(int id);
    public Task<int> CreateProductAsync(Product product);
    public Task<int> UpdateProductAsync(Product product);
    public Task<int> DeleteProductAsync(Product product);
}
Next, create the following ProductService class and implement the above IProductService interface. We are injecting the instance of the IProductRepository interface in the constructor of the ProductService class using the Dependency Injection feature available in .NET Core. The methods defined in ProductService are very straightforward. They are simply calling the corresponding method of ProductRepository class.
ProductService.cs
public class ProductService : IProductService
{
    private readonly IProductRepository _productRepository;

    public ProductService(IProductRepository productRepository)
    {
        _productRepository = productRepository;
    }

    public async Task<List<Product>> GetAllProducts()
    {
        return await _productRepository.GetAllAsync();
    }

    public async Task<Product> GetProductById(int id)
    {
        return await _productRepository.GetByIdAsync(id);
    }

    public async Task<int> CreateProductAsync(Product product)
    {
        return await _productRepository.CreateAsync(product);
    }

    public async Task<int> UpdateProductAsync(Product product)
    {
        return await _productRepository.UpdateAsync(product);
    }

    public async Task<int> DeleteProductAsync(Product product)
    {
        return await _productRepository.DeleteAsync(product);
    }
}
We also need to register our repositories and services in Startup.cs file as follows otherwise ASP.NET Core dependency container will not be able to inject these classes objects into the constructors.
Startup.cs
public void ConfigureServices(IServiceCollection services)
{
    services.AddControllersWithViews();

    services.AddScoped<IProductRepository, ProductRepository>();
    services.AddScoped<IProductService, ProductService>();
}
If you want to learn more about dependency injection you can read my article A Step by Step Guide to ASP.NET Core Dependency Injection
Implementing Products List Page
It is now time to use our service and data access layer in ASP.NET Core 5 MVC Web Application. Add a new ProductsController in the Controllers folder and inject IProductService in the constructor of the ProductsController.
ProductsController.cs
public class ProductsController : Controller
{
    private readonly IProductService _productService;

    public ProductsController(IProductService productService)
    {
        _productService = productService;
    }
}
Define the following Index action method in ProductsController and call the GetAllProducts method of IProductService interface. We already know that this method will return the list of Products from the backend and those products are then passed as a Model to our View.
public async Task<IActionResult> Index()
{
    return View(await _productService.GetAllProducts());
}
The Index.cshtml view fill will simply run a foreach loop on the Model and will generate HTML table rows showing all the products from the database.
Index.cshtml
@model IEnumerable<AspNetCoreDapperCrudDemo.Domain.Product>

@{
    ViewData["Title"] = "Index";
    Layout = "~/Views/Shared/_Layout.cshtml";
}

<div class="row">
    <div class="col">
        <h1>Products</h1>
    </div>
    <div class="col text-right">
        <a asp-action="Create" class="btn btn-success">Create New</a>
    </div>
</div>

<br/>
<table class="table">
    <thead>
        <tr>
            <th>
                @Html.DisplayNameFor(model => model.Id)
            </th>
            <th>
                @Html.DisplayNameFor(model => model.Name)
            </th>
            <th>
                @Html.DisplayNameFor(model => model.Price)
            </th>
            <th>
                @Html.DisplayNameFor(model => model.Quantity)
            </th>
            <th></th>
        </tr>
    </thead>
    <tbody>
        @foreach (var item in Model) {
            <tr>
                <td>
                    @Html.DisplayFor(modelItem => item.Id)
                </td>
                <td>
                    @Html.DisplayFor(modelItem => item.Name)
                </td>
                <td>
                    @Html.DisplayFor(modelItem => item.Price)
                </td>
                <td>
                    @Html.DisplayFor(modelItem => item.Quantity)
                </td>
                <td>
                    @Html.ActionLink("Edit", "Edit", new { id = item.Id }, new { @class = "btn btn-primary" })
                    @Html.ActionLink("Details", "Details", new { id=item.Id }, new { @class = "btn btn-secondary" })
                    @Html.ActionLink("Delete", "Delete", new { id=item.Id }, new { @class = "btn btn-danger" })
                </td>
            </tr>
        }
    </tbody>
</table>
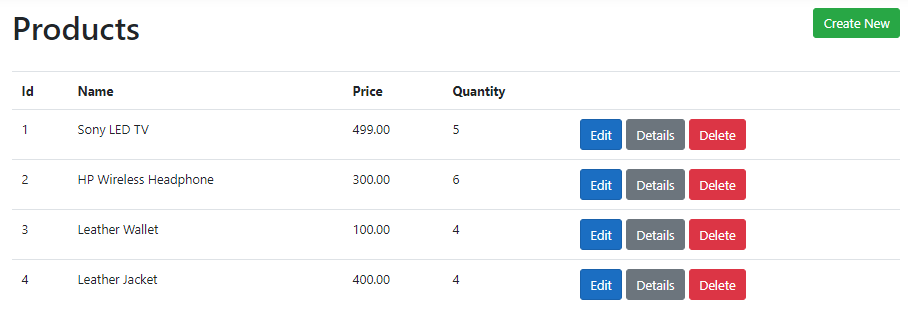
Run the project and navigate to /Products page and you should be able to see a page similar to the following screenshot. We have a Create New button on the top to create a new product. We also have Edit, Details, and Delete buttons available with every product to edit, view or delete products.
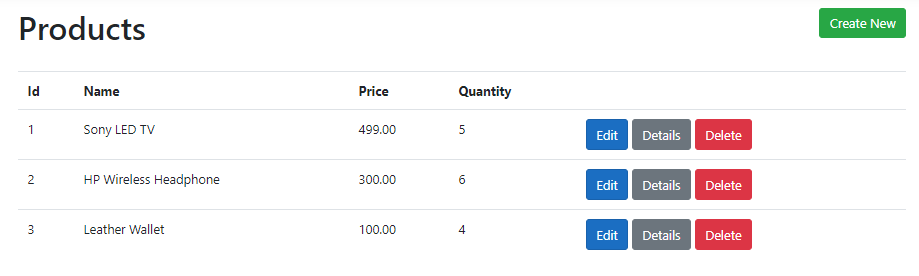
We are passing the product Id property as a route parameter to Details, Delete and Edit actions so that when user click any button we know which product we need to view, edit or delete.
@Html.ActionLink("Edit", "Edit", new { id = item.Id }, new { @class = "btn btn-primary" })
@Html.ActionLink("Details", "Details", new { id=item.Id }, new { @class = "btn btn-secondary" })
@Html.ActionLink("Delete", "Delete", new { id=item.Id }, new { @class = "btn btn-danger" })
Implementing Product Details Page
To view the details of a single product, implement the following Details action method. The method simply receives the Id of the project and then fetches the production information from the backend database using the GetProductById method.
public async Task<IActionResult> Details(int id)
{
    return View(await _productService.GetProductById(id));
}
The Details view receives the single Product as the Model and displays the product information on the page.
Details.cshtml
@model AspNetCoreDapperCrudDemo.Domain.Product

@{
    ViewData["Title"] = "Details";
    Layout = "~/Views/Shared/_Layout.cshtml";
}

<h1>@Model.Name</h1>
<hr />
<div>

    <dl class="row">
        <dt class="col-sm-2">
            @Html.DisplayNameFor(model => model.Id)
        </dt>
        <dd class="col-sm-10">
            @Html.DisplayFor(model => model.Id)
        </dd>
        <dt class="col-sm-2">
            @Html.DisplayNameFor(model => model.Name)
        </dt>
        <dd class="col-sm-10">
            @Html.DisplayFor(model => model.Name)
        </dd>
        <dt class="col-sm-2">
            @Html.DisplayNameFor(model => model.Price)
        </dt>
        <dd class="col-sm-10">
            @Html.DisplayFor(model => model.Price)
        </dd>
        <dt class="col-sm-2">
            @Html.DisplayNameFor(model => model.Quantity)
        </dt>
        <dd class="col-sm-10">
            @Html.DisplayFor(model => model.Quantity)
        </dd>
    </dl>
</div>
<div>
    @Html.ActionLink("Edit", "Edit", new { id = Model.Id }, new { @class = "btn btn-primary" })
    <a asp-action="Index" class="btn btn-secondary">Back to List</a>
</div>
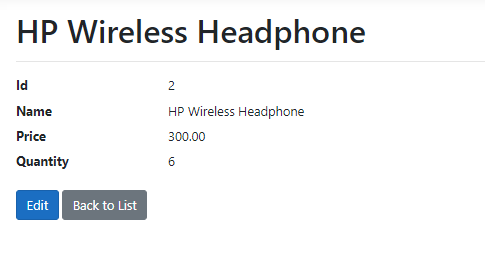
Run the project and try to click the Details button and you should be able to see the product details as shown in the following screenshot.
Implementing Create Product Page
To implement the create product page, we need two action methods. The first action method will display a form on the page to collect product information from the user.
public IActionResult Create()
{
    return View();
}
Following is the HTML view page we need to create a simple Create Product form.
Create.cshtml
@model AspNetCoreDapperCrudDemo.Domain.Product

@{
    ViewData["Title"] = "Create";
    Layout = "~/Views/Shared/_Layout.cshtml";
}

<h1>Create Product</h1>
<hr />
<div class="row">
    <div class="col-md-4">
        <form asp-action="Create" method="post">
            <div class="form-group">
                <label asp-for="Name" class="control-label"></label>
                <input asp-for="Name" class="form-control" />
                <span asp-validation-for="Name" class="text-danger"></span>
            </div>
            <div class="form-group">
                <label asp-for="Price" class="control-label"></label>
                <input asp-for="Price" class="form-control" />
                <span asp-validation-for="Price" class="text-danger"></span>
            </div>
            <div class="form-group">
                <label asp-for="Quantity" class="control-label"></label>
                <input asp-for="Quantity" class="form-control" />
                <span asp-validation-for="Quantity" class="text-danger"></span>
            </div>
            <div class="form-group">
                <input type="submit" value="Create" class="btn btn-primary" />
                <a asp-action="Index" class="btn btn-secondary">Back to List</a>
            </div>
        </form>
    </div>
</div>
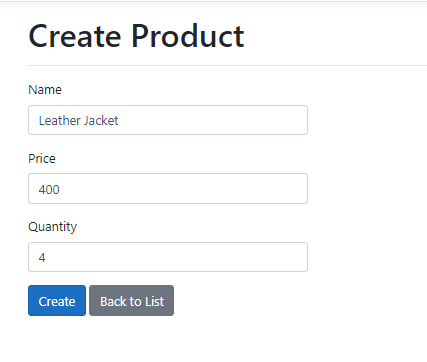
Run the product and you should see the form similar to the following.
The second Create method will handle HTTP POST requests and will be responsible to save the product details in the database. The method will call the CreateProductAsync method of the IProductService interface to send the product entity to the backend database layer.
[HttpPost]
[ValidateAntiForgeryToken]
public async Task<IActionResult> Create(Product product)
{
    try
    {
        if (ModelState.IsValid)
        {
            await _productService.CreateProductAsync(product);
            return RedirectToAction(nameof(Index));
        }
    }
    catch (Exception ex)
    {
        ModelState.AddModelError("", "Unable to save changes.");
    }
    return View(product);
}
Implementing Edit Product Page
To implement the edit product page, we once again need two action methods. The first action method will fetch the product details from the database and will send the product to view to display an edit form on the page.
public async Task<IActionResult> Edit(int id)
{
    return View(await _productService.GetProductById(id));
}
Following is the HTML view page we need to edit the product.
Edit.cshtml
@model AspNetCoreDapperCrudDemo.Domain.Product

@{
    ViewData["Title"] = "Edit";
    Layout = "~/Views/Shared/_Layout.cshtml";
}

<h1>Edit Product</h1>

<hr />
<div class="row">
    <div class="col-md-4">
        <form asp-action="Edit" method="post">
            <input asp-for="Id" class="form-control" type="hidden" />
            <div class="form-group">
                <label asp-for="Name" class="control-label"></label>
                <input asp-for="Name" class="form-control" />
                <span asp-validation-for="Name" class="text-danger"></span>
            </div>
            <div class="form-group">
                <label asp-for="Price" class="control-label"></label>
                <input asp-for="Price" class="form-control" />
                <span asp-validation-for="Price" class="text-danger"></span>
            </div>
            <div class="form-group">
                <label asp-for="Quantity" class="control-label"></label>
                <input asp-for="Quantity" class="form-control" />
                <span asp-validation-for="Quantity" class="text-danger"></span>
            </div>
            <div class="form-group">
                <input type="submit" value="Save" class="btn btn-primary" />
                <a asp-action="Index" class="btn btn-secondary">Back to List</a>
            </div>
        </form>
    </div>
</div>
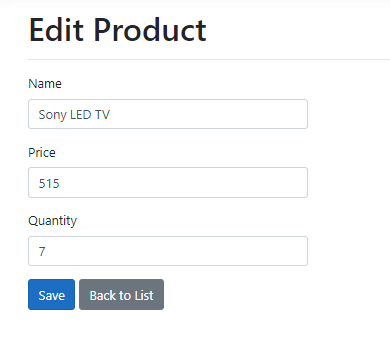
Run the project and you should be able to see the edit product page similar to the following screenshot. Try to click the Edit button next to any product and you should see the product details populated in the edit product form.
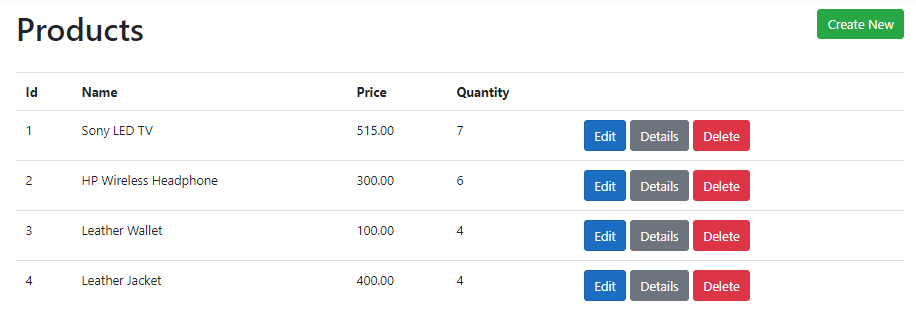
The second Edit method will handle HTTP POST requests and will be responsible to update the product details in the database. The method will call the UpdateProductAsync method of the IProductService interface to send the product entity to the backend database layer.
[HttpPost]
[ValidateAntiForgeryToken]
public async Task<IActionResult> Edit(int id, Product product)
{
    try
    {
        if (ModelState.IsValid)
        {
            var dbProduct = await _productService.GetProductById(id);
            if (await TryUpdateModelAsync<Product>(dbProduct))
            {
                await _productService.UpdateProductAsync(dbProduct);
                return RedirectToAction(nameof(Index));
            }
        }
    }
    catch (Exception ex)
    {
        ModelState.AddModelError("", "Unable to save changes.”);
    }
    return View(product);
}
Implementing Delete Product Method
The Delete action method does not require a page. It will simply fetch the product from the database and then it will call the DeleteProductAsync method of the IProductService interface to delete the project from the database.
[HttpGet]
public async Task<IActionResult> Delete(int id)
{
    try
    {
        var dbProduct = await _productService.GetProductById(id);
        if (dbProduct != null)
        {
            await _productService.DeleteProductAsync(dbProduct);
        }
    }
    catch (Exception ex)
    {
        ModelState.AddModelError("", "Unable to delete. ");
    }

    return RedirectToAction(nameof(Index));
}

Summary
In this tutorial, I tried to give you a basic overview of Dapper ORM and we learned about the different methods it provides us to perform database operations. We then learned how to use different Dapper methods to create a repository class that can perform CRUD operations on a SQL Server database. Of course, Dapper has many more features to explore and it is not possible to cover all its features in a single post. If you are interested to know more about this fastest ORM you can visit its official docs.


Thanks for sharing very helpful Articles,
Hello,
It is clearly explained. But the data doesn’t displayed. I only see started View. It is not working my Views(Index, Edit, etc). I get Ex Model get returned null.
Is it need something else, or needed any configuration?
Very well explained. But even after the whole part is done, we have a problem with “Edit” and “Delete”.
When we click “edit” and correct something, we are not allowed to save the change, but we get an error. Also, with “delete” it is not possible to delete an item, even if we have reached the end of the action, ie we have received a red delete button but it is not functional. Need a little help. Thanks
Please share the error details so that I can help.
You can also download the complete code related to this post and compare it with your code.
string sql = “SELECT TOP 10 * FROM Customers”;
using (var connection = new SqlConnection(“ConnectionString”))
{
var customers = connection.Query(sql).ToList();
}
How’s this not a SQL injection problem? The example will hardly be the case in production, it will need variables, e.g. TOP n. and more.
Examples should show SqlParameter usage.
I am using Dapper in this post and it doesn’t have the concept of SqlParameter. It supports DynamicParameters and I have already shown examples of using DynamicParameters with plain SQL and Stored Procedures in the post.
Thanks for the nice article
Excelente, parabéns Thanks
Why we need service layer ? we can’t call repository directly in controller ?
You can even call the Dapper inside your controller but that is something I will not recommend. You should keep your data and business layer separate and you should not put data access code directly inside your controllers. Service layer can also have all your business logic in it.
This is a good basic introduction to the concepts but can’t be used in real world applications.
Having to rely on unique hand written SQL for each entity is not only overly laborious but also extremely error prone. We found a better solution was to create a GenericRepository class that provides the CRUD methods for ANY subclass of (our equivalent of) the BaseEntity class. We couple that with an EntityFactory class to generate a DB acceptable new instantiation for any BaseEntity subclass and a DB parameter class to allow custom filtering of queries. We also have the ability to substitute either a view or stored proc for the table in any Read operation as long as the view/proc return a valid entity.
With this as a base, we have a rule that no developer embeds a SQL query in their code without management approval. With VERY few exceptions, in virtually every case that has come up so far we do not need the embedded SQL.
This approach works well for all but the most high volume applications. Given that we are generating web apps, that is not an issue.
We also have GenericController classes to manage all of the basic web operations. We subclass the GenericController only for custom actions on each entity type.
What about Paginations?
I will write a post on sorting, searching and pagination using Dapper ORM soon.
In our Generic implementation, we created a PageWrapper class that handles all search and pagination for ALL BaseEntity subclasses based on Attributes we defined a BaseEntityAttribute that govern which properties to include in a generic search form for any type. We use partial pages for both the paginator and the search form that can be reused in our standard cshtml template.
Nice article on Dapper Crud operations. I think Dapper is better than EF Core. What are your views on it?