
In my previous article A Step by Step Guide to In-Memory Caching in ASP.NET Core, I covered the basics of in-memory caching and I have shown you a practical example of implementing caching ASP.NET Web API. In-memory caching is only useful when your application is deployed on a single server. If you are planning to deploy your application on multiple servers in a typical web farm scenario, then you need a centralized caching solution. There are many ways you can implement distributed caching in ASP.NET Core and in this tutorial, I will talk about one of the most popular distributed cache called Redis Cache with some practical examples.
Table of Contents
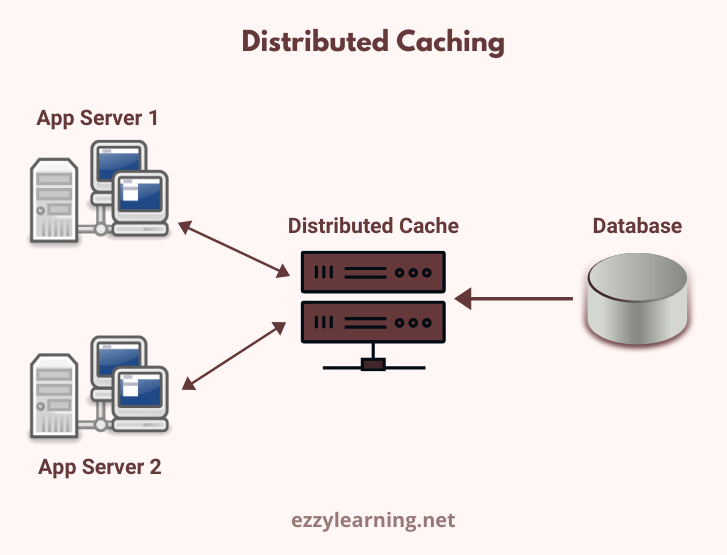
What Is Distributed Caching?
A distributed cache is a cache shared by multiple application servers. Typically, it is maintained as an external service accessible to all servers. Distributed cache improve application performance and scalability because it can provide same data to multiple servers consistently and if one server restarts or crashes, the cashed data is still available to other servers as normal.
Distributed Caching in .NET Core
To use distributed cache in ASP.NET Core, we have multiple built-in and third-party implementations to choose from. For example:
- To use a SQL Server distributed cache, we need to use the following package
Microsoft.Extensions.Caching.SqlServer - To use a Redis distributed cache, we need to use the following package
Microsoft.Extensions.Caching.StackExchangeRedis - To use NCache distributed cache, we need to use the following package NCache.Microsoft.Extensions.Caching.OpenSource
Regardless of which implementation we choose, the application always interacts with the cache using the IDistributedCache interface available in Microsoft.Extensions.Caching.Distributed. The IDistributedCache interface provides the following methods to manipulate items in the distributed cache:
- Get, GetAsync – These methods accept a string key and retrieve a cached item as a
byte[]array. - Set, SetAsync – These methods add an item (as
byte[]array) to the cache using a string key. - Refresh, RefreshAsync – These methods are used to refreshes an item in the cache based on its key, resetting its sliding expiration timeout (if any).
- Remove, RemoveAsync – These methods removes a cache item based on its string key.
What is Redis Cache?
Redis is an open-source in-memory data store, which is often used as a distributed database cache. It is written in ANSI C language and provides data structures such as strings, hashes, lists, sets, sorted sets with range queries, bitmaps, hyperloglogs, geospatial indexes, and streams. It is a blazing fast key-value based database and that’s why it is used by some of the biggest apps such as Twitter, Github, Pinterest, Snapchat, Flickr, Digg, Stackoverflow, etc. You can use Redis from most programming languages. It is such a popular and widely used cache that Microsoft Azure also provides its cloud-based version with the name Azure Cache for Redis. In this tutorial, I will not use the Azure Cache for Redis but will show you how to install and use Redis Cache on Windows.
Setting Up Redis Server On Windows
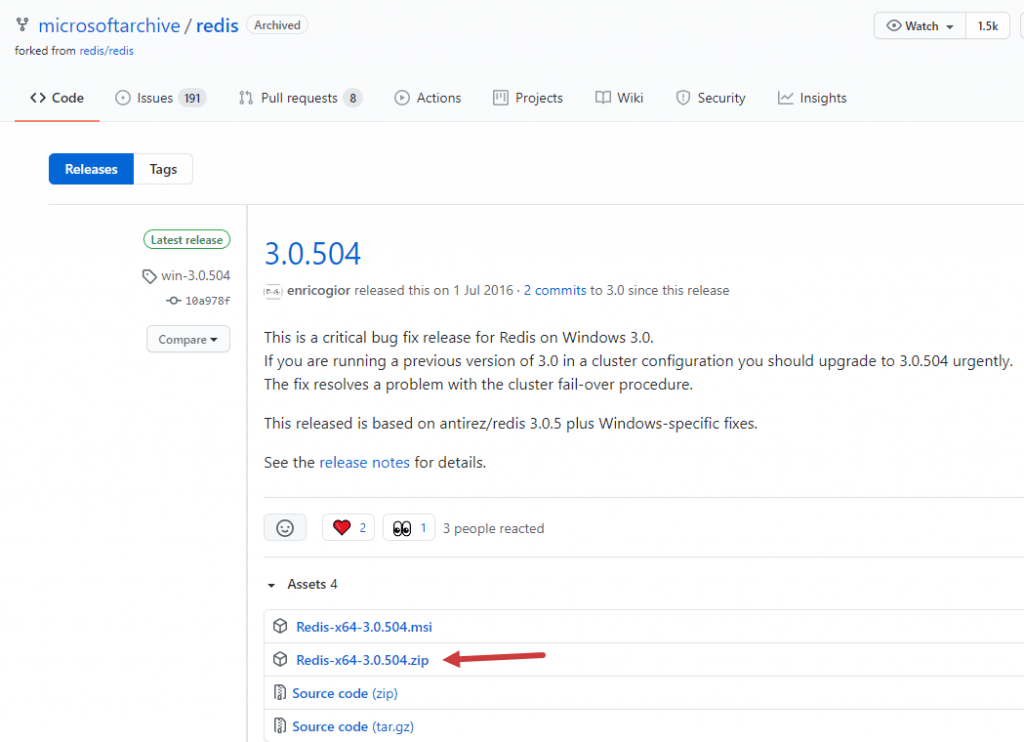
Redis has been developed and tested mostly in BSD, Linus, and OSX operating systems and unfortunately, there is no official support for the Windows based operating systems but there are some ports available that can be used to install and use Redis on Windows. Typically, a separate machine is used by developers to serve as cache memory for multiple applications. Visit the following URL to download the Redis Cache for Windows supported by Microsoft.
https://github.com/microsoftarchive/redis/releases/tag/win-3.0.504
Download the zip file from the above Github Repo and extract it anywhere on your machine.
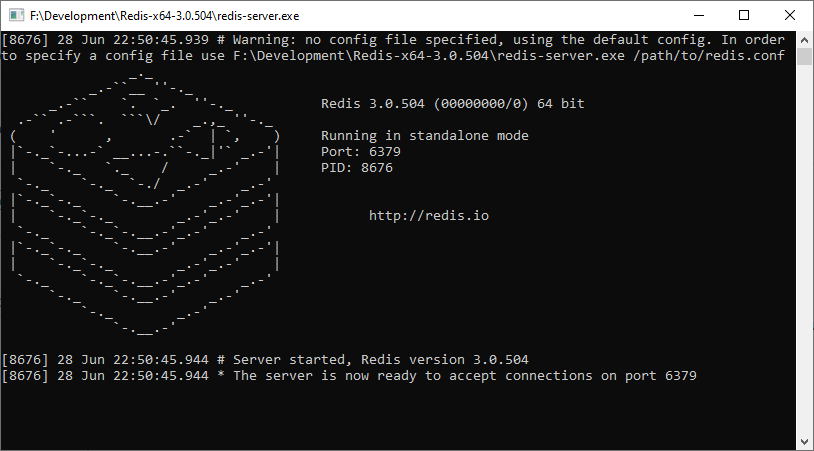
Open the folder and simply run the redis-server.exe file to start the Redis server. You will see a console window similar to the following and you need to keep this window open so that the Redis server keeps on running to serve clients.
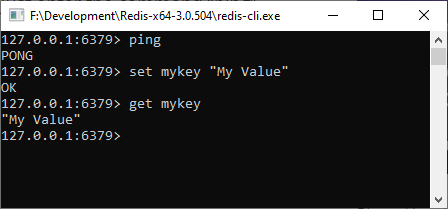
Redis also supports CLI commands and using the CLI we can easily test the cache is working fine or not. Run the Redis-cli.exe file from the same folder where you extracted the zip file.
Once you see a command window enter the command ping and you will see the word PONG in response. This is a simple test to see if the server is alive. Next, you can use the set command to set a new key-value based cache item. In the following example, I used the key mykey and the value My Value. To retrieve the cache value, we can use the get command with the cache key. A full list of CLI commands and their documentation is available here.
Setting Up an ASP.NET Core Web API
Let’s create a new ASP.NET Core 5 Web API project in Visual Studio 2019 to learn how to use Redis cache in ASP.NET Core. I will create a simple Web API that will use Entity Framework Core to query and return the products from the Microsoft AdventureWorks database. The initial version of this API will not use any caching and we will observe the time our API will take to process the request.
To connect to SQL Server database from the Web APIs, configure the database connection string in the application appsettings.json file.
appsettings.json
{
  "ConnectionStrings": {
    "DefaultConnection": "Server=DB_SERVER; Database=AdventureWorks; Trusted_Connection=True; MultipleActiveResultSets=true"
  },
  "Logging": {
    "LogLevel": {
      "Default": "Information",
      "Microsoft": "Warning",
      "Microsoft.Hosting.Lifetime": "Information"
    }
  },
  "AllowedHosts": "*"
}
Open the Package Manager Console in Visual Studio 2019 and use the following command to generate the Entity Framework DbContext and Product entity model.
Scaffold-DbContext -Connection "Server=DB_SERVER; Database= AdventureWorks; Trusted_Connection=True; MultipleActiveResultSets=true;" -Provider Microsoft.EntityFrameworkCore.SqlServer -OutputDir "Models" -ContextDir "Data" -Context "AdventureWorksDbContext" -Tables "Product"
Open the Startup.cs file and register Entity Framework Core using the AddDbContext method.
Startup.cs
public void ConfigureServices(IServiceCollection services)
{
    services.AddControllersWithViews();

    services.AddDbContext<AdventureWorksDbContext>(options =>
        options.UseSqlServer(Configuration.GetConnectionString("DefaultConnection")));
}
Create a new Web API controller with the name ProductController inside the Controllers folder. Inject the AdventureWorksDbContext in the constructor of the controller and return all products from the GetAll method.
ProductController.cs
[Route("api/[controller]")]
[ApiController]
public class ProductController : ControllerBase
{
    private readonly AdventureWorksDbContext _context;

    public ProductController(AdventureWorksDbContext context)
    {
        _context = context;
    }

    [HttpGet]
    public async Task<IActionResult> GetAll()
    {
        var products = await _context.Products.ToListAsync();

        return Ok(products);
    }
}
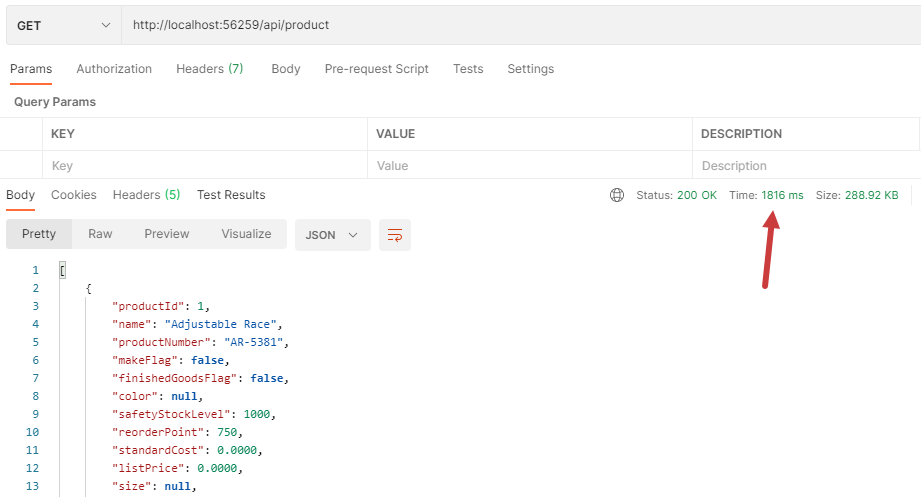
Open the Postman or any other API testing tool you use and try to query the above API and notice the time API is taking to fetch and return data from the database. The following screenshot shows that it took 1816 milliseconds when I tested the API without using any caching.
Integrating Redis Cache in ASP.NET Core
To connect and start caching data from .NET Core applications, we need to install the following package from NuGet.
Microsoft.Extensions.Caching.StackExchangeRedis
Next, we need to configure our application to support Redis cache and for this purpose, we need to call the AddStackExchangeRedisCache method in the ConfigureServices method of the Startup.cs file.
Startup.cs
public void ConfigureServices(IServiceCollection services)
{
    services.AddControllers();

    services.AddDbContext<AdventureWorksDbContext>(options =>
        options.UseSqlServer(Configuration.GetConnectionString("DefaultConnection")));

    services.AddStackExchangeRedisCache(options =>
    {
        options.Configuration = Configuration["RedisCacheServerUrl"];
    });
}
We can add the RedisCacheServerUrl setting in the appsettings.json file and the value of this setting will specify the port on which Redis Server is available to listen to client requests.
appsettings.json
{
  "RedisCacheServerUrl": "127.0.0.1:6379",
  "ConnectionStrings": {
    "DefaultConnection": "Server=DB_SERVER; Database=AdventureWorks; Trusted_Connection=True; MultipleActiveResultSets=true"
  },
  "Logging": {
    "LogLevel": {
      "Default": "Information",
      "Microsoft": "Warning",
      "Microsoft.Hosting.Lifetime": "Information"
    }
  },
  "AllowedHosts": "*"
}
Once the Redis server settings are configured, we are allowed to inject the IDistributedCache interface in our services and controllers. The following is the updated code of our ProductController in which I first injected the IDistributedCache in the constructor and then used GetAsync and SetAsync methods to get and set the products list in the cache.
ProductController.cs
[Route("api/[controller]")]
[ApiController]
public class ProductController : ControllerBase
{
    private readonly AdventureWorksDbContext _context;
    private readonly IDistributedCache _cache;

    public ProductController(AdventureWorksDbContext context, IDistributedCache cache)
    {
        _context = context;
        _cache = cache;
    }

    [HttpGet]
    public async Task<IActionResult> GetAll()
    {
        var cacheKey = "GET_ALL_PRODUCTS";
        List<Product> products = new List<Product>();

        // Get data from cache
        var cachedData = await _cache.GetAsync(cacheKey);
        if (cachedData != null)
        {
            // If data found in cache, encode and deserialize cached data
            var cachedDataString = Encoding.UTF8.GetString(cachedData);
            products = JsonConvert.DeserializeObject<List<Product>>(cachedDataString);
        }
        else
        {
            // If not found, then fetch data from database
            products = await _context.Products.ToListAsync();

           // serialize data
            var cachedDataString = JsonConvert.SerializeObject(products);
            var newDataToCache = Encoding.UTF8.GetBytes(cachedDataString);

            // set cache options
            var options = new DistributedCacheEntryOptions()
                .SetAbsoluteExpiration(DateTime.Now.AddMinutes(2))
                .SetSlidingExpiration(TimeSpan.FromMinutes(1));

            // Add data in cache
            await _cache.SetAsync(cacheKey, newDataToCache, options);
        }

        return Ok(products);
    }
}
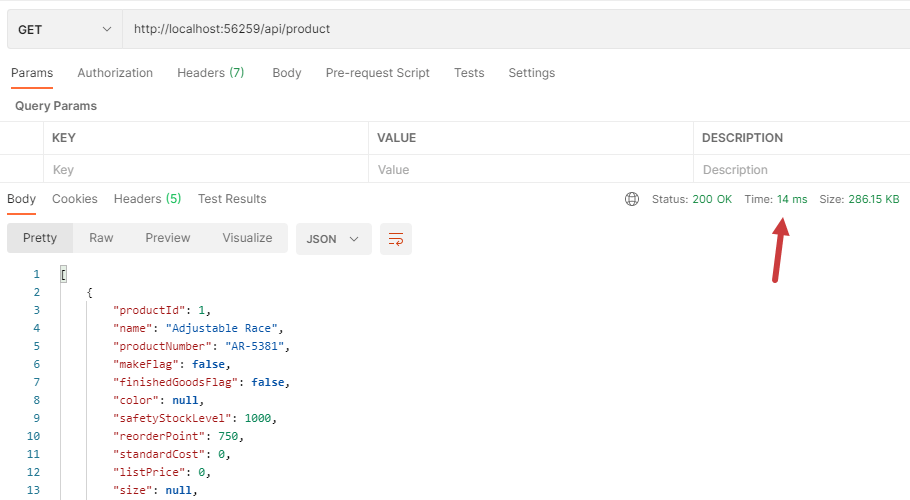
Let’s try to access our Web API once again in Postman. The first request will take a slightly longer time to execute but the subsequent requests will improve the response time considerably. For me, it came down to just 14 milliseconds which is quite impressive.
Summary
In this tutorial, we learned about implementing distributed caching using the Redis cache. We learned how to install and configure the Redis server on Windows and how to improve the performance of an existing Web API in just a few lines of code. If you have any comments or suggestions, please leave your comments below. Don’t forget to share this tutorial with your friends or community.


How to redis cache when depoly dotnet core application on IIS
You can install Redis Cache on the same server where IIS is running or you can install it on a separate server.
Good one
Any light on memory invalidation? suppose there is some portal for some tables update and which are used here in the api’s how do you prefer cache invalidation on that cases