
In the last few weeks, I wrote articles about ASP.NET Core Web APIs, EF Core, and Angular SPA and many readers asked me to write a post about combining all these pieces to create a Full-Stack web application. In this tutorial, we are going to build a full-stack web application using ASP.NET Core 5, Web APIs, EF Core (Database First), and Angular 8. We will use SQL Server as a backend database and will implement typical CRUD operations on the Football Players database by following the best practices.
Table of Contents
Prerequisites
- Install .NET Core 5 or the latest SDK from the Microsoft website.
- Install Visual Studio 2019 Community Edition from here.
- Download and install the latest version of Node.js from here.
- Install SQL Server 2008 or above.
For this tutorial, I will use SQL Server 2016 along with Visual Studio 2019 Community Edition.
Setup Database for CRUD Operations
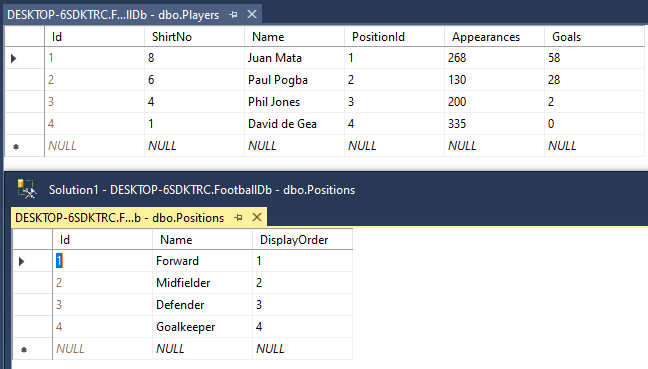
Create a new SQL Server Database with the following two tables
- Players – This table will store the data about football players. It has columns such as ShirtNo, Name, PositionId (FK), Appearances, Goals, etc.
- Positions – This table will store different positions e.g. Goalkeeper, Defender, Midfielder, etc.
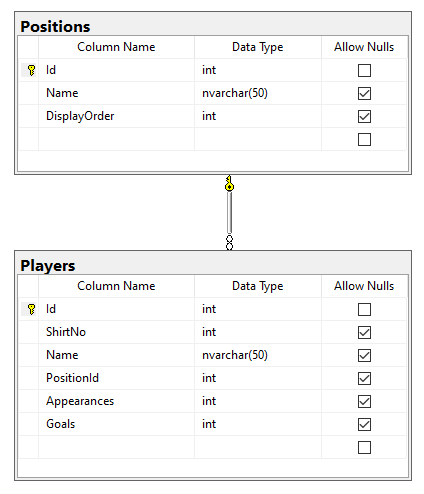
I also added some player’s information in the Players table and these players are currently playing in a famous English Premier League club Manchester United. We will implement CRUD operations on this table soon and the Positions table will be used to bind a dropdown list on players create or update forms.
Setup ASP.NET Core Angular Web Application with EF Core
Open Visual Studio 2019 and create a new ASP.NET Core 5 Web Application using ASP.NET Core with Angular template.
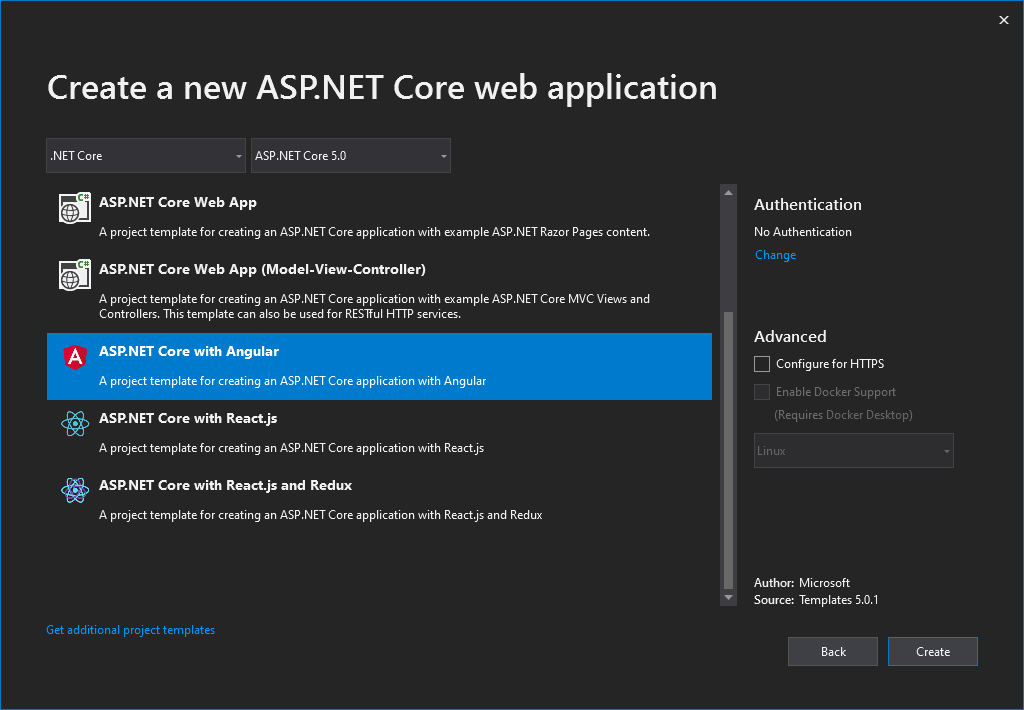
The above project template will generate a standard ASP.NET Core Web Application and a ClientApp folder that contains the Angular client-side application.
Next, we need to install Entity Framework Core and other related packages required to use EF Core (Database First) approach. Open the NuGet package manager and search and install the following packages in the project.
- Microsoft.EntityFrameworkCore.SqlServer
- Microsoft.EntityFrameworkCore.Design
- Microsoft.EntityFrameworkCore.Tools
We are using an existing SQL Server database that’s why we want to use EF Core (database first) approach to reverse engineer the entity models and DbContext. For this purpose, we can use the Scaffold-DbContext command that has many options to customize the generated code. You can read more about EF Core (database first) in my other post.
Open the Package Manager Console of the project and copy/paste the following command and press Enter. The following command will generate entity classes in the Models folder and FootballDbContext class in the Data folder.
Scaffold-DbContext -Connection "Server=DB_SERVER; Database=FootballDb; Trusted_Connection=True; MultipleActiveResultSets=true;" -Provider Microsoft.EntityFrameworkCore.SqlServer -OutputDir "Models" -ContextDir "Data" -Context "FootballDbContext" -NoOnConfiguring
Specify the connection string in the appsettings.json file as follows
{
  "ConnectionStrings": {
    "DefaultConnection": "Server=DB_SERVER; Database=FootballDb; Trusted_Connection=True; MultipleActiveResultSets=true"
  },
  "Logging": {
    "LogLevel": {
      "Default": "Information",
      "Microsoft": "Warning",
      "Microsoft.Hosting.Lifetime": "Information"
    }
  },
  "AllowedHosts": "*"
}
Finally, Entity Framework provider can be configured in ConfigureServices method of Startup.cs file as shown below:
services.AddDbContext<FootballDbContext>(options =>
    options.UseSqlServer(Configuration.GetConnectionString("DefaultConnection")));
The application we are going to build will allow us to perform CRUD operations from an Angular App. The Angular App will call ASP.NET Core Web APIs and those Web APIs will call the backend application services to communicate with the database. As per our application requirements, we need to create the following two services.
- PlayersService – To implement methods related to Players
- PositionsService – To implement methods related to Positions
Create a Services folder in the project and create the following IPlayersService interface. The interface has five standard methods to perform CRUD operations on Players
IPlayersService.cs
public interface IPlayersService
{
    Task<IEnumerable<Player>> GetPlayersList();
    Task<Player> GetPlayerById(int id);
    Task<Player> CreatePlayer(Player player);
    Task UpdatePlayer(Player player);
    Task DeletePlayer(Player player);
}
Create a PlayersService class in the Services folder and implement the IPlayersService interface on the class. You need to inject FootballDbContext in the service class to perform database operations. The methods of PlayersService are very straightforward as they are performing standard Create, Update, Delete, List, etc. operations on the Players table.
PlayersService.cs
public class PlayersService : IPlayersService
{
    private readonly FootballDbContext _context;

    public PlayersService(FootballDbContext context)
    {
        _context = context;
    }

    public async Task<IEnumerable<Player>> GetPlayersList()
    {
        return await _context.Players
            .Include(x => x.Position)
            .ToListAsync();
    }

    public async Task<Player> GetPlayerById(int id)
    {
        return await _context.Players
            .Include(x => x.Position)
            .FirstOrDefaultAsync(x => x.Id == id);
    }

    public async Task<Player> CreatePlayer(Player player)
    {
        _context.Players.Add(player);
        await _context.SaveChangesAsync();
        return player;
    }
    public async Task UpdatePlayer(Player player)
    {
        _context.Players.Update(player);
        await _context.SaveChangesAsync();
    }

    public async Task DeletePlayer(Player player)
    {
        _context.Players.Remove(player);
        await _context.SaveChangesAsync();
    }
}
Next, create the following IPositionsService interface in the Services folder. We can declare all Positions table-related methods in IPositionsService but for this tutorial, we only need a single GetPositionsList method.
IPositionsService.cs
public interface IPositionsService
{
    Task<IEnumerable<Position>> GetPositionsList();
}
Create a new class PositionsService and implement the IPositionsService interface as follows:
PositionsService.cs
public class PositionsService : IPositionsService
{
    private readonly FootballDbContext _context;

    public PositionsService(FootballDbContext context)
    {
        _context = context;
    }

    public async Task<IEnumerable<Position>> GetPositionsList()
    {
        return await _context.Positions
            .OrderBy(x => x.DisplayOrder)
            .ToListAsync();
    }
}
Implement ASP.NET Core Web APIs for Angular Application
To create Web APIs, add the following PlayersController class in the Controllers folder. The class inherits from the ControllerBase class and the IPlayersService interface is injected in the class using the constructor. The methods of the class are pretty straightforward as they are simply calling the corresponding methods defined in the PlayersService above. These methods will then be exposed to all the callers and we will see shortly how these Web APIs will be consumed by Angular App.
PlayersController.cs
[ApiController]
[Route("api/[controller]")]
public class PlayersController : ControllerBase
{
    private readonly IPlayersService _playerService;

    public PlayersController(IPlayersService playerService)
    {
        _playerService = playerService;
    }

    // GET: api/Players
    [HttpGet]
    public async Task<IEnumerable<Player>> Get()
    {
        return await _playerService.GetPlayersList();
    }

    // GET: api/Players/5
    [HttpGet("{id}")]
    public async Task<ActionResult<Player>> Get(int id)
    {
        var player = await _playerService.GetPlayerById(id);

        if (player == null)
        {
            return NotFound();
        }

        return Ok(player);
    }

    // POST: api/Players
    [HttpPost]
    public async Task<ActionResult<Player>> Post(Player player)
    {
        await _playerService.CreatePlayer(player);

        return CreatedAtAction("Post", new { id = player.Id }, player);
    }

    // PUT: api/Players/5
    [HttpPut("{id}")]
    public async Task<IActionResult> Put(int id, Player player)
    {
        if (id != player.Id)
        {
            return BadRequest("Not a valid player id");
        }

        await _playerService.UpdatePlayer(player);

        return NoContent();
    }

    // DELETE: api/Players/5
    [HttpDelete("{id}")]
    public async Task<IActionResult> Delete(int id)
    {
        if (id <= 0)
            return BadRequest("Not a valid player id");

        var player = await _playerService.GetPlayerById(id);
        if (player == null)
        {
            return NotFound();
        }

        await _playerService.DeletePlayer(player);

        return NoContent();
    }
}
Next, add another Web API Controller with the name PositionsController that will expose the Positions table data to Angular App
PositionsController.cs
[ApiController]
[Route("api/[controller]")]
public class PositionsController : ControllerBase
{
    private readonly IPositionsService _positionService;

    public PositionsController(IPositionsService positionService)
    {
        _positionService = positionService;
    }

    // GET: api/Positions
    [HttpGet]
    public async Task<IEnumerable<Position>> Get()
    {
        return await _positionService.GetPositionsList();
    }
}
To make sure everything is working as expected, run the project by pressing F5 and open the following URL in the browser address bar. Please note that the port number shown in the following URL can be different in your case.
http://localhost:50016/api/Players
You should be able to see the player’s information returned from the API in JSON format.
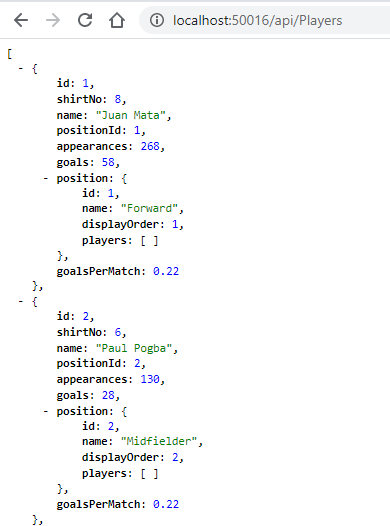
At this point, you may see the following error in your browser. This error comes if you have two objects referencing each other. In the above JSON, you can see that every player has a position property and every position object has an array of players inside which results in circular dependency between two objects. Ideally, we should not return the database entities from Web APIs and we should create separate DTOs for transforming and returning data but I avoid that approach in this tutorial to keep things simple.
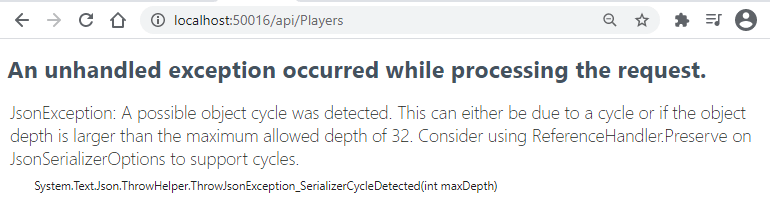
If you ever receive above error, you can solve it easily by adding Microsoft.AspNetCore.Mvc.NewtonsoftJson NuGet package in your project and adding AddNewtonsoftJson method in ConfigureServices method of Startup.cs file.
services.AddControllersWithViews()
    .AddNewtonsoftJson(options =>
        options.SerializerSettings.ReferenceLoopHandling = Newtonsoft.Json.ReferenceLoopHandling.Ignore
    );
The APIs we created above will expose the following endpoints related to Players and we will use these endpoints in our Angular App to perform CRUD operations.
| API | Description |
| GET /api/players | Get all players |
| GET /api/players/{id} | Get a player by Id |
| POST /api/players | Create a new player |
| PUT /api/players/{id} | Update an existing player |
| DELETE /api/players/{id} | Delete a player |
Generating Angular Module, Services and Components
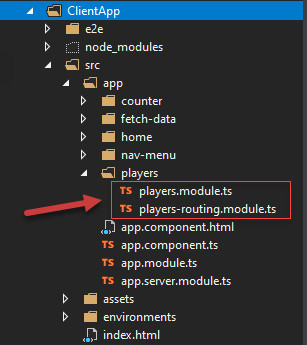
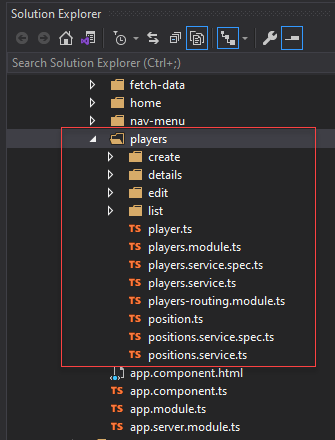
Our back-end Web APIs are ready and they will be consumed by the Angular front-end app. If you will expand the ClientApp/src/app folder in your project, you will notice that there are already some components created by default in counter, fetch-data, and home folders. We need to add a new feature in this app to perform CRUD operations on players which means we need multiple components and services to perform operations such as Create, Update, List, Details, etc. It is always a good practice to create an Angular module that group all related components, services, routes together in a single module. We want to name this module players module as it will have all the functionality related to players in one module.
Luckily, it is not difficult to generate Angular modules, services or components, etc. because we can use Angular CLI commands for generating everything related to the Angular App. Navigate to the ClientApp folder in Windows Explorer and run the following command in command or Terminal window.
ng generate module players --routing

The above command will create a players folder inside the app folder and will generate the players.module.ts and players-routing.module.ts typescript files inside the players module.
Next, we need to generate four angular components to perform CRUD operations. Run the following command in the command window to generate the players list component.
ng generate component players/list
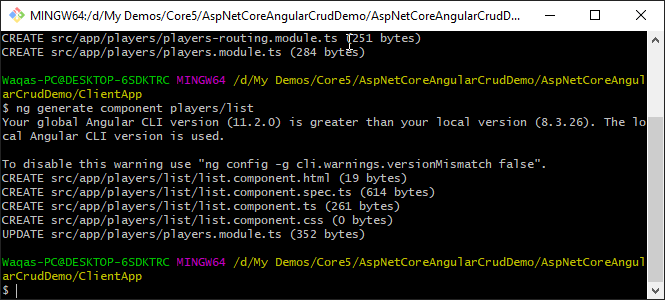
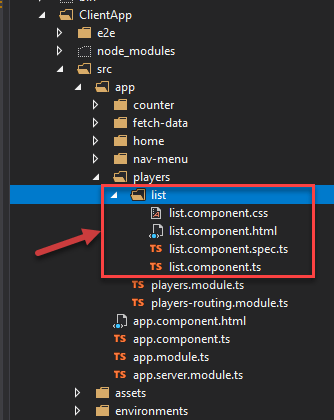
As you can see the above command will generate four component-related files inside a newly created players/list folder.
Run the following three commands to generate details, create and edit components
ng generate component players/details
ng generate component players/create
ng generate component players/edit
While we are in the command window, we can also generate the players and positions angular services using the following commands. Angular services are similar to the back-end services we created above and they also serve the same purpose. Back-end services normally have business logic related to backend operations whereas angular services can have UI/UX related logic needed in front-end app.
ng generate service players/players
ng generate service players/positions
Finally, generate Player and Position interfaces using the following commands. Angular interfaces are similar to entity classes we create and use at the backend but they are used in the Angular front-end app.
ng generate interface players/player
ng generate interface players/position
We will work on all these generated components and services shortly when we will implement CRUD operations. If all of the above commands are successful you will see all services, components, etc. related to players in the players folders
As I mentioned above, the Angular module is a collection of all related modules, services, and components, and generally, we declare the components belong to a certain module in a module file. Open the players.module.ts file and import the components we generated above using the import statement. We also need to specify all four components in the declarations section as shown below.
players.module.ts
import { NgModule } from '@angular/core';
import { CommonModule } from '@angular/common';

import { PlayersRoutingModule } from './players-routing.module';
import { ListComponent } from './list/list.component';
import { DetailsComponent } from './details/details.component';
import { CreateComponent } from './create/create.component';
import { EditComponent } from './edit/edit.component';

import { FormsModule, ReactiveFormsModule } from '@angular/forms';

@NgModule({
  declarations: [
    ListComponent,
    DetailsComponent,
    CreateComponent,
    EditComponent
  ],
  imports: [
    CommonModule,
    PlayersRoutingModule,
    FormsModule,
    ReactiveFormsModule
  ]
})
export class PlayersModule { }
We also need to import FormsModule and ReactiveFormsModule because we will use these modules to create reactive angular forms shortly in create and edit player components.
The next step is to define the routes of the list, create, edit, and details components in players-routing.module.ts file. This step will help us to define the URLs on which these individual components will be available in our app. For example, to access the players list components we can use either /players or /players/list URLs. Similarly, to view the details of a specific player with the id 2, we can use /players/2/details URL in the browser.
players-routing.module.ts
import { NgModule } from '@angular/core';
import { Routes, RouterModule } from '@angular/router';
import { ListComponent } from './list/list.component';
import { DetailsComponent } from './details/details.component';
import { CreateComponent } from './create/create.component';
import { EditComponent } from './edit/edit.component';

const routes: Routes = [
  { path: 'players', redirectTo: 'players/list', pathMatch: 'full' },
  { path: 'players/list', component: ListComponent },
  { path: 'players/:playerId/details', component: DetailsComponent },
  { path: 'players/create', component: CreateComponent },
  { path: 'players/:playerId/edit', component: EditComponent }
];

@NgModule({
  imports: [RouterModule.forChild(routes)],
  exports: [RouterModule]
})
export class PlayersRoutingModule { }
We also want our Players list page to be accessible from the top navigation bar so add the new Players link in nav-menu.component.ts file.
nav-menu.component.ts
<ul class="navbar-nav flex-grow">
  <li class="nav-item"
      [routerLinkActive]="['link-active']"
      [routerLinkActiveOptions]="{ exact: true }">
    <a class="nav-link text-dark" [routerLink]="['/']">Home</a>
  </li>
  <li class="nav-item" [routerLinkActive]="['link-active']">
    <a class="nav-link text-dark" [routerLink]="['/counter']">Counter</a>
  </li>
  <li class="nav-item" [routerLinkActive]="['link-active']">
    <a class="nav-link text-dark" [routerLink]="['/fetch-data']">Fetch data</a>
  </li>
  <li class="nav-item" [routerLinkActive]="['link-active']">
    <a class="nav-link text-dark" [routerLink]="['/players']">Players</a>
  </li>
</ul>
Finally, we need to import our players module in the application module as follows:
app.module.ts
import { BrowserModule } from '@angular/platform-browser';
import { NgModule } from '@angular/core';
import { FormsModule } from '@angular/forms';
import { HttpClientModule } from '@angular/common/http';
import { RouterModule } from '@angular/router';

import { PlayersModule } from './players/players.module';

import { AppComponent } from './app.component';
import { NavMenuComponent } from './nav-menu/nav-menu.component';
import { HomeComponent } from './home/home.component';
import { CounterComponent } from './counter/counter.component';
import { FetchDataComponent } from './fetch-data/fetch-data.component';
import { ListComponent } from "./players/list/list.component";

@NgModule({
  declarations: [
    AppComponent,
    NavMenuComponent,
    HomeComponent,
    CounterComponent,
    FetchDataComponent
  ],
  imports: [
    BrowserModule.withServerTransition({ appId: 'ng-cli-universal' }),
    HttpClientModule,
    FormsModule,
    FormsModule,
    PlayersModule,
    RouterModule.forRoot([
      { path: '', component: HomeComponent, pathMatch: 'full' },
      { path: 'counter', component: CounterComponent },
      { path: 'fetch-data', component: FetchDataComponent },
      { path: 'players', component: ListComponent },
    ])
  ],
  providers: [],
  bootstrap: [AppComponent]
})
export class AppModule { }
Run the application and you should be able to navigate to the empty Players list page using the Players navigation link in the top bar.
Implement Angular Services to Consume ASP.NET Core Web APIs
Before we start implementing angular services, let’s quickly implement Position and Player interfaces that will contain the properties similar to the properties we have in our server-side Position and Player entity classes but this time we are writing Typescript code instead of C#.
position.ts
export interface Position {
  id: number;
  name: string;
  displayOrder?: number;
}
player.ts
export interface Player {
  id: number;
  shirtNo: number;
  name: string;
  positionId?: number;
  appearances?: number;
  goals?: number;
  goalsPerMatch?: number;
  position?: Position;
}
The first service we are going to create is the PositionsService and it has only one method getPositions that will call our back-end Positions Web API and return all positions. The back-end Web API URL is declared as a private variable and to call the backend Web API we are using the HttpClient object that is injected in the constructor of the service.
positions.service.ts
import { Injectable } from '@angular/core';
import { HttpClient, HttpHeaders } from '@angular/common/http';
import { Observable, throwError } from 'rxjs';
import { catchError } from 'rxjs/operators';

import { Position } from "./position";

@Injectable({
  providedIn: 'root'
})
export class PositionsService {

  private apiURL = "http://localhost:50016/api";

  constructor(private httpClient: HttpClient) { }

  getPositions(): Observable<Position[]> {
    return this.httpClient.get<Position[]>(this.apiURL + '/positions')
      .pipe(
        catchError(this.errorHandler)
      );
  }

  errorHandler(error) {
    let errorMessage = '';

    if (error.error instanceof ErrorEvent) {
      errorMessage = error.error.message;
    } else {
      errorMessage = `Error Code: ${error.status}\nMessage: ${error.message}`;
    }
    return throwError(errorMessage);
  }
}
The next service is our main PlayersService that will define all CRUD methods related to players. All of these methods will call a specific back-end Web API endpoint using the same HttpClient object.
players.service.ts
import { Injectable } from '@angular/core';
import { HttpClient, HttpHeaders  } from '@angular/common/http';
import { Observable, throwError } from 'rxjs';
import { catchError } from 'rxjs/operators';

import { Player } from "./player";

@Injectable({
  providedIn: 'root'
})
export class PlayersService {

  private apiURL = "http://localhost:50016/api";
  httpOptions = {
    headers: new HttpHeaders({
      'Content-Type': 'application/json'
    })
  };

  constructor(private httpClient: HttpClient) { }

  getPlayers(): Observable<Player[]> {
    return this.httpClient.get<Player[]>(this.apiURL + '/players')
      .pipe(
        catchError(this.errorHandler)
      );
  }

  getPlayer(id): Observable<Player> {
    return this.httpClient.get<Player>(this.apiURL + '/players/' + id)
      .pipe(
        catchError(this.errorHandler)
      );
  }

  createPlayer(player): Observable<Player> {
    return this.httpClient.post<Player>(this.apiURL + '/players/', JSON.stringify(player), this.httpOptions)
      .pipe(
        catchError(this.errorHandler)
      );
  }

  updatePlayer(id, player): Observable<Player> {
    return this.httpClient.put<Player>(this.apiURL + '/players/' + id, JSON.stringify(player), this.httpOptions)
      .pipe(
        catchError(this.errorHandler)
      );
  }

  deletePlayer(id) {
    return this.httpClient.delete<Player>(this.apiURL + '/players/' + id, this.httpOptions)
      .pipe(
        catchError(this.errorHandler)
      );
  }

  errorHandler(error) {
    let errorMessage = '';

    if (error.error instanceof ErrorEvent) {
      errorMessage = error.error.message;
    } else {
      errorMessage = `Error Code: ${error.status}\nMessage: ${error.message}`;
    }
    return throwError(errorMessage);
  }
}
Implement Players List Component
The first component we are going to create is the list component. This component has a players property that is initialized in the ngOnInit method by calling a getPlayers function we defined in PlayersService. The component also has a deletePlayer function that calls the deletePlayer function defined in PlayersService.
list.component.ts
import { Component, OnInit } from '@angular/core';
import { Player } from "../player";
import { PlayersService } from "../players.service";

@Component({
  selector: 'app-list',
  templateUrl: './list.component.html',
  styleUrls: ['./list.component.css']
})
export class ListComponent implements OnInit {

  players: Player[] = [];

  constructor(public playersService: PlayersService) { }

  ngOnInit(): void {
    this.playersService.getPlayers().subscribe((data: Player[]) => {
      this.players = data;
    });
  }

  deletePlayer(id) {
    this.playersService.deletePlayer(id).subscribe(res => {
      this.players = this.players.filter(item => item.id !== id);
    });
  }
}
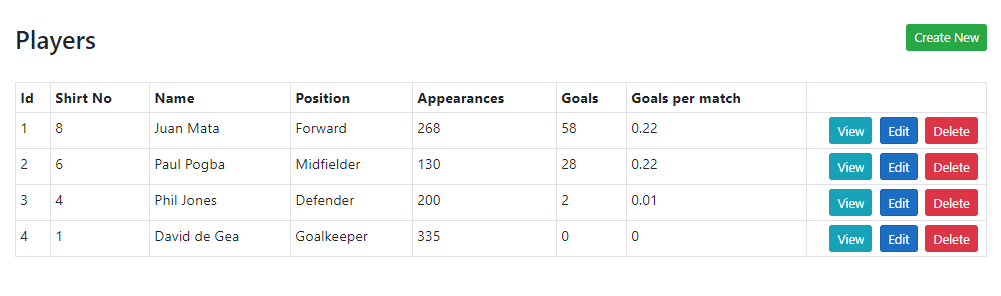
The HTML template associated with the list component is mainly iterating all the players using the ngFor loop and generating a table with the data and typical View, Edit and Delete buttons. There is also a Create button on top of the page that will open a page where we can create new player in database.
list.component.html
<div class="container">
  <br />
  <div class="row">
    <div class="col">
      <h3>Players</h3>
    </div>
    <div class="col text-right">
      <a href="#" routerLink="/players/create/" class="btn btn-success btn-sm">Create New</a>
    </div>
  </div>
  <br />
  <table class="table table-bordered table-sm">
    <tr>
      <th>Id</th>
      <th>Shirt No</th>
      <th>Name</th>
      <th>Position</th>
      <th>Appearances</th>
      <th>Goals</th>
      <th>Goals per match</th>
      <th width="200px"></th>
    </tr>
    <tr *ngFor="let player of players">
      <td>{{ player.id }}</td>
      <td>{{ player.shirtNo }}</td>
      <td>{{ player.name }}</td>
      <td>{{ player.position?.name }}</td>
      <td>{{ player.appearances }}</td>
      <td>{{ player.goals }}</td>
      <td>{{ player.goalsPerMatch }}</td>
      <td class="text-right">
        <a href="#" [routerLink]="['/players/', player.id, 'details']" class="btn btn-info btn-sm">View</a>
        <a href="#" [routerLink]="['/players/', player.id, 'edit']" class="btn btn-primary btn-sm">Edit</a>
        <button type="button" (click)="deletePlayer(player.id)" class="btn btn-danger btn-sm">Delete</button>
      </td>
    </tr>
  </table>
</div>
Press F5 to run the project and you will see the output similar to the following screenshot.
Implement Player Details Component
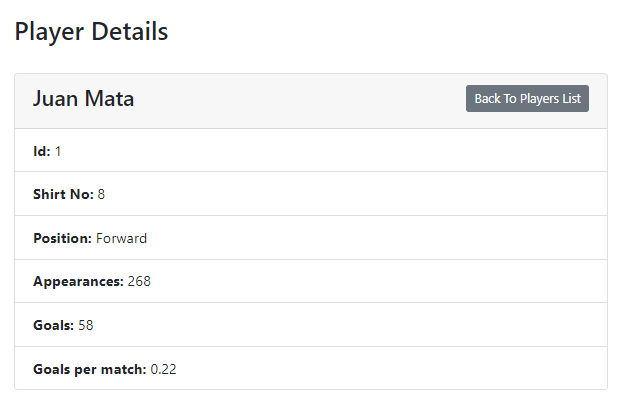
The next component we are going to create is the details component. This component will display the details of a specific player when we will click the View button in the Players list. We are injecting the PlayersService in this component as well and the main piece of code is in the ngOnInit function where we are calling the getPlayer function of PlayersService and passing it the id of the currently viewed player. The player returned by the getPlayer function is then used to initialize the player property.
details.component.ts
import { Component, OnInit } from '@angular/core';
import { ActivatedRoute, Router } from '@angular/router';

import { Player } from "../player";
import { PlayersService } from "../players.service";

@Component({
  selector: 'app-details',
  templateUrl: './details.component.html',
  styleUrls: ['./details.component.css']
})
export class DetailsComponent implements OnInit {

  id: number;
  player: Player;

  constructor(
    public playersService: PlayersService,
    private route: ActivatedRoute,
    private router: Router
  ) { }

  ngOnInit(): void {
    this.id = this.route.snapshot.params['playerId'];
    this.playersService.getPlayer(this.id).subscribe((data: Player) => {
      this.player = data;
    });
  }
}
The HTML template for the details component is shown below
<div class="container">
  <br />
  <h3>Player Details</h3>
  <br />
  <div class="card">
    <div class="card-header">
      <div class="row">
        <div class="col">
          <h4>{{ player.name }}</h4>
        </div>
        <div class="col text-right">
          <a href="#" routerLink="/players/list" class="btn btn-secondary btn-sm">Back To Players List</a>
        </div>
      </div>
    </div>
    <ul class="list-group list-group-flush">
      <li class="list-group-item"><b>Id:</b> {{ player.id }}</li>
      <li class="list-group-item"><b>Shirt No:</b> {{ player.shirtNo }}</li>
      <li class="list-group-item"><b>Position:</b> {{ player.position?.name }}</li>
      <li class="list-group-item"><b>Appearances:</b> {{ player.appearances }}</li>
      <li class="list-group-item"><b>Goals:</b> {{ player.goals }}</li>
      <li class="list-group-item"><b>Goals per match:</b> {{ player.goalsPerMatch }}</li>
    </ul>
  </div>
</div>
Press F5 to run the project and click the View button to view the details of any player. You should be able to see the output similar to the following screenshot.
Implement Create Player Component
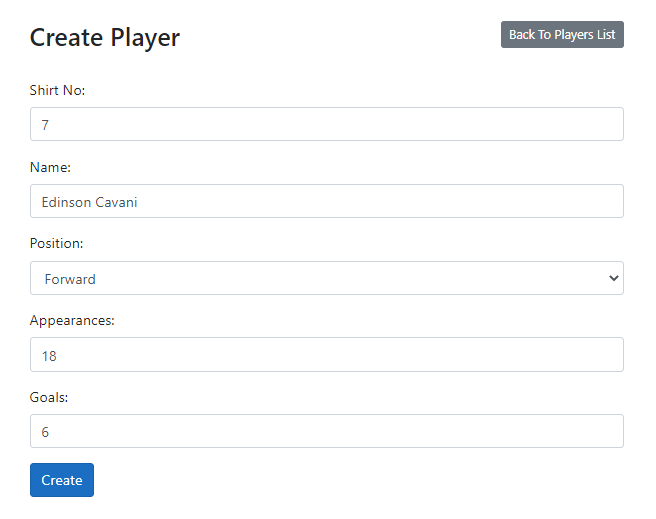
The next component will allow us to create new Players in the database. We declare a positions property that will be initialized in the ngOnInit function with the positions fetched using the getPositions function. We will use this property to populate the dropdown in the form. We are also using Angular FormBuilder to create a form as per our requirements and fields. Finally, we define the onSubmit method that will call the createPlayer function of PlayersService to create players in the database. Once the new player is created we are redirecting the user to the players list page using the navigateUrl function.
create.component.ts
import { Component, OnInit } from '@angular/core';
import { FormBuilder, Validators } from '@angular/forms';
import { ActivatedRoute, Router } from '@angular/router';

import { Position } from "../position";
import { PlayersService } from "../players.service";
import { PositionsService } from "../positions.service";

@Component({
  selector: 'app-create',
  templateUrl: './create.component.html',
  styleUrls: ['./create.component.css']
})
export class CreateComponent implements OnInit {

  positions: Position[] = [];
  createForm;

  constructor(
    public playersService: PlayersService,
    public positionsService: PositionsService,
    private route: ActivatedRoute,
    private router: Router,
    private formBuilder: FormBuilder
  ) {
    this.createForm = this.formBuilder.group({
      shirtNo: ['', Validators.required],
      name: ['', Validators.required],
      positionId: [''],
      appearances: [''],
      goals: [''],
    });
  }

  ngOnInit(): void {
    this.positionsService.getPositions().subscribe((data: Position[]) => {
      this.positions = data;
    });
  }

  onSubmit(formData) {
    this.playersService.createPlayer(formData.value).subscribe(res => {
      this.router.navigateByUrl('players/list');
    });
  }
}
The HTML template for the create component is shown below
create.component.html
<div class="container">
  <br />
  <div class="row">
    <div class="col">
      <h3>Create Player</h3>
    </div>
    <div class="col text-right">
      <a href="#" routerLink="/players/list" class="btn btn-secondary btn-sm">Back To Players List</a>
    </div>
  </div>
  <br />
  <form [formGroup]="createForm" (ngSubmit)="onSubmit(createForm)">

    <div class="form-group">
      <label for="shirtNo">Shirt No:</label>
      <input formControlName="shirtNo"
             id="shirtNo"
             type="text"
             class="form-control" />
    </div>

    <div class="form-group">
      <label for="name">Name:</label>
      <input formControlName="name"
             id="name"
             type="text"
             class="form-control" />
    </div>

    <div class="form-group">
      <label for="name">Position:</label>
      <select formControlName="positionId"
              id="positionId"
              class="form-control">
        <option value="">- Select -</option>
        <option *ngFor="let position of positions" [ngValue]="position.id">
          {{position.name}}
        </option>
      </select>
    </div>

    <div class="form-group">
      <label for="appearances">Appearances:</label>
      <input formControlName="appearances"
             id="appearances"
             type="text"
             class="form-control" />
    </div>

    <div class="form-group">
      <label for="goals">Goals:</label>
      <input formControlName="goals"
             id="goals"
             type="text"
             class="form-control" />
    </div>

    <button class="btn btn-primary" type="submit" [disabled]="!createForm.valid">Create</button>
  </form>
</div>
Press F5 to run the project and click the Create New button shown on top of the players list component. You will see the form similar to the following screenshot. Fill the form and submit and your newly created player will appear in the players list.
Implement Edit Player Component
The edit component is very similar to create component we created above. It has an additional function call in ngOnInit function to fetch the currently edited player using the getPlayer function of PlayersService. Another difference is the call to updatePlayer function of PlayersService in the onSubmit function which is passing the currently edited player id and the entire form data to the updatePlayer function.
edit.component.ts
import { Component, OnInit } from '@angular/core';
import { FormBuilder, Validators  } from '@angular/forms';
import { ActivatedRoute, Router } from '@angular/router';

import { Player } from "../player";
import { Position } from "../position";
import { PlayersService } from "../players.service";
import { PositionsService } from "../positions.service";

@Component({
  selector: 'app-edit',
  templateUrl: './edit.component.html',
  styleUrls: ['./edit.component.css']
})
export class EditComponent implements OnInit {

  id: number;
  player: Player;
  positions: Position[] = [];
  editForm;

  constructor(
    public playersService: PlayersService,
    public positionsService: PositionsService,
    private route: ActivatedRoute,
    private router: Router,
    private formBuilder: FormBuilder
  ) {
    this.editForm = this.formBuilder.group({
      id: [''],
      shirtNo: ['', Validators.required],
      name: ['', Validators.required],
      positionId: [''],
      appearances: [''],
      goals: [''],
    });
  }

  ngOnInit(): void {
    this.id = this.route.snapshot.params['playerId'];

    this.positionsService.getPositions().subscribe((data: Position[]) => {
      this.positions = data;
    });

    this.playersService.getPlayer(this.id).subscribe((data: Player) => {
      this.player = data;
      this.editForm.patchValue(data);
    });
  }

  onSubmit(formData) {
    this.playersService.updatePlayer(this.id, formData.value).subscribe(res => {
      this.router.navigateByUrl('players/list');
    });
  }
}
The HTML template for the edit component is shown below and it is very similar to the create component template we created above.
edit.component.html
<div class="container">
  <br />
  <div class="row">
    <div class="col">
      <h3>Update Player</h3>
    </div>
    <div class="col text-right">
      <a href="#" routerLink="/players/list" class="btn btn-secondary btn-sm">Back To Players List</a>
    </div>
  </div>
  <br />
  <form [formGroup]="editForm" (ngSubmit)="onSubmit(editForm)">

    <input formControlName="id"
           id="id"
           type="hidden" />

    <div class="form-group">
      <label for="shirtNo">Shirt No:</label>
      <input formControlName="shirtNo"
             id="shirtNo"
             type="text"
             class="form-control" />
    </div>

    <div class="form-group">
      <label for="name">Name:</label>
      <input formControlName="name"
             id="name"
             type="text"
             class="form-control" />
    </div>

    <div class="form-group">
      <label for="name">Position:</label>
      <select formControlName="positionId"
              id="positionId"
              class="form-control">
        <option value="">- Select -</option>
        <option *ngFor="let position of positions" [ngValue]="position.id">
          {{position.name}}
        </option>
      </select>
    </div>

      <div class="form-group">
        <label for="appearances">Appearances:</label>
        <input formControlName="appearances"
               id="appearances"
               type="text"
               class="form-control" />
      </div>

      <div class="form-group">
        <label for="goals">Goals:</label>
        <input formControlName="goals"
               id="goals"
               type="text"
               class="form-control" />
      </div>

      <button class="btn btn-primary" type="submit" [disabled]="!editForm.valid">Update</button>
  </form>
</div>
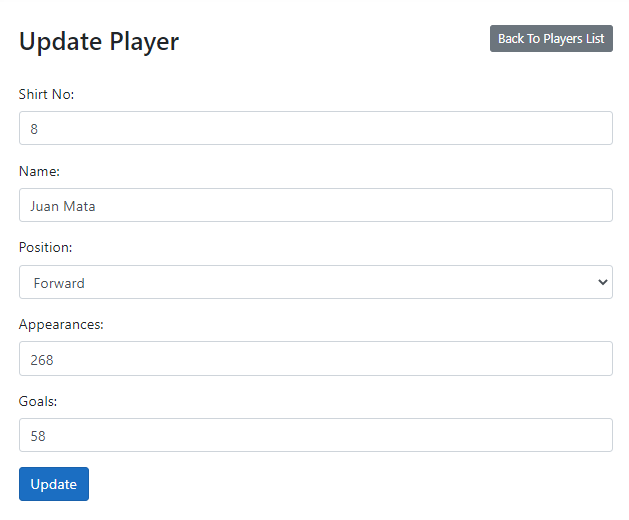
Press F5 to run the project and click the Edit button shown with every player in the players list. You will see the edit form similar to the following screenshot where the data of the selected player will be pre-populated for us to update. Update the player information and submit the form. You will see the updated information in the players list.
Summary
In this tutorial, I tried to teach you how to build a full-stack Angular app using ASP.NET Core Web APIs as the backend. I also demonstrated how to use Entity Framework Core (database first) approach along the way. I tried my best to teach you how to write clean code by separating the functionality of services, controllers, components, etc. I hope you will like this tutorial and will share it with your colleagues and friends to spread the knowledge.


I don’t understand why do you create the IPlayersService , can you explain it ? is it login to have one interface per class ?
Please add below line in program.cs file
builder.Services.AddScoped();
Hi,
It is not working for insert and update as it is giving error.
Failed to load resource: the server responded with a status of 500 (Internal Server Error)
ERROR Error Code: 500
Message: Http failure response for http://localhost:50016/api/players/: 500 Internal Server Error
Kindly suggest how to fix this?
you should try to install
“Microsoft.AspNetCore.Mvc.NewtonsoftJson” and add to ” Program.cs”
builder.Services.AddControllersWithViews()
.AddNewtonsoftJson(options =>
options.SerializerSettings.ReferenceLoopHandling = Newtonsoft.Json.ReferenceLoopHandling.Ignore
);
Perfect tutorial to learn. Great !
hi, when i run the angular app, the browser shows me loading, cannot see any data….??
You must have some error in your code. Can you debug your code and follow the application flow?
Hi
I have followed table creation done .
but why this error comes . but my tables are correct
Microsoft.Data.SqlClient.SqlException (0x80131904): Invalid column name ‘PositionId’.
Invalid column name ‘Appearances’.
Invalid column name ‘Goals’.
Invalid column name ‘PositionId’.
Invalid column name ‘ShirtNo’.
Invalid column name ‘DisplayOrder’.
I think you forgot to create parent child relationship between the Positions and Players table. Create the relationship in SQL Server database and try to Scaffold Entity Framework models again.
Hi
Your project not working in swagger.
System.InvalidOperationException: Unable to resolve service for type ‘WebAPIPlayerPosition.Services.IPlayersService’ while attempting to activate ‘WebAPIPlayerPosition.Controllers.PlayersController’.
at Microsoft.Extensions.DependencyInjection.ActivatorUtilities.GetService(IServiceProvider sp, Type type, Type requiredBy, Boolean isDefaultParameterRequired)
I guess you forgot to add services.AddSwaggerGen() in your ConfigureServices(IServiceCollection services) method. This method registers the ISwaggerProvider interface in the DI container.
remove players/index and put players/list for redirection in routing
Fixed
Hi, why do you put a ZIP file in Github?. You should put your code instead.