
Modern public-facing applications such as Gmail and Facebook have changed the mindset of the users. Most clients now expect a similar type of responsiveness and performance from their applications. Developers have to use many strategies to meet client’s expectations. One such strategy is called caching that improves the application performance significantly. In this tutorial, I will show you how to use In-Memory caching in ASP.NET Core applications. I will also cover different techniques to configure the caching as per your application requirements.
Table of Contents
What is Caching?
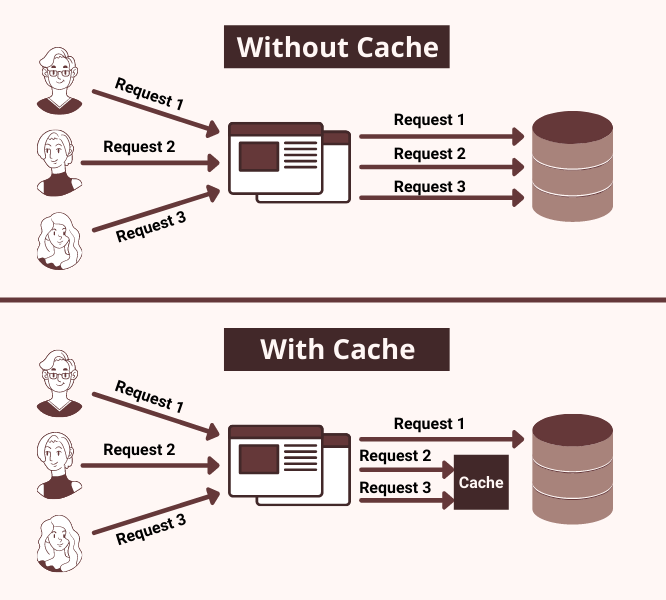
Caching is one of the common techniques to make applications performant and scalable. It allows developers to store frequently accessed or heavy computed data to a temporary but fast storage layer so that all future requests for the same data are served up faster. Normally the cached data is transient and is stored in fast access hardware such as computer memory (RAM). Caching increases the data retrieval performance as the application doesn’t need to access the slower storage layer such as database or disk.
Introduction to Caching in ASP.NET Core
ASP.NET Core has many caching features to improve the application performance. We can use Cache Tag Helper, Distributed Cache Tag Helper, and Response Caching Middleware and ResponseCache attribute to improve the application performance. It is important for developers to understand the following two main types of caching techniques available in ASP.NET Core.
In-memory Caching
In-memory caching refers to a caching technique where the data is stored in the server’s memory that is running the application. This means if the server is restarted or crashed, the data cached in the server memory is no longer available. This type of caching is useful during the development or in scenarios where only a single server is used to deploy the application. It can be used in multi-server (web farm) if sticky sessions are configured.
Distributed Caching
Distributed cache refers to a caching technique where the data is typically stored as an external service and then shared with multiple app servers hosting the application in the cloud or in a server farm. Distributed caching can not only improve the performance but can also make applications more scalable because cached data will not be flushed if one of the servers will restart or crash.
In this tutorial, I will cover In-memory caching and If you want to learn about using a distributed cache such as Redis then read my post Distributed Caching in ASP.NET Core using Redis Cache.
Setting Up an ASP.NET Core Web API
Let’s create a new ASP.NET Core 5 Web API project in Visual Studio 2019 to see In-memory caching in action. I will create a simple Web API that will use Entity Framework Core to query and return the products from the Microsoft AdventureWorks database. The initial version of this API will not use any caching and we will observe the time our API will take to process the request.
If you are new to ASP.NET Core and you don’t know how to use Entity Framework Core with existing database and how to create Web APIs in ASP.NET Core 5 then I will recommend you to read the following posts related to these topics.
- A Developer’s Guide for Creating Web APIs with ASP.NET Core 5
- Data Access in ASP.NET Core using EF Core (Database First)
To connect to SQL Server database from the Web APIs, configure the database connection string in the application appsettings.json file.
appsettings.json
{
  "ConnectionStrings": {
    "DefaultConnection": "Server=DB_SERVER; Database=AdventureWorks; Trusted_Connection=True; MultipleActiveResultSets=true"
  },
  "Logging": {
    "LogLevel": {
      "Default": "Information",
      "Microsoft": "Warning",
      "Microsoft.Hosting.Lifetime": "Information"
    }
  },
  "AllowedHosts": "*"
}
Open the Package Manager Console in Visual Studio 2019 and use the following command to generate the Entity Framework DbContext and Product entity model.
Scaffold-DbContext -Connection "Server=DESKTOP-6SDKTRC; Database= AdventureWorks; Trusted_Connection=True; MultipleActiveResultSets=true;" -Provider Microsoft.EntityFrameworkCore.SqlServer -OutputDir "Models" -ContextDir "Data" -Context "AdventureWorksDbContext" -Tables "Product"
Open the Startup.cs file and register Entity Framework Core using AddDbContext method.
Startup.cs
public void ConfigureServices(IServiceCollection services)
{
    services.AddControllersWithViews();

    services.AddDbContext<AdventureWorksDbContext>(options =>
        options.UseSqlServer(Configuration.GetConnectionString("DefaultConnection")));
}
Create a new Web API controller with the name ProductController inside the Controllers folder. Inject the AdventureWorksDbContext in the constructor of the controller and return all products from the GetAll method.
ProductController.cs
[Route("api/[controller]")]
[ApiController]
public class ProductController : ControllerBase
{
    private readonly AdventureWorksDbContext _context;

    public ProductController(AdventureWorksDbContext context)
    {
        _context = context;
    }

    [HttpGet]
    public async Task<IActionResult> GetAll()
    {
        var products = await _context.Products.ToListAsync();

        return Ok(products);
    }
}
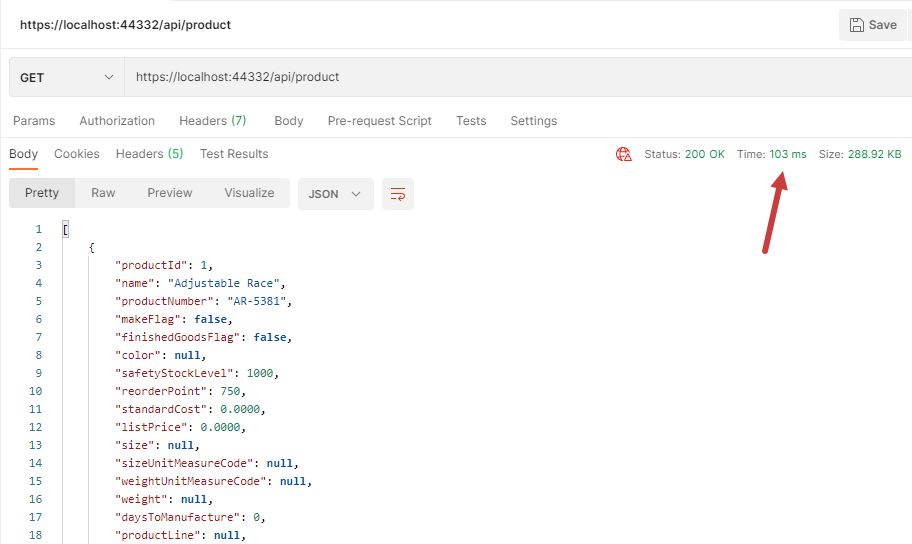
Open the Postman or any other API testing tool you use and try to query the above API and notice the time API is taking to fetch and return data from the database. The following screenshot shows that it took 103 milliseconds when I tested the API without using any caching.
Using In-Memory Caching in ASP.NET Core
To enable the In-memory cache feature in ASP.NET Core applications, we can use the AddMemoryCache method in the ConfigureServices method of the Startup.cs file.
Startup.cs
public void ConfigureServices(IServiceCollection services)
{
    services.AddControllersWithViews();

    services.AddDbContext<AdventureWorksDbContext>(options =>
        options.UseSqlServer(Configuration.GetConnectionString("DefaultConnection")));

    services.AddMemoryCache();
}
For most ASP.NET Core applications, the In-memory caching is enabled by default especially if we are calling AddMvc, AddControllersWithViews, AddRazorPages, AddMvcCore, AddRazorViewEngine, and many other Add[Service] methods in the ConfigureServices method. These methods enable In-memory caching so we don’t even need to call AddMemoryCache shown above.
Once the In-memory caching is enabled either automatically or by using the AddMemoryCache method, we are allowed to inject the IMemoryCache interface in our services and controllers. IMemoryCache interface is a simple interface with the following three methods.
| Method | Description |
|---|---|
| CreateEntry(Object) | Create or overwrite an entry in the cache. |
| Remove(Object) | Removes the object associated with the given key. |
| TryGetValue(Object, Object) | Gets the item associated with this key if present. |
There are also some extension methods that can provide developers many options to use IMemoryCache as per their requirements.
The following is the updated code of our ProductController in which I first injected the IMemoryCache in the constructor and then used TryGetValue and Set methods to get and set the products list in the cache.
ProductController.cs
[Route("api/[controller]")]
[ApiController]
public class ProductController : ControllerBase
{
    private readonly AdventureWorksDbContext _context;
    private readonly IMemoryCache _cache;

    public ProductController(AdventureWorksDbContext context, IMemoryCache cache)
    {
        _context = context;
        _cache = cache;
    }

    [HttpGet]
    public async Task<IActionResult> GetAll()
    {
        var cacheKey = "GET_ALL_PRODUCTS";

        // If data found in cache, return cached data
        if (_cache.TryGetValue(cacheKey, out List<Product> products))
        {
            return Ok(products);
        }

        // If not found, then fetch data from database
        products = await _context.Products.ToListAsync();

        // Add data in cache
        _cache.Set(cacheKey, products);

        return Ok(products);
    }
}
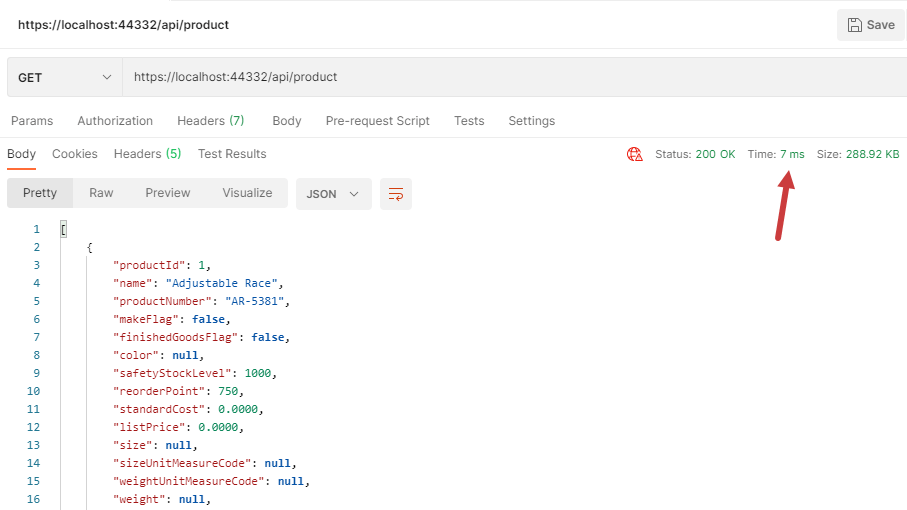
With the in-memory caching in place, let’s try to access our Web API once again in Postman. The first request will take a slightly longer time to execute but the subsequent requests will improve the response time considerably. For me, it came down from 103 milliseconds to 7 milliseconds which is almost 90% faster response and this is a clear example that how quickly you can improve the performance with only a few lines of caching related code.
Configuring Cache Settings in ASP.NET Core
When we add items to the cache, they don’t stay in the cache forever. They might become stale after some time and when it happens the application has to fetch and compute the fresh data and store it in cache once again. If you want to control the cache expiration, then you can use the MemoryCacheEntryOptions object that will allow you to configure the expiration and other cache options.
To cache data for the exact time, we can use the AbsoluteExpiration setting. In the following code snippet, the AbsoluteExpiration is set to 5 minutes, which means no matter how frequently our cached data is accessed, it will flush after 5 minutes.
var cacheOptions = new MemoryCacheEntryOptions()
{
    AbsoluteExpiration = DateTime.Now.AddMinutes(5)
};

_cache.Set(cacheKey, products, cacheOptions);
We can also use the SlidingExpiration setting which allows us to remove cached items which are not frequently accessed. In the example below, I set it to 5 minutes which means that data will remove from the cache only if it is not accessed in the last 5 minutes.
var cacheOptions = new MemoryCacheEntryOptions()
{
    SlidingExpiration = TimeSpan.FromMinutes(5)
};

_cache.Set(cacheKey, products, cacheOptions);
If our data is accessed more frequently than our sliding expiration time, then we will end up in a situation where our data will never expire. Application users will never see fresh data fetched from the database. We can solve this problem by combing both sliding and absolute expiration settings. In the following code snippet, the application will keep on serving the cached data to users if they are accessing the data frequently within 5 minute expiry time but due to absolute expiration set to 60 minutes, the fresh data will replace the old cached data every 60 minutes.
var cacheOptions = new MemoryCacheEntryOptions()
{
    SlidingExpiration = TimeSpan.FromMinutes(5),
    AbsoluteExpiration = DateTime.Now.AddMinutes(60)
};

_cache.Set(cacheKey, products, cacheOptions);
We can also set the priority of the cached items to keep high priority items in cache during a memory pressure triggered cleanup. By default, all items in the cache have Normal priority but we are allowed to set Low, Normal, High, and NeverRemove options as well.
var cacheOptions = new MemoryCacheEntryOptions()
{
    AbsoluteExpiration = DateTime.Now.AddMinutes(60),
    Priority = CacheItemPriority.High
};

_cache.Set(cacheKey, products, cacheOptions);
Summary
In this tutorial, I have covered the basics of in-memory caching. We have seen a practical example of an ASP.NET Core Web API whose performance increased significantly with caching. Please keep in mind that you should not use in-memory caching if your application is hosted on multiple servers or in a cloud hosting environment unless you are using sticky sessions. If you have any comments or suggestions, please leave your comments below. Don’t forget to share this tutorial with your friends or community.


Good and smooth explanation. Thank you.
BEST EXPALNATION EVER
Superb explained good job
in cachin world Biggest problem is cache invalidation. let’s say there is some one time setup data change from some portal occasionally. how to invalidate on those case?
When we update data, we can simply remove the cached data using cache key.
_cache.Remove(cacheKey);
Once data is removed from cache and someone try to access the same data it will be added in cache again.
Good stuff. Great 👍.
I have a doubt. I updated one data. If data catched as not updated value. This scenario we cant get fresh data, is correct ? If yes means how will i get updated data ?
When we update data, we can simply remove the cached data using cache key.
_cache.Remove(cacheKey);