
Imagine you are building an application that requires the construction of a complex object which has many fields and nested objects that you need to initialize one by one by going through many boring and laborious steps. You can initialize all fields and nested objects by passing dozens of parameters in a monstrous constructor or you can create a huge list of overloaded constructors with all possible combinations but these solutions will not be elegant. You can also create a set of subclasses to cover all combinations of the parameters but you will end up with a considerable number of subclasses. In this tutorial, I will show you how to use a design pattern called Builder to solve this problem by following an easy step by step approach.
Table of Contents
What is a Builder Pattern?
Builder Design Pattern allows us to separate the construction of a complex object from its representation so that we can use the same construction code to produce different types and representations of an object. It is used to construct a complex object step by step and return the complete object after the final step.
Let’s assume that you are creating a House object and to build a simple house you need a constructor with walls, floors, doors, windows, and roof so a constructor will look something like this:
House(walls, floors, doors, windows, roofs)
The object creation using the above constructor will look similar to the following:
House house = new House(4, 3, 6, 3, 1);
For a larger and more expensive house, you may also need a heating system, electrical wiring, swimming pool, etc. so the above constructor needs to introduce more parameters as follows:
House(walls, floors, doors, windows, roofs,
   hasHeatingSystem, hasElectricialWiring, hasSwimmingPool)
Most of the simple houses don’t need all those extra features so those additional parameters will remain unused nine out of ten times.
House house = new House(4, 3, 6, 3, 1, null, null, null);
The builder pattern divides the object construction into multiple steps such as buildWall, buildRoof, buildDoor, etc., and to create an object, we can execute one or more of these steps. This gives us freedom because now we can extract the object construction code from the main class and move the code to separate small objects called builders. We can then use the builders we need to construct an object.
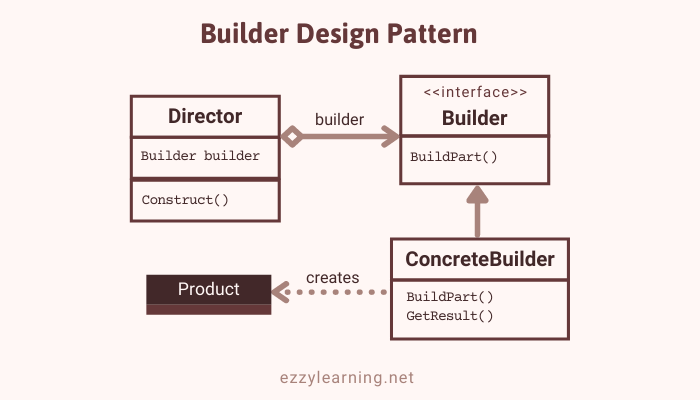
The main objects used to implement a builder pattern are following:
Builder – This interface declares all steps required to create an object. The actual implementation of each step is usually defined in concrete builder classes.
ConcreteBuilder – These classes provide different implementations of the construction steps. They also define a method that returns the final product.
Product – This class is the actual complex object generated by the builder pattern. This class can belong to the same or a different type of class hierarchy
Director – This class defines the order in which to call construction steps. This class can also define the algorithm or logic to generate the final product object. This class normally has an encapsulated builder object which can be passed either using the constructor or a method, e.g. setBuilder.
If you like video tutorials then here is my video on Builder Pattern.
Pros and Cons of Builder Pattern
Pros
- By constructing the object using a step by step approach, you can construct run the steps in a different order for creating a different types of products. You can defer some steps or even run some steps recursively.
- The same construction code can be reused to build various representations of the products.
- The code of creating complex objects can be separated from the business logic which increases code readability and maintainability
- You don’t need to create big constructors with so many parameters to create complex objects.
Cons
- You need to create many new classes which increase the overall complexity of the code.
- You need to create a separate ConcreteBuilder for each type of product.
A Real-world Example of Builder Design Pattern
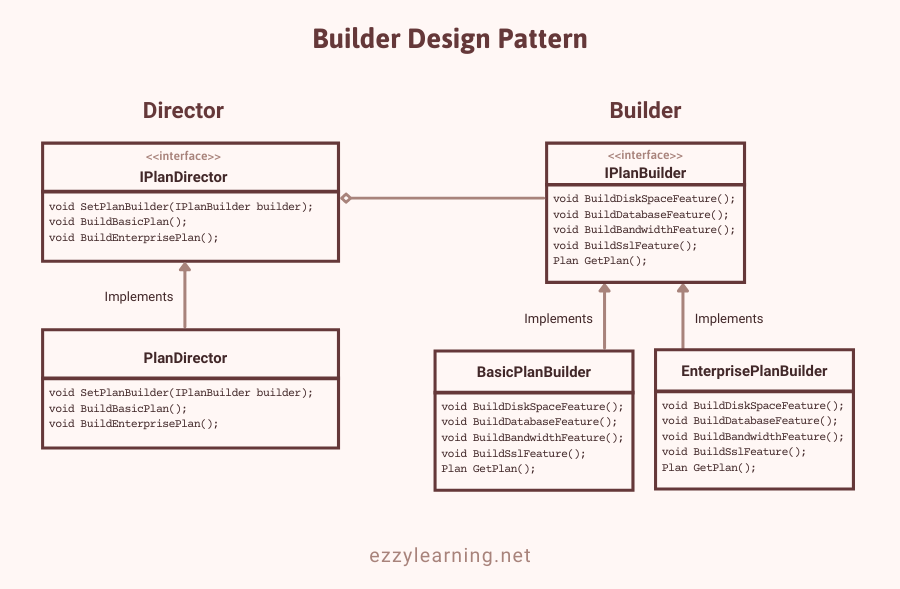
Imagine you are building a web application of a web hosting company and you want to implement a pricing plans page that will show different plans such as Basic, Enterprise, etc. Each pricing plan can have lots of features e.g. Disk space, bandwidth, database size, etc. Each plan can be considered as a complex object and the features in the plan can be built as steps. To make things more interesting, I will also introduce a custom pricing plan to show you how to build a custom object by mixing different steps in any order you want.
The following diagram shows the Builder pattern example we are going to build.
Setting Up ASP.NET Core Project
Let’s create a new ASP.NET Core MVC web application and create the following Feature class in the Models folder. This class will represent the web hosting plan features, e.g. Disk space, bandwidth, etc.
Feature.cs
public class Feature
{
    public string Title { get; set; }
    public string Value { get; set; }
}
Next, create the following Plan class in the Models folder. This class will represent the hosting plan with a features collection. I also implemented a method AddFeature to easily add features to a plan.
Plan.cs
public class Plan
{
    public string Name { get; set; }
    public decimal Price { get; set; }

    public List<Feature> Features { get; set; } = new List<Feature>();

    public void AddFeature(Feature feature)
    {
        Features.Add(feature);
    }
}
Implement Builder Interface and Concrete Classes
Next, create the following builder interface that has methods to create different features of the hosting plan. There is also a GetPlan method that will return the completed plan.
IPlanBuilder.cs
public interface IPlanBuilder
{
    void BuildDiskSpaceFeature();
    void BuildDatabaseFeature();
    void BuildBandwidthFeature();
    void BuildSslFeature();

    Plan GetPlan();
}
Next, we need to create concrete builder classes that will implement the above IPlanBuilder interface and will provide the specific implementations of the building features to create the final hosting plan. We can have several variations of concrete builders and each one of these variations can be implemented differently. For this example, let’s create two hosting plan builders e.g. Basic and Enterprise.
The BasicPlanBuilder will define hosting plan features as per its requirements.
BasicPlanBuilder.cs
public class BasicPlanBuilder : IPlanBuilder
{
    public Plan Plan { get; set; } = new Plan();

    public BasicPlanBuilder()
    {
        this.Reset();
    }

    public void Reset()
    {
        Plan = new Plan() { Name = "Basic", Price = 19 };
    }

    public void BuildDiskSpaceFeature()
    {
        Plan.AddFeature(new Feature() { Title = "Disk Space", Value = "1 GB" });
    }

    public void BuildDatabaseFeature()
    {
        Plan.AddFeature(new Feature() { Title = "Database Size", Value = "5 GB" });
    }

    public void BuildBandwidthFeature()
    {
        Plan.AddFeature(new Feature() { Title = "Bandwidth", Value = "10 GB" });
    }

    public void BuildSslFeature()
    {
        Plan.AddFeature(new Feature() { Title = "SSL", Value = "Not Free" });
    }

    public Plan GetPlan()
    {
        Plan result = Plan;

        this.Reset();

        return result;
    }
}
The EnterprisePlanBuilder will define hosting plan features as per its own requirements.
EnterprisePlanBuilder.cs
public class EnterprisePlanBuilder : IPlanBuilder
{
    public Plan Plan { get; set; } = new Plan();

    public EnterprisePlanBuilder()
    {
        this.Reset();
    }

    public void Reset()
    {
        Plan = new Plan() { Name = "Enterprise", Price = 49 };
    }

    public void BuildDiskSpaceFeature()
    {
        Plan.AddFeature(new Feature() { Title = "Disk Space", Value = "100 GB" });
    }

    public void BuildDatabaseFeature()
    {
        Plan.AddFeature(new Feature() { Title = "Database Size", Value = "300 GB" });
    }

    public void BuildBandwidthFeature()
    {
        Plan.AddFeature(new Feature() { Title = "Bandwidth", Value = "Unlimited" });
    }

    public void BuildSslFeature()
    {
        Plan.AddFeature(new Feature() { Title = "SSL", Value = "Free" });
    }

    public Plan GetPlan()
    {
        Plan result = Plan;

        this.Reset();

        return result;
    }
}
Implement Director Interface and Class
The client application can create objects using the builders directly but it is a good idea to create a Director who is responsible for executing the object building steps in a particular sequence. The Director can also be helpful in scenarios where we want to produce products according to a specific configuration. In our web hosting plans example, the Director class can be used to build different hosting plans.
Let’s create the following IPlanDirector interface in the project. It has two methods to build Basic and Enterprise hosting plans and a method that will allow us to provide different types of builders. The director can work with any type of builder passed to it from the client.
IPlanDirector.cs
public interface IPlanDirector
{
    void SetPlanBuilder(IPlanBuilder builder);

    void BuildBasicPlan();

    void BuildEnterprisePlan();
}
Let’s implement the above interface in the following PlanDirector class. Notice how we are building all basic and enterprise features step by step in a particular order. Each step will add a specific feature, e.g. Diskspace, Database, etc. to the plan. The enterprise plan will add one additional feature SSL which is not available in the basic plan.
PlanDirector.cs
public class PlanDirector : IPlanDirector
{
    private IPlanBuilder _builder;

    public void SetPlanBuilder(IPlanBuilder builder)
    {
        _builder = builder;
    }

    public void BuildBasicPlan()
    {
        _builder.BuildDiskSpaceFeature();
        _builder.BuildDatabaseFeature();
        _builder.BuildBandwidthFeature();
    }

    public void BuildEnterprisePlan()
    {
        _builder.BuildDiskSpaceFeature();
        _builder.BuildDatabaseFeature();
        _builder.BuildBandwidthFeature();
        _builder.BuildSslFeature();
    }
}
Testing Builder Pattern Implementation
We are now ready to test our builders and directors in an ASP.NET Core application. To use the above builders and directors, we need to Register in the Startup.cs file as follows.
Startup.cs
public void ConfigureServices(IServiceCollection services)
{
    services.AddControllersWithViews();

    services.AddScoped<IPlanBuilder, BasicPlanBuilder>();
    services.AddScoped<IPlanBuilder, EnterprisePlanBuilder>();

    services.AddScoped<IPlanDirector, PlanDirector>();
}
In our example application, we want to build and return multiple pricing plans so let’s create the following PricingPlansModel class that will hold all these plans for us. We will pass the model to the Razor view to display pricing plans on the page.
PricingPlansModel.cs
public class PricingPlansModel
{
    public Plan BasicPlan { get; set; }
    public Plan EnterprisePlan { get; set; }
    public Plan CustomPlan { get; set; }
}
The client code needs to create a builder object, pass it to the director, and then initiates the construction process. The final product is then retrieved from the builder object since the director isn’t aware of and not dependent on concrete builders and products.
Open the HomeController and inject the IPlanDirector in the constructor of the controller. Inside the Index action method, create the BasicPlanBuilder object, pass it to the director using the setPlanBuilder method, initiate the building process by calling the BuildBasicPlan method, and finally get the complete plan using the builder’s GetPlan method.
HomeController.cs
public class HomeController : Controller
{
    private readonly IPlanDirector _director;

    public HomeController(IPlanDirector director)
    {
        _director = director;
    }

    public IActionResult Index()
    {
        PricingPlansModel model = new PricingPlansModel();

        // Build Basic Plan

        var basicPlanBuilder = new BasicPlanBuilder();
        _director.SetPlanBuilder(basicPlanBuilder);
        _director.BuildBasicPlan();
        model.BasicPlan = basicPlanBuilder.GetPlan();
   }

   return View(model);
}
To display the pricing plans, you can add the following code to the razor view page.
Index.cshtml
@model BuilderDesignPatternDemo.Models.PricingPlansModel;

@{
    ViewData["Title"] = "Pricing Plans";
}

<div class="text-center">
    <div class="px-3 py-3 pt-md-5 pb-md-4 mx-auto text-center">
        <h1 class="display-4">Pricing Plans</h1>
    </div>
    <div class="container">
        <div class="card-deck mb-3 text-center">

            <div class="card mb-4 box-shadow">
                <div class="card-header">
                    <h3 class="my-0 font-weight-normal">@Model.BasicPlan.Name</h3>
                </div>
                <div class="card-body">
                    <h4 class="card-title">
                        $ @Model.BasicPlan.Price
                        <small class="text-muted">/ mo</small>
                    </h4>
                    <ul class="list-unstyled mt-3 mb-4">
                        @foreach (var feature in Model.BasicPlan.Features)
                        {
                            <li>@feature.Title - @feature.Value</li>
                        }
                    </ul>
                    <button type="button" class="btn btn-lg btn-block btn-primary">Buy Now</button>
                </div>
            </div>

        </div>
    </div>
</div>
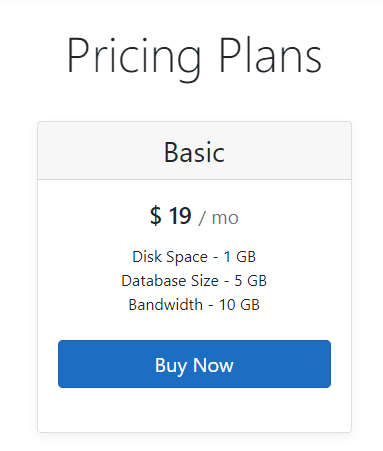
Run the project and you should see the Basic pricing plan as shown in the following screenshot.
The code for building an enterprise plan is quite similar but this time you need to create an EnterprisePlanBuilder object and you need to call the BuildEnterprisePlan method of the director. The BuildEnterprisePlan will then add all the features related to the enterprise plan in the order we implemented above.
public IActionResult Index()
{
    PricingPlansModel model = new PricingPlansModel();

    // Build Basic Plan

    var basicPlanBuilder = new BasicPlanBuilder();
    _director.SetPlanBuilder(basicPlanBuilder);
    _director.BuildBasicPlan();
    model.BasicPlan = basicPlanBuilder.GetPlan();

    // Build Enterprise Plan

    var enterprisePlanBuilder = new EnterprisePlanBuilder();
    _director.SetPlanBuilder(enterprisePlanBuilder);
    _director.BuildEnterprisePlan();
    model.EnterprisePlan = enterprisePlanBuilder.GetPlan();

    return View(model);
}
The razor view markup will also be quite similar and this time we need to render enterprise plan details and features.
<div class="card mb-4 box-shadow">
    <div class="card-header">
        <h3 class="my-0 font-weight-normal">@Model.EnterprisePlan.Name</h3>
    </div>
    <div class="card-body">
        <h4 class="card-title">
            $ @Model.EnterprisePlan.Price
            <small class="text-muted">/ mo</small>
        </h4>
        <ul class="list-unstyled mt-3 mb-4">
            @foreach (var feature in Model.EnterprisePlan.Features)
            {
                <li>@feature.Title - @feature.Value</li>
            }
        </ul>
        <button type="button" class="btn btn-lg btn-block btn-primary">Buy Now</button>
    </div>
</div>
I already mentioned above that we don’t need to use the director to implement the builder pattern. We can also create objects using the builders so let’s create a custom pricing plan using this approach. Create an object of the BasicPlanBuilder class and mix and match the features you need to build your custom plan. For example, I can only add the Disk space and bandwidth features in my custom plan and can omit the Database and SSL features.
public IActionResult Index()
{
    PricingPlansModel model = new PricingPlansModel();

    // Build Basic Plan

    var basicPlanBuilder = new BasicPlanBuilder();
    _director.SetPlanBuilder(basicPlanBuilder);
    _director.BuildBasicPlan();
    model.BasicPlan = basicPlanBuilder.GetPlan();

    // Build Enterprise Plan

    var enterprisePlanBuilder = new EnterprisePlanBuilder();
    _director.SetPlanBuilder(enterprisePlanBuilder);
    _director.BuildEnterprisePlan();
    model.EnterprisePlan = enterprisePlanBuilder.GetPlan();


    // Build Custom Plan

    var customPlanBuilder = new BasicPlanBuilder();
    customPlanBuilder.BuildDiskSpaceFeature();
    customPlanBuilder.BuildBandwidthFeature();
    model.CustomPlan = customPlanBuilder.GetPlan();

    return View(model);
}
To display the custom plan, you can use the following markup in the razor view page.
<div class="card mb-4 box-shadow">
    <div class="card-header">
        <h3 class="my-0 font-weight-normal">@Model.CustomPlan.Name</h3>
    </div>
    <div class="card-body">
        <h4 class="card-title">
            Custom Pricing
        </h4>
        <ul class="list-unstyled mt-3 mb-4">
            @foreach (var feature in Model.CustomPlan.Features)
            {
                <li>@feature.Title - @feature.Value</li>
            }
        </ul>
        <button type="button" class="btn btn-lg btn-block btn-primary">Buy Now</button>
    </div>
</div>
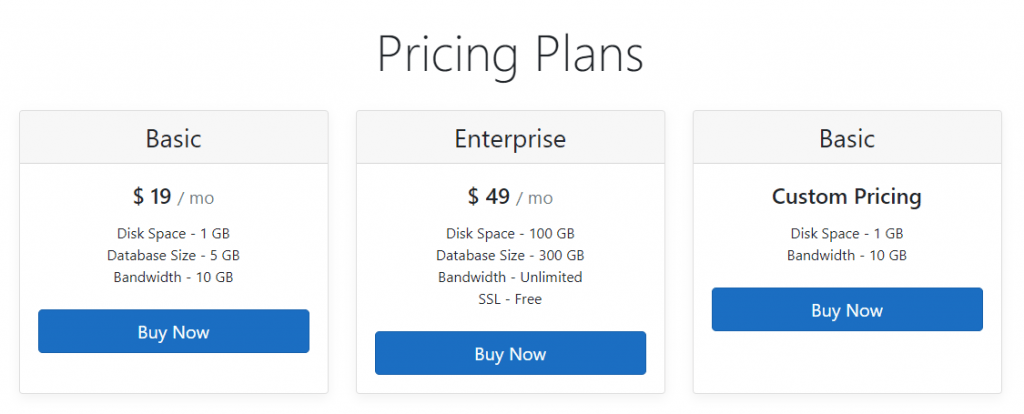
Run the application once again and you should see all pricing plans as shown below.
You can download the complete source code of this post using the Download Source Code button shown at the start of this post.
Summary
The Builder pattern lets you construct composite trees or other complex objects step by step, using only those steps that you really need. This makes our code very easy to understand and maintain. I hope you have found this post useful. If you have any comments or suggestions, please leave your comments below. Don’t forget to share this tutorial with your friends or community.


