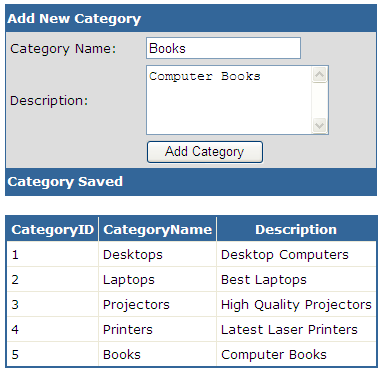
The ObjectDataSource control enables you to bind Databound controls such as the GridView, FormView or DetailsView controls to a custom .NET component. Normally, these custom .NET components are available in Business Login Layer or Data Access Layer and they perform all basic operations such as Insert, Update, Delete or Selecting Data from the backend Data Source. In this tutorial I will show you how you can use ObjectDataSource control to insert data in Database. I will also show you how you can pass custom .NET objects as parameters and how you can handle exceptions while inserting data in Database.
The ObjectDataSource control has TypeName property which specifies the fully qualified name of the custom .NET component you want ObjectDataSource to connect for its operations. It also has four major properties for basic database operations such as SelectMethod, UpdateMethod, InsertMethod and DeleteMethod. These four properties can be set with the names of the methods available in custom .NET component.

Let’s start with a simple Data Access Layer component named CategoriesDAL what has two simple methods. The first method GetCategories will fetch all the Categories from the Database. This method executes SQL SELECT statement and returns a DataTable object. The second method AddCategory takes Category object as parameter and then executes SQL INSERT statement to insert data in Categories table in Database.
public class CategoriesDAL
{
   public DataTable GetCategories()
   {
      string constr = "Server=TestServer; Database=SampleDatabase; uid=test; pwd=test;";
      string query = "SELECT CategoryID, CategoryName, Description FROM Categories";

      SqlDataAdapter da = new SqlDataAdapter(query, constr);
      DataTable table = new DataTable();

      da.Fill(table);
      return table;
   }

   public void AddCategory(Category c)
   {
      string constr = "Server=TestServer; Database=SampleDatabase; uid=test; pwd=test;";
      string query = "INSERT INTO Categories (CategoryName, Description) VALUES(@CategoryName, @Description)";

      SqlConnection con = new SqlConnection(constr);
      SqlCommand com = new SqlCommand(query, con);

      com.Parameters.AddWithValue("@CategoryName", c.CategoryName);
      com.Parameters.AddWithValue("@Description", c.Description);

      con.Open();
      com.ExecuteNonQuery();
      con.Close();
   }
}
The Category object is very straight forward and has only two simple properties:
public class Category
{
   public string CategoryName { get; set; }
   public string Description { get; set; }
}
Once the component is ready we can configure ObjectDataSource control to use CategoriesDAL component and its methods for Selecting and Inserting categories. Following markup shows you how you can configure ObjectDataSource control. Notice how the properties TypeName, SelectMethod and InsertMethod are configured to use the CategoriesDAL components and its methods. I have also given a value to the DataObjectTypeName property which needs the name of the type you want to pass as a parameter in your Insert method. For example in this tutorial I am passing Category object as parameter in AddCategory method so DataObjectTypeName property value should be the name of Category object.
<asp:ObjectDataSource ID="ObjectDataSource1" runat="server"
   DataObjectTypeName="Category"
   InsertMethod="AddCategory"
   SelectMethod="GetCategories"
   TypeName="CategoriesDAL">
</asp:ObjectDataSource>
You can use a simple GridView control to display categories as shown in the figure above. Here is the markup of GridView control which is associated with ObjectDataSource control for displaying categories.
<asp:GridView ID="GridView1" runat="server" DataSourceID="ObjectDataSource1"
   BorderColor="#336699" BorderStyle="Solid" BorderWidth="2px" CellPadding="4"
   Font-Names="Verdana" Font-Size="10pt">
   <HeaderStyle BackColor="#336699" ForeColor="White" />
</asp:GridView>
I am using FormView control to create user interface for inserting category in database. The FormView control is very powerful template driven control added in ASP.NET 2.0. You can use the FormView control to display, page, edit, insert and delete records. By using FormView templates you have full control over the layout of the edit or insert forms. Following markup shows you how to associate the FormView control with the ObjectDataSource control and how to use InsertItemTemplate of the control to create insert form shown in the above figure.
<asp:FormView ID="FormView1" runat="server" BackColor="#DDDDDD"
   BorderColor="#336699" BorderStyle="Solid" BorderWidth="1px"
   DataSourceID="ObjectDataSource1" DefaultMode="Insert"
   Font-Names="Verdana" Font-Size="10pt" HeaderText="Add New Category"
   Width="372px" OnItemInserted="FormView1_ItemInserted">

   <FooterStyle BackColor="#336699" Font-Bold="True"
      ForeColor="White" Height="25px" />

   <InsertItemTemplate>

      <table class="style1">
         <tr>
            <td>Category Name:</td>
            <td>
               <asp:TextBox ID="txtCategoryName" runat="server"
                  Text='<%# Bind("CategoryName") %>' />
            </td>
         </tr>
         <tr>
            <td>Description:</td>
            <td>
               <asp:TextBox ID="txtDescription" runat="server"
                  Text='<%# Bind("Description") %>' TextMode="MultiLine" Rows="4" />
            </td>
         </tr>
         <tr>
            <td> </td>
            <td>
               <asp:Button ID="Button1" runat="server" CommandName="Insert"
                  Text="Add Category" />
            </td>
         </tr>
      </table>

   </InsertItemTemplate>

   <HeaderStyle BackColor="#336699" Font-Bold="True"
      ForeColor="White" Height="25px" />

</asp:FormView>
I have created a simple HTML table inside InsertItemTemplate that has two TextBox and one Button controls. Notice how the Text property of the TextBox controls is bind with the properties of Category object using the ASP.NET binding expression syntax. The Bind method used here provides two way data binding capabilities to display and modify database. Keep in mind that you need to set Button CommandName property to Insert to fire Insert command of FormView control.
The final important information in the above markup is the ItemInserted event of FormView control. I have attached an event handler with ItemInserted event to check whether data in inserted or not. This event fires at data bound control level rather than ObjectDataSource control level and it also allows you to handle exceptions while inserting the data in the database. Following code shows you how to handle ItemInserted event. It checks the ExceptionFormViewInsertedEventArgs property of object and if it is not null it keeps FormView in InsertMode and also set the ExceptionHandled flag to true.
protected void FormView1_ItemInserted(object sender, FormViewInsertedEventArgs e)
{
   if (e.Exception == null)
   {
      FormView1.FooterText = "Category Saved";
   }
   else
   {
      e.ExceptionHandled = true;
      e.KeepInInsertMode = true;

      FormView1.FooterText = "Failed to Saved Category";
   }
}


Nice Article..
Thank you very much this helped me lot
hi sir
this article is very good. its very helpful for the beginners like me. it will be more appreciated if you place the sample applications with all your articles in both vb.net and C#.
Thanks
Shahid
Thanks man…nice tutorial.
Assalam-o-Alaikum,
Thank you so much for demonstrating an important topic in very simple manners. I am new to asp.net and was trying to get basic information/method that how to use objectdatasource but never found it before.
Hoping to see more articles on the same topic with different issues.
Best regards,
H.Bilal