In my previous post Getting Started with GraphQL in ASP.NET Core, you learned how to write and test GraphQL queries using the Entity Framework Core and a popular GraphQL library called Hot Chocolate. In this post, I will show you how to build a simple GraphQL server and expose API endpoints that can be used to run CRUD operations using GraphQL queries and mutations.
Table of Contents
Initial ASP.NET Core Project Setup
The initial setup required for this tutorial is almost the same as we use in the previous post. We will use Visual Studio 2022, Entity Framework Core, and ASP.NET Core with .NET 6.0. We will be using the same database FootballDb which I used in my previous post. The database has the following two tables in it.
- Positions – This table will store different positions e.g. Goalkeeper, Defender, Midfielder, etc.
- Players – This table will store the data about football players. It has columns such as ShirtNo, Name, PositionId (FK), Appearances, Goals, etc.
We also need to download and install the following Nuget packages for using Entity Framework and Hot Chocolate.
We then need to add the database connection string in the appsettings.json file
"ConnectionStrings": {
    "DefaultConnection": "Server=.; Database=FootballDb;
      Trusted_Connection=True; MultipleActiveResultSets=true"
}
Next, we need to generate the Entity Framework models and DbContext using the following Scaffold-DbContext command.
Scaffold-DbContext -Connection "Server=.; Database=FootballDb;
Trusted_Connection=True; MultipleActiveResultSets=true;"
-Provider Microsoft.EntityFrameworkCore.SqlServer -OutputDir "Models"
-ContextDir "Data" -Context "SportsDbContext" –NoOnConfiguring
Finally, we need to configure the Entity Framework Core provider in Program.cs file as shown below:
builder.Services.AddDbContext<SportsDbContext>(options =>
    options.UseSqlServer(builder.Configuration.GetConnectionString("DefaultConnection")));
Implementing Backend Services
To perform CRUD operations using GraphQL queries and mutations, we first need to make sure that we have the business layer ready. Create a Services folder in the project and create the following IPlayersService interface. The interface will declare several methods for performing CRUD operations on the Players table in the database.
IPlayersService.cs
public interface IPlayerService
{
    Task<Player> CreatePlayerAsync(Player player);
    Task<int> UpdatePlayerAsync(Player player);
    Task<int> DeletePlayerAsync(Player player);
    Task<Player> GetPlayerAsync(int id);
    Task<IEnumerable<Player>> GetAllPlayersAsync();
}
Create a PlayersService class in the Services folder and implement the IPlayersService interface on the class. You need to inject SportsDbContext into the service class to perform database operations.
PlayersService.cs
public class PlayerService : IPlayerService
{
    private readonly SportsDbContext _context;

    public PlayerService(SportsDbContext context)
    {
        _context = context;
    }

    public async Task<IEnumerable<Player>> GetAllPlayersAsync()
    {
        return await _context.Players
            .Include(x => x.Position)
            .ToListAsync();
    }

    public async Task<Player> GetPlayerAsync(int id)
    {
        return await _context.Players
            .Include(x => x.Position)
            .Where(x => x.Id == id)
            .SingleAsync();
    }

    public async Task<Player> CreatePlayerAsync(Player player)
    {
        _context.Players.Add(player);
        await _context.SaveChangesAsync();
        return player;
    }

    public async Task<int> UpdatePlayerAsync(Player player)
    {
        _context.Players.Update(player);
        return await _context.SaveChangesAsync();
    }

    public async Task<int> DeletePlayerAsync(Player player)
    {
        _context.Players.Remove(player);
        return await _context.SaveChangesAsync();
    }
}
The methods defined in the PlayerService are very straightforward forward and they perform the following operations.
- GetAllPlayersAsync – returns all players along with their positions
- GetPlayerAsync – returns a single player matching with the id parameter
- CreatePlayerAsync – inserts a new player in the database
- UpdatePlayerAsync – updates an existing player in the database
- DeletePlayerAsync – deletes a player from the database
You can also create the following IPositionService interface and PositionService classes in the Services folder. This class currently has only one method that returns all positions from the Positions table in the database but you can also create other methods as per application requirements.
IPositionService
public interface IPositionService
{
    Task<IEnumerable<Position>> GetAllPositionsAsync();
}
PositionService
public class PositionService : IPositionService
{
    private readonly SportsDbContext _context;

    public PositionService(SportsDbContext context)
    {
        _context = context;
    }

    public async Task<IEnumerable<Position>> GetAllPositionsAsync()
    {
        return await _context.Positions
            .ToListAsync();
    }
}
Finally, we need to register the above services in the Program.cs file so that we can use ASP.NET Core built-in dependency injection feature.
builder.Services.AddScoped<IPlayerService, PlayerService>();
builder.Services.AddScoped<IPositionService, PositionService>();
Configure GraphQL Server using Hot Chocolate
Hot Chocolate is an open-source GraphQL library that is compliant with the latest GraphQL specs. It takes away a lot of the complexity of building a full-fledge GraphQL server and lets you focus on writing your APIs. To build a GraphQL server, we need to call the AddGraphQLServer method in the Program.cs file.
builder.Services
    .AddGraphQLServer()
To expose the GraphQL server on /graphql endpoint, we need to call the MapGraphQL method in Program.cs file.
app.MapGraphQL();
To build GraphQL queries and mutations, we need to define GraphQL schema. Hot Chocolate provides three different ways to define a schema.
Schema First
This approach fully involves writing GraphQL schema using Schema Definition Language.
public class Author
{
    public string Name { get; set; }
}

public class Startup
{
    public void ConfigureServices(IServiceCollection services)
    {
        services
            .AddGraphQLServer()
            .AddDocumentFromString(@"
                type Author {
                  name: String
                }
            ")
            .BindRuntimeType<Author>();
    }
}
Code First
In this approach, you don’t need to write schema definitions by hand. You need to create a new class inheriting from ObjectType<T> to map your POCO classes to an object type. Using this technique, you can keep the GraphQL type configuration separate from your .NET types.
public class Author
{
    public string Name { get; set; }
}

public class AuthorType : ObjectType<Author>
{
    protected override void Configure(IObjectTypeDescriptor<Author> descriptor)
    {

    }
}
Annotation-Based or Pure Code First
In this approach, we don’t bother about GraphQL schema types, we will just write clean C# code that automatically translates to GraphQL types.
[ExtendObjectType("Query")]
public class BookQueryResolver
{
    public Book GetBook()
    {
        return new Book { Title  = "Learning GraphQL", Author = "Eve Porcello" };
    }
}

public class Startup
{
    public void ConfigureServices(IServiceCollection services)
    {
        services
            .AddGraphQLServer()
            .AddQueryType(q => q.Name("Query"))
           .AddType<BookQueryResolver>();
    }
}
You are not bound to any one method. You can mix and match any approach depending on your application architecture. Please note that under the hood all of these approaches are translated into the code-first approach. In this tutorial, I will use the Annotation based approach to write GraphQL queries and mutations.
What is GraphQL Query Resolver?
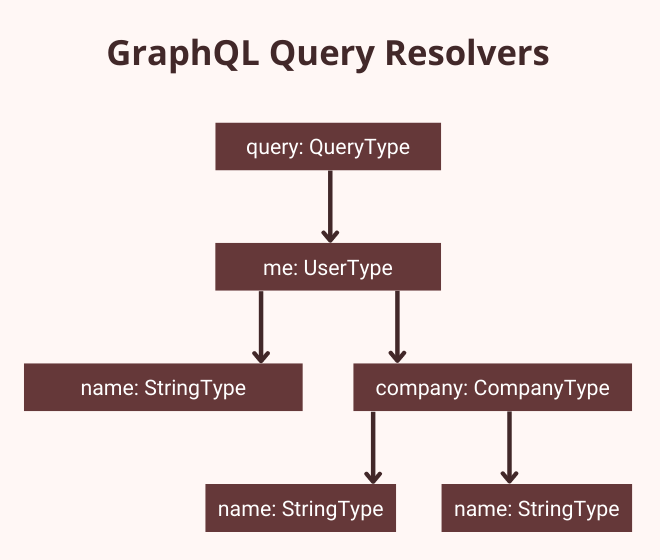
GraphQL resolver acts as a query handler and it consists of one or more functions that are responsible for fetching data from an arbitrary data source and generating the response for a particular field in GraphQL queries. GraphQL query is normally a hierarchy of fields where each field has a resolver associated with it. Let’s imagine we have a simple GraphQL query like the following where we want to fetch some fields of the currently logged-in user.
query {
  me {
    name
    company {
      id
      name
    }
  }
}
The above query will result in the following resolver tree where the GraphQL engine will traverse the tree starting from the root resolver, e.g. me, and will execute the resolver of each field one after another. Please keep in mind that a child field resolver will only start its execution after the parent field value is resolved.
Implementing GraphQL Query Resolvers
It is now time to implement our first GraphQL query resolver so let’s create a Resolvers folder inside the project root folder and then create a new folder named Queries inside the Resolvers folder. Next, add a new C# class inside the Queries folder with the name PlayerQueryResolver and add the following code inside the class.
PlayerQueryResolver.cs
[ExtendObjectType("Query")]
public class PlayerQueryResolver
{
	public async Task<IEnumerable<Player>> GetAllPlayersAsync(
		[Service] IPlayerService playerService)
	{
		return await playerService.GetAllPlayersAsync();
	}
}
In the above code snippet:
- Query resolver class is decorated with the ExtendObjectType attribute that allows us to add, remove or replace fields on existing types. We passed the name Query inside the method as a parameter because we want to extend the GraphQL Query type by name.
- The class has only one method named GetAllPlayersAsync in which we are injecting the IPlayerService object using the [Service] attribute.
- The method calls the GetAllPlayersAsync method of PlayerService class and returns all players available in the database.
Open the Program.cs file and add the following code to it.
builder.Services
    .AddGraphQLServer()
    .AddQueryType(q => q.Name("Query"))
    .AddType<PlayerQueryResolver>();
In the above code snippet, we registered the Query type using the AddQueryType method. Note that we passed the name Query to define a root query resolver that can be extended by all query resolvers of the project using the [ExtendObjectType(“Query”)] attribute as we did in our PlayerQueryResolver class. Finally, we registered our PlayerQueryResolver class using the AddType extension method.
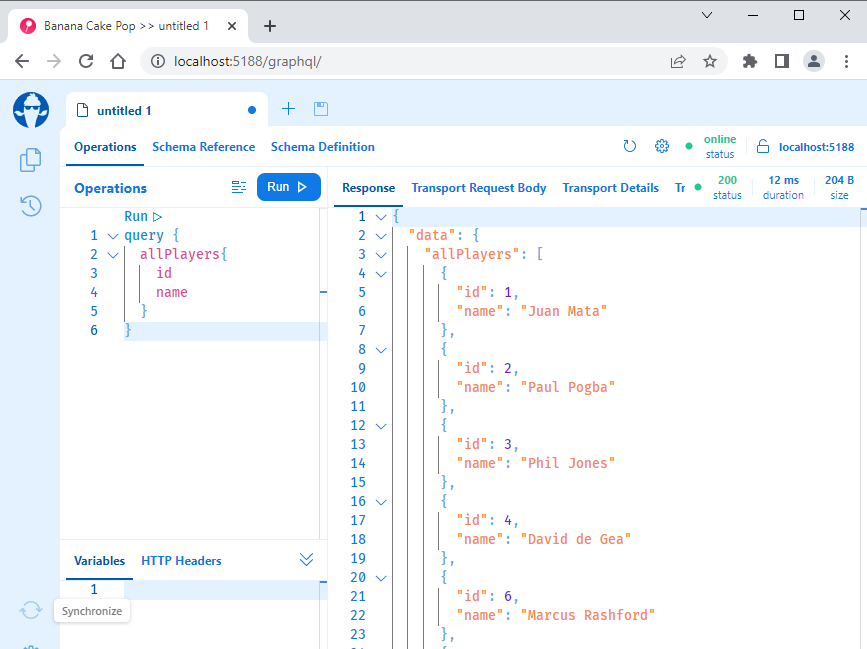
Let’s run the project and query players using the following GraphQL Query.
query {
  allPlayers{
    id
    name
  }
}
You will see the output similar to the following screenshot.
If you are not sure how to run GraphQL queries in the browser then read my previous post Getting Started with GraphQL in ASP.NET Core.
Organizing Multiple Query Resolvers
You can create one query resolver class and define all methods of your project inside one class. For better code management, it is better to have a separate query resolver class per type. Let’s create a second query resolver PositionQueryResolver inside the Queries folder.
PositionQueryResolver.cs
[ExtendObjectType("Query")]
public class PositionQueryResolver
{
	public async Task<IEnumerable<Position>> GetAllPositionsAsync(
		[Service] IPositionService positionService)
	{
		return await positionService.GetAllPositionsAsync();
	}
}
Register the second query resolver PositionQueryResolver in Program.cs file using the same AddType method as shown in the code snippet below.
builder.Services
    .AddGraphQLServer()
    .AddQueryType(q => q.Name("Query"))
    .AddType<PlayerQueryResolver>()
    .AddType<PositionQueryResolver>();
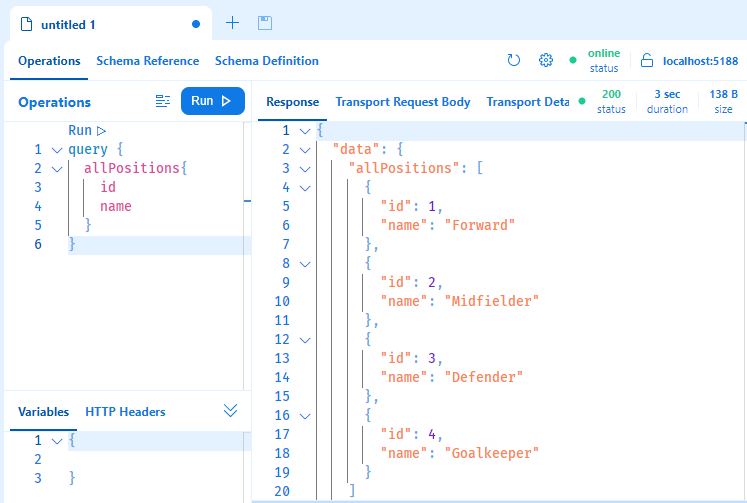
Run the project once again and try to query all positions as follows.
query {
  allPositions{
    id
    name
  }
}
You should see the output similar to the following screenshot.
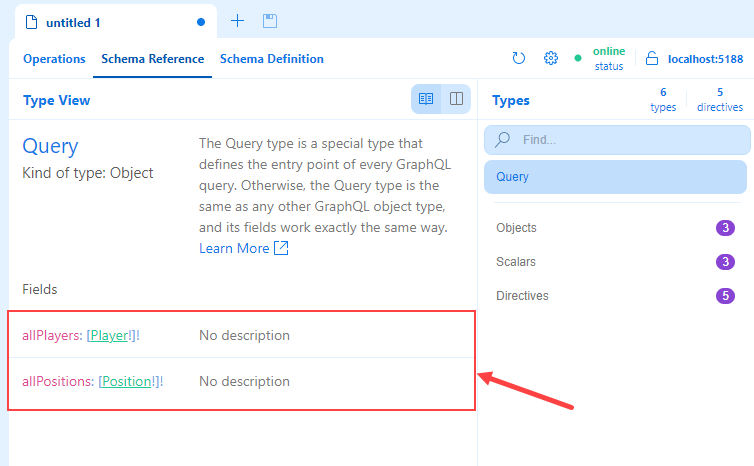
Adding GraphQL Schema Documentation
If your project is still running in the browser, then navigate to the Schema Reference tab and you will see that both allPlayers and allPositions are defined with no description. By default, the Hot Chocolate library automatically infers the names of the object types and their fields using the following rules.
- The name of the class becomes the name of the object type in GraphQL schema definition language.
- If you are using ObjectType<T> using the Code-first approach, then the name of T will become the name of the object type.
- The names of the methods and properties in a class will become the names of the fields of the object type.
- Get prefixes will be removed from the method names as it is redundant information.
- Async postfixes will also be removed because they refer to implementation details and they are not relevant to the schema.
- The first letter will be lowercased as a widely agreed upon standard in the GraphQL world.
For better API documentation, it is very important that you explicitly set names and some descriptions to your GraphQL endpoints for the API callers. Luckily, the Hot Chocolate library provides some useful attributes to add some metadata information to your GraphQL queries.
- The [GraphQLName] attribute allows us to specify an explicit name.
- The [GraphQLDescription] attribute can be used to provide descriptions for classes, properties, methods, and method parameters.
You can now add the above attributes with the GetAllPlayersAsync method as shown below.
[ExtendObjectType("Query")]
public class PlayerQueryResolver
{
    [GraphQLName("players")]
    [GraphQLDescription("Players API")]
    public async Task<IEnumerable<Player>> GetAllPlayersAsync(
        [Service] IPlayerService playerService)
    {
        return await playerService.GetAllPlayersAsync();
    }
}
Similarly, you can add the same attributes with the GetAllPositionsAsync method.
[ExtendObjectType("Query")]
public class PositionQueryResolver
{
    [GraphQLName("positions")]
    [GraphQLDescription("Positions API")]
    public async Task<IEnumerable<Position>> GetAllPositionsAsync(
        [Service] IPositionService positionService)
    {
        return await positionService.GetAllPositionsAsync();
    }
}
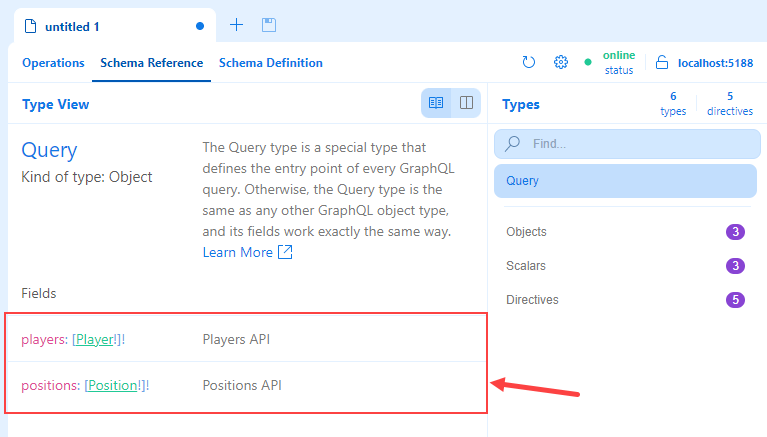
Run the project once again and you will see much better names and descriptions of your queries.
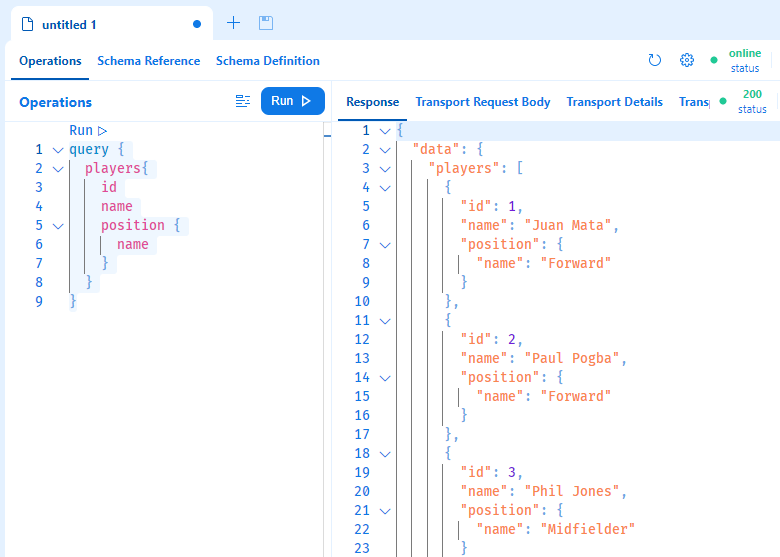
You can now fetch all players using the players field instead of allPlayers field.
query {
  players{
    id
    name
    position {
      name
    }
  }
}
Run the project once again and you should see the query response similar to the following screenshot.
Querying Single Record using GraphQL Filters
Until now, all our examples are querying all players from the database. If you want to fetch a single record, you need to define another query method GetPlayerAsync in PlayersQueryResolver class.
[GraphQLName("player")]
[GraphQLDescription("Get Player API")]
public async Task<Player> GetPlayerAsync(int id,
	[Service] IPlayerService playerService)
{
	return await playerService.GetPlayerAsync(id);
}
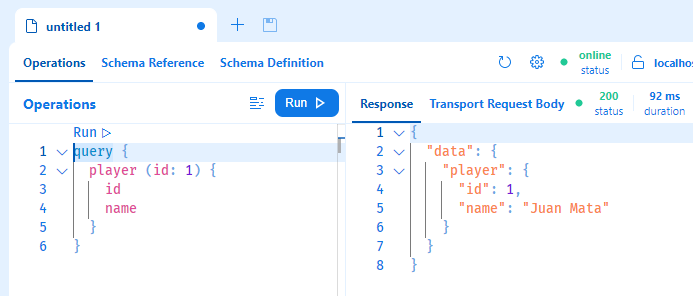
The method GetPlayerAsync is accepting an int parameter id that will be passed to it from the GraphQL query. This parameter will be passed to the GetPlayerAsync method of PlayerService which will fetch the player with the matching id parameter value. To query this method, you can write the following GraphQL query in the browser window.
query {
  player (id: 1) {
    id
    name
  }
}
Run the project once again and you should see the output as shown below.
What is GraphQL Mutation?
GraphQL mutations are functions that allow us to mutate/change data on the server side. Using mutations, we can insert new data or modify or delete existing data in the same manner as we do with POST, PUT or DELETE requests in the REST world. Mutations are defined using the Mutation type which are top-level fields in GraphQL. This means that you need to define the Mutation type once and then clients can execute one or more mutations (methods) as per requirements. The following code snippet shows a typical mutation in GraphQL schema definition language.
type Mutation {
  addBook(input: AddBookInput!): AddBookPayload!
  updateBook(input: UpdateBookInput!): UpdateBookPayload!
}
In C#, mutation type can be defined as a regular class and we can register that class in Program.cs file using the AddMutationType method.
services
    .AddGraphQLServer()
    .AddMutationType<Mutation>();
Please note that Hot Chocolate allows you to only register one mutation type using the AddMutationType method. If you have multiple mutation classes, you can use Hot Chocolate type extensions.
Creating Records using GraphQL Mutations
So far, we created two Query resolvers inside the Queries folder. I am a fan of keeping everything organized so I want to keep my mutations separate from queries. Create a new folder Mutations inside the Resolvers folder we created earlier and add the following class in it.
PlayerInput.cs
public class PlayerInput
{
    public int? ShirtNo { get; set; }
    public string? Name { get; set; }
    public int? PositionId { get; set; }
    public int? Appearances { get; set; }
    public int? Goals { get; set; }
}
This is a simple C# class that has the properties of the player and we will use this class in our mutation methods as a parameter. Next, create a mutation class with the name PlayerMutationResolver inside the Mutations folder and add the following CreatePlayerAsync method in the class.
PlayerMutationResolver.cs
[ExtendObjectType("Mutation")]
public class PlayerMutationResolver
{
    [GraphQLName("createPlayer")]
    [GraphQLDescription("Create New Player")]
    public async Task<Player> CreatePlayerAsync(PlayerInput playerInput,
        [Service] IPlayerService playerService)
    {
        var player = new Player()
        {
            ShirtNo = playerInput.ShirtNo,
            Name = playerInput.Name,
            PositionId = playerInput.PositionId,
            Appearances = playerInput.Appearances,
            Goals = playerInput.Goals
        };

        return await playerService.CreatePlayerAsync(player);
    }
}
- The PlayerMutationResolver class is decorated with the same ExtendObjectType attribute we used with the PlayerQueryResolver resolver earlier. This time, we passed the name Mutation as a method parameter because we want to extend the GraphQL Mutation type by name.
- The class has one method CreatePlayerAsync in which we are passing the PlayerInput class object as an argument. We are also injecting the IPlayerService object using the [Service] attribute.
- The method first copies the PlayerInput object properties to a Player class object and then calls the CreatePlayerAsync method of PlayerService class to create a player in the database and then returns the created Player object.
Open the Program.cs file and add the following code to it.
builder.Services
    .AddGraphQLServer()
    .AddQueryType(q => q.Name("Query"))
    .AddType<PlayerQueryResolver>()
    .AddType<PositionQueryResolver>()
    .AddMutationType(m => m.Name("Mutation"))
    .AddType<PlayerMutationResolver>();
In the above code snippet, we registered the Mutation type using the AddMutationType method. Note that we passed the name Mutation to define a root mutation resolver that can be extended by all mutation resolvers of the project using the [ExtendObjectType(“Mutation”)] attribute as we did in our PlayerMutationResolver class. Finally, we registered our PlayerMutationResolver class using the AddType extension method.
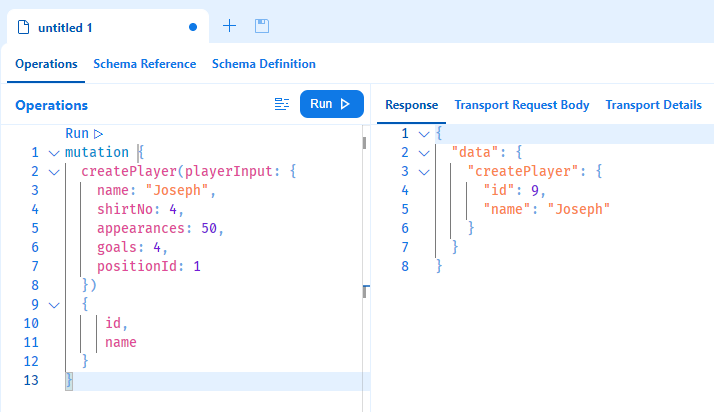
Let’s run the project and create a new player in the database using the following GraphQL mutation request.
mutation {
  createPlayer(playerInput: {
    name: "Joseph",
    shirtNo: 4,
    appearances: 50,
    goals: 4,
    positionId: 1
  })
  {
     id,
     name
  }
}
Once you will hit the Run button, you will see the output similar to the following screenshot. Note how we are querying the id and name properties of the players we just created in the database and returning from our mutation method.
Updating Records using GraphQL Mutations
To update players in the database, we can create the following method UpdatePlayerAsync in our PlayerMutationResolver class.
[GraphQLName("updatePlayer")]
[GraphQLDescription("Update Player")]
public async Task<Player> UpdatePlayerAsync(int id, PlayerInput playerInput,
    [Service] IPlayerService playerService)
{
    var player = await playerService.GetPlayerAsync(id);
    if(player == null)
    {
        throw new GraphQLException(new Error("Player not found.", "PLAYER_NOT_FOUND"));
    }

    player.ShirtNo = playerInput.ShirtNo;
    player.Name = playerInput.Name;
    player.PositionId = playerInput.PositionId;
    player.Appearances = playerInput.Appearances;
    player.Goals = playerInput.Goals;

    await playerService.UpdatePlayerAsync(player);

    return player;
}
- The method queries the player from the database using the GetPlayerAsync method of PlayerService class and if it didn’t find the player matching with the id parameter value then it throws a custom exception named GraphQLException that is available to us from the Hot Chocolate library.
- If a player is found, then the method simply updates the properties of the player object using the PlayerInput object passed in the method as an argument.
- Finally, the method calls the UpdatePlayerAsync method to update the player in the database.
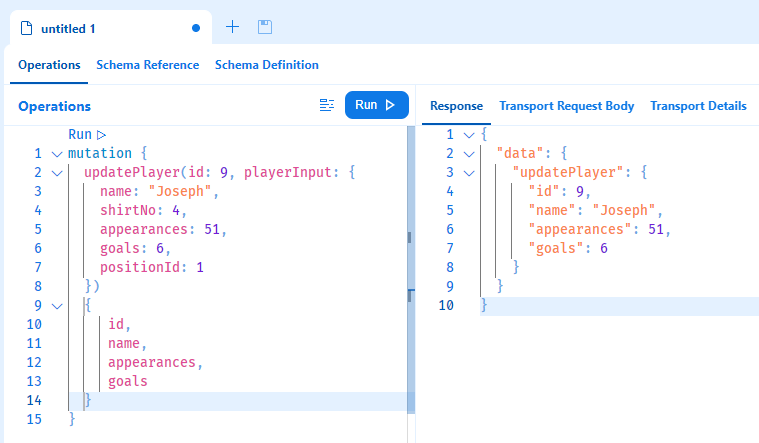
You can run the project and use the following GraphQL mutation request to update the player in the database.
mutation {
  updatePlayer(id: 9, playerInput: {
    name: "Joseph",
    shirtNo: 4,
    appearances: 51,
    goals: 6,
    positionId: 1
  })
  {
     id,
     name,
     appearances,
     goals
  }
}
Hit the Run button, you will see the output similar to the following screenshot.
Deleting Records using GraphQL Mutations
To delete players from the database, we can create the following method DeletePlayerAsync in our PlayerMutationResolver class.
[GraphQLName("deletePlayer")]
[GraphQLDescription("Delete Player")]
public async Task<int> DeletePlayerAsync(int id,
    [Service] IPlayerService playerService)
{
    var player = await playerService.GetPlayerAsync(id);
    if (player == null)
    {
        throw new GraphQLException(new Error("Player not found.", "PLAYER_NOT_FOUND"));
    }

    return await playerService.DeletePlayerAsync(player);
}
- The method queries the player from the database using the GetPlayerAsync method of PlayerService class.
- It then calls the DeletePlayerAsync method to delete the player in the database.
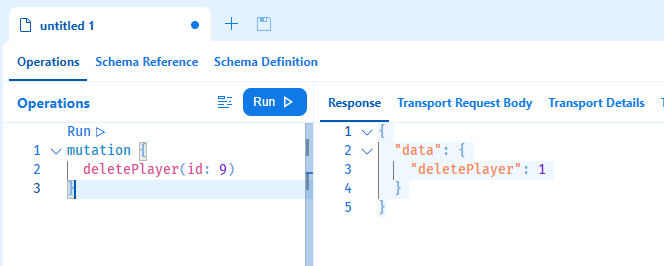
You can run the project and use the following GraphQL mutation request to delete the player from the database.
mutation {
  deletePlayer(id: 9)
}
Hit the Run button, you will see the output similar to the following screenshot.
Summary
I am hoping that I have delivered a lot of useful information related to GraphQL queries and mutations and also covered the necessary steps required to integrate the Hot Chocolate library with ASP.NET Core and Entity Framework. If you have any comments or suggestions, please leave your comments below. Don’t forget to share this tutorial with your friends or community.


