
In my previous tutorial Binding Android ListView with String Array using ArrayAdapter, I have shown you how you can bind the Android ListView control with an array of String objects. Although it was a very simple implementation, but it was useful for those who are just starting learning Android application development. As an Android developer, soon you will realize that showing simple Strings in the ListView is not what you exactly want in real-world Android Apps, and you will often find yourself dealing with collections of custom Java objects. In this tutorial, I have decided to show you how you can bind Android ListView with custom objects using ArrayAdapter.
Create a new Android project in Eclipse with MainActivity as your default Activity and main.xml as your default layout file. Declare a ListView control in your main.xml layout file as shown in the following code.
Table of Contents
main.xml
<?xml version="1.0" encoding="utf-8"?>
<LinearLayout xmlns:android="http://schemas.android.com/apk/res/android"
   android:orientation="vertical"
   android:layout_width="fill_parent"
   android:layout_height="fill_parent">

   <ListView
      android:id="@+id/listView1"
      android:layout_height="fill_parent"
      android:layout_width="fill_parent" />

</LinearLayout>
The above code is using simple LinearLayout with vertical orientation, and a ListView is declared to cover the entire width and height of the parent container using the fill_parent as the value of both android:layout_height and android:layout:width properties. ListView also has a unique id listView1 that will be used in the MainActivity to reference the ListView control.
Before I show you the MainActivity code, you need to create a java class whose objects you will bind with the ListView. Add a new class Product in your Android project and add the following code in it.
Product.java
public class Product {
    private int id;
    private String name;
    private double price;

    public Product(){
        super();
    }

    public Product(int id, String name, double price) {
        super();
        this.id = id;
        this.name = name;
        this.price = price;
    }

    @Override
    public String toString() {
        return this.id + ". " + this.name + " [$" + this.price + "]";
    }
}
The MainActivity code is shown below first access the ListView control by passing the generated id to findViewById function. Then the array of Product objects is defined and passed as a parameter to the constructor of ArrayAdapter. Finally, the adapter is provided to ListView using setAdapter function available in ListView class. You may be wondering how the ListView will display the Product object and which property of the Product object will be displayed. The answer is very simple, by default Android ListView control renders a simple TextView inside every ListView item and TextView control can only display simple text. Notice how the toString() function is overridden in the Product class we defined above. Whatever String you will return from the object toString() function will be displayed in the TextView rendered in the ListView items.
MainActivity.java
public class MainActivity extends Activity {

    @Override
    public void onCreate(Bundle savedInstanceState) {
        super.onCreate(savedInstanceState);
        setContentView(R.layout.main);

        ListView listView1 = (ListView) findViewById(R.id.listView1);

        Product[] items = {
            new Product(1, "Milk", 21.50),
            new Product(2, "Butter", 15.99),
            new Product(3, "Yogurt", 14.90),
            new Product(4, "Toothpaste", 7.99),
            new Product(5, "Ice Cream", 10.00),
        };

        ArrayAdapter<Product> adapter = new ArrayAdapter<Product>(this,
                    android.R.layout.simple_list_item_1, items);

        listView1.setAdapter(adapter);
    }
}
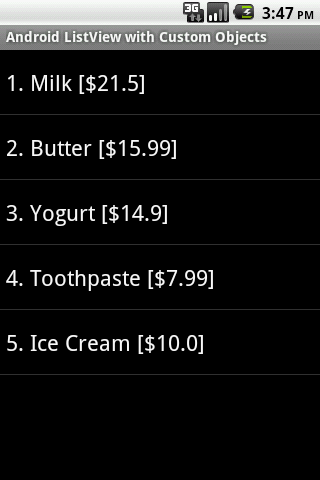
Run your project and you will be able to see the following output.


Thank you so much for the tutorial…..
Thanks, I am glad you like it.
Very informative, thanks!
simple_list_item_1.xml contains a Text view ..which shows the list data at run time…………
totally cool, but in custom list view i want to set price name id at 3 different text view of single list item, how to do this can you post another example for that in simple manner..
thanx
simple_list_item_1 ? what does this page contains
Sir How to get an object from specific position in @override onItemClick method()
really useful stuff..thanq
Awesome tutorial..!!! .Thank you..
awesome (y)
Very nice tutorial 😀
But can i ask you why did you put the super() on your constructor ?
Thanks for such a valuable information, I would like to know how can we load Image in listview for each item of the list.
Thank you.
What does simple_list_item_1.xml contain?
Very usefull.Keep it up
Thanks, keep up the great writing.
Thank you. This was very helpful yet easy.
Im a bit new to android and found this very useful. But how should I do it if I want items to be added to the listview when user for instance press a button. How can I add items to the items list dynamically?
Very helpful, but what if I want to bind the object to a listitem, and I only want name to show up?
Thanks a lot, awesome information 🙂