
LinearLayout is one of the easiest and commonly used layouts available to Android developers to arrange different views on the device screen. LinearLayout arranges its child views in a single row (horizontally) or a single column (vertically). In this tutorial, I will show you how you can use LinearLayout and how the views can be arranged inside LinearLayout.
Create a new Android project in Eclipse with MainActivity as your default Activity and main.xml as your default layout file. Add the following code in your main.xml file.
<?xml version="1.0" encoding="utf-8"?>
<LinearLayout
    xmlns:android="http://schemas.android.com/apk/res/android"
    android:orientation="vertical"
    android:layout_width="fill_parent"
    android:layout_height="fill_parent"
    android:padding="25dp">

    <TextView
         android:layout_width="fill_parent"
         android:layout_height="wrap_content"
         android:text="Android Linear Layout"
         android:textSize="20dp"
         android:padding="15dp"
         android:gravity="center"
         android:textColor="#FFFFFF"
         android:textStyle="bold" />

     <Button
         android:layout_width="fill_parent"
         android:layout_height="wrap_content"
         android:text="Play Game"
         android:textSize="20dp"
         android:padding="15dp" />

     <Button
         android:layout_width="fill_parent"
         android:layout_height="wrap_content"
         android:text="Top Scores"
         android:textSize="20dp"
         android:padding="15dp" />

     <Button
         android:layout_width="fill_parent"
         android:layout_height="wrap_content"
         android:text="Game Settings"
         android:textSize="20dp"
         android:padding="15dp" />

    <Button
         android:layout_width="fill_parent"
         android:layout_height="wrap_content"
         android:text="Help"
         android:textSize="20dp"
         android:padding="15dp" />

</LinearLayout>
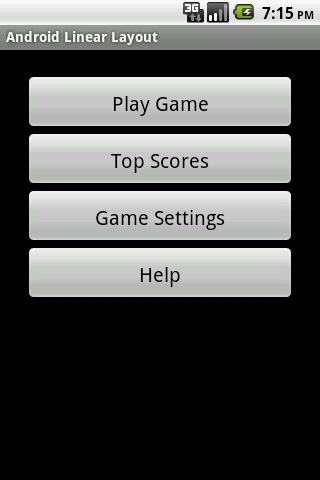
In the above code LinearLayout is defined with the vertical orientation and 25dp padding. The android:layout_height and android:layout:width properties has the value fill_parent so that the layout fill the entire activity area. Inside LinearLayout four Buttons are declared which will be displayed vertically in the LinearLayout as shown in the screenshot below:
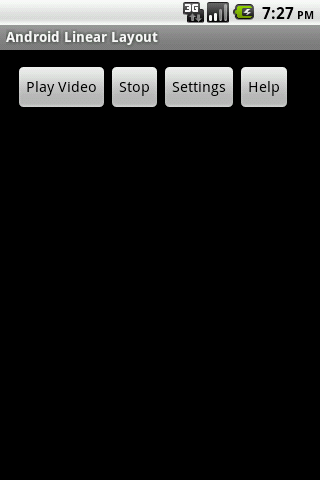
Following code shows how you can use LinearLayout with Horizontal orientation. Notice the value of android:layout:width property of the Button views is changed from fill_parent to wrap_content. This will stop the button views to cover the entire available width of the activity and keep the buttons together horizontally.
<?xml version="1.0" encoding="utf-8"?>
<LinearLayout
    xmlns:android="http://schemas.android.com/apk/res/android"
    android:orientation="horizontal"
    android:layout_width="fill_parent"
    android:layout_height="fill_parent"
    android:padding="15dp">

     <Button
         android:layout_width="wrap_content"
         android:layout_height="wrap_content"
         android:text="Play Video"
         android:textSize="15dp" />

     <Button
         android:layout_width="wrap_content"
         android:layout_height="wrap_content"
         android:text="Stop"
         android:textSize="15dp" />

     <Button
         android:layout_width="wrap_content"
         android:layout_height="wrap_content"
         android:text="Settings"
         android:textSize="15dp" />

     <Button
         android:layout_width="wrap_content"
         android:layout_height="wrap_content"
         android:text="Help"
         android:textSize="15dp" />

</LinearLayout>
Following is the output of the above code.


