
Almost all applications collect some sort of data from the user and validating this data according to different business rules is always the least productive, repetitive, and boring task. Many .NET developers use Data Annotations to implement basic validations but the Data Annotations are not suitable for writing dynamic and conditional validations. In this tutorial, I will introduce a library called FluentValidation that will allow you to write basic as well as complex validation rules in a fluent way. This library will not only make writing validation code a lot of fun but will also make validation code very easy to understand and maintain.
Table of Contents
What is FluentValidation?
FluentValidation is one of the most popular open-source libraries for .NET and it allows developers to validate their models or business objects using strongly-typed validation rules. These rules are written using lambda expression and can be chained together to handle more complex and conditional validations. It makes validation code clean, easy to understand, and easy to maintain because the validation code is not tightly coupled with the models and is generally written separately. Following are some advantages of using the FluentValidation library:
- It is very easy to configure and work with, which increases the development speed and makes developers more productive.
- Validation rules are generally written in a separate class or file and they are not tightly coupled with the models.
- Validation rules are easy to understand and maintain.
- Validation rules are immutable which means they can be cached and used to validate thousands of objects with high speed.
- We can apply validation rules to external models that we don’t have access.
- Validation rules are super easy to test with any unit testing framework.
If you like video tutorials then here is my video on FluentValidation.
Configure FluentValidation in ASP.NET Core
Let’s create a new ASP.NET Core MVC web application in Visual Studio 2019 and install the FluentValidation library from NuGet. You can install it by running the following command in the Package Manager console.
Install-Package FluentValidation
To integrate and use FluentValidation in ASP.NET Core projects we can install FluentValidation.AspNetCore package that will automatically install the FluentValidation if you haven’t installed it separately. Run the following command in the Package Manager console.
Install-Package FluentValidation.AspNetCore
To use FluentValidation with .NET built-in dependency injection framework, you can install FluentValidation.DependencyInjectionExtensions package that will add some Dependency injection extensions for FluentValidation. Run the following command in the Package Manager console.
Install-Package FluentValidation.DependencyInjectionExtensions
To configure FluentValidation in the ASP.NET Core project, you need to call the AddFluentValidation method in the ConfigureServices method of Startup.cs file as shown in the following code snippet. The method RegisterValidatorsFromAssembly automatically finds and registers all the validators in a specific assembly.
Startup.cs
public void ConfigureServices(IServiceCollection services)
{
    services.AddControllersWithViews();

    services.AddFluentValidation(v =>
    {
        v.RegisterValidatorsFromAssembly(Assembly.GetExecutingAssembly());
    });
}
Create a Model and Data Input Form
Before we start using FluentValidation, let’s create a model class with some basic properties. Add the following Customer class in the Models folder of the project.
Customer.cs
public class CustomerModel
{
    public string FirstName { get; set; }
    public string LastName { get; set; }
    public string Email { get; set; }
    public decimal Height { get; set; }
    public int Age { get; set; }
    public string Phone { get; set; }
}
Next, we need to create the following CustomerController in the Controllers folder. This controller has two simple action methods that will be used to create a simple Add Customer form.
CustomerController.cs
public class CustomerController : Controller
{
    public IActionResult Create()
    {
        return View();
    }

    [HttpPost]
    public IActionResult Create(CustomerModel model)
    {
        if (!ModelState.IsValid)
        {
            return View(model);
        }

       //TODO: Save the customer to the database.

        return Ok();
    }
}
Create the following razor view page to create Add Customer form.
Create.cshtml
@model AspNetCoreFluentValidationDemo.Models.CustomerModel

@{
    ViewData["Title"] = "Create";
    Layout = "~/Views/Shared/_Layout.cshtml";
}


<h3>Add Customer</h3>
<hr />

<form asp-action="Create" method="post">
    <div class="row">
        <div class="col-md-6">
            <div class="form-group">
                <label>First Name</label>
                <input asp-for="FirstName" class="form-control" />
                <span asp-validation-for="FirstName" class="text-danger"></span>
            </div>
        </div>
        <div class="col-md-6">
            <div class="form-group">
                <label>Last Name</label>
                <input asp-for="LastName" class="form-control" />
                <span asp-validation-for="LastName" class="text-danger"></span>
            </div>
        </div>
    </div>
    <div class="row">
        <div class="col-md-6">
            <div class="form-group">
                <label>Email</label>
                <input asp-for="Email" class="form-control" />
                <span asp-validation-for="Email" class="text-danger"></span>
            </div>
        </div>
        <div class="col-md-6">
            <div class="form-group">
                <label>Height</label>
                <input asp-for="Height" class="form-control" />
                <span asp-validation-for="Height" class="text-danger"></span>
            </div>
        </div>
    </div>
    <div class="row">
        <div class="col-md-6">
            <div class="form-group">
                <label>Age</label>
                <input asp-for="Age" class="form-control" />
                <span asp-validation-for="Age" class="text-danger"></span>
            </div>
        </div>
        <div class="col-md-6">
            <div class="form-group">
                <label>Phone</label>
                <input asp-for="Phone" class="form-control" />
                <span asp-validation-for="Phone" class="text-danger"></span>
            </div>
        </div>
    </div>
    <div class="row">
        <div class="col-md-6">
            <div class="form-group">
                <input type="submit" value="Create" class="btn btn-primary" />
            </div>
        </div>
    </div>
</form>
Run the project and access the /Customer/Create view in the browser and you should see the form similar to the following screenshot.

Creating your first Validator
FluentValidation library has a class called AbstractValidator that can be used to define a set of validation rules for a particular model or object. You need to create a class that inherits from AbstractValidator<T>, where T is the type of class that you wish to validate. In our case, we want to validate the Customer model class so let’s a folder called Validators and define the following CustomerValidator class in the folder.
CustomerValidator.cs
public class CustomerValidator : AbstractValidator<CustomerModel>
{
    public CustomerValidator()
    {

    }
}
The validation rules should be defined in the validator class’s constructor. To specify a validation rule for a particular property, call the RuleFor method, passing a lambda expression that indicates the property that you wish to validate. For example, to ensure that the FirstName and LastName properties are not null or empty, we can define the following validation rules.
CustomerValidator.cs
public class CustomerValidator : AbstractValidator<CustomerModel>
{
    public CustomerValidator()
    {
        RuleFor(x => x.FirstName).NotNull().NotEmpty();
        RuleFor(x => x.LastName).NotNull().NotEmpty();
    }
}
The FluentValidation library has several built-in validators and in the above code snippet, we are using two built-in validators NotNull and NotEmpty. The NotNull validator ensures that the specified property is not null and the NotEmpty validator ensures that the specified property is not null, an empty string or whitespace (or the default value for value types, e.g., 0 for int).
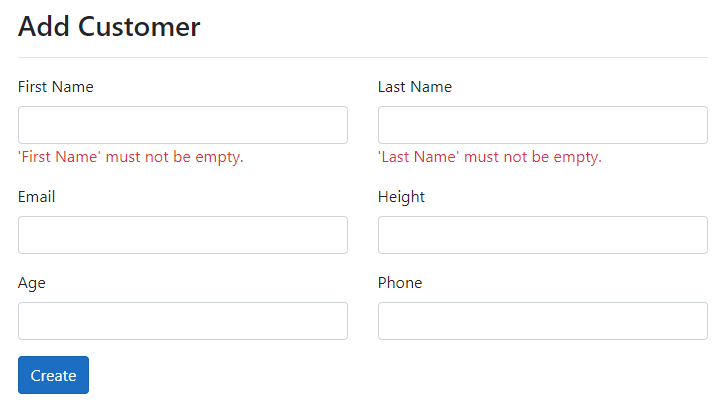
Run the project and click the Create button without providing any values in the First Name and Last Name fields and you will see the validation messages appearing at the bottom of the fields as shown below.
The error message for each validator can contain special placeholders that will be filled in when the error message is constructed. We can also specify custom error messages by using the WithMessage method.
CustomerValidator.cs
public class CustomerValidator : AbstractValidator<CustomerModel>
{
    public CustomerValidator()
    {
        RuleFor(x => x.FirstName).NotEmpty().WithMessage("First Name is required.");
        RuleFor(x => x.LastName).NotEmpty().WithMessage("Last Name is required.");}
    }
}
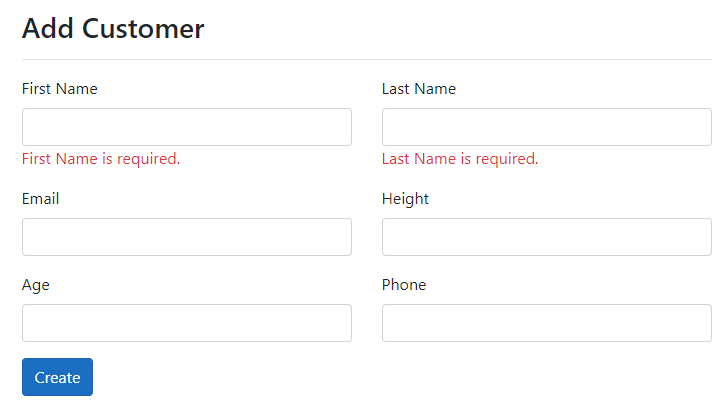
Run the project again and this time you will see the custom validation messages as shown below:
To validate the Email property, we can use the built-in EmailAddress validator.
RuleFor(x => x.Email).NotNull().NotEmpty().EmailAddress();
To validate the Height property, we can use the built-in ScalePrecision validator. The ScalePrecision validator checks whether a decimal value has the specified scale and precision.
RuleFor(x => x.Height).ScalePrecision(1, 3);
To validate Age property, we can use the built-in InclusiveBetween validator. The InclusiveBetween checks whether the property value is in a range between the two specified numbers (inclusive). There is also another similar validator called ExclusiveBetween that checks whether the property value is in a range between the two specified numbers (exclusive).
RuleFor(x => x.Age).InclusiveBetween(18, 50);
If you want to run some custom validator logic, then you can use a validator called Predicate or Must. The Must validator passes the value of the specified property into a delegate that can perform custom validation logic on the value of the property. Let’s say you have a requirement that the phone number must start with the + sign so you can use the Must validator as follows:
RuleFor(x => x.Phone).Must(phone =>
    !string.IsNullOrEmpty(phone) && phone.StartsWith("+")
).WithMessage("Phone must starts with + sign.");
Once we have all the above validations rules in place, our CustomerValidator class will look similar to the following code snippet.
CustomerValidator.cs
public class CustomerValidator : AbstractValidator<CustomerModel>
{
    public CustomerValidator()
    {
        RuleFor(x => x.FirstName).NotEmpty().WithMessage("First Name is required.");
        RuleFor(x => x.LastName).NotEmpty().WithMessage("Last Name is required.");
        RuleFor(x => x.Email).NotNull().NotEmpty().EmailAddress();
        RuleFor(x => x.Height).ScalePrecision(1, 3);
        RuleFor(x => x.Age).InclusiveBetween(18, 50);

        RuleFor(x => x.Phone).Must(phone =>
            !string.IsNullOrEmpty(phone) && phone.StartsWith("+")
        ).WithMessage("Phone must starts with + sign.");
    }
}
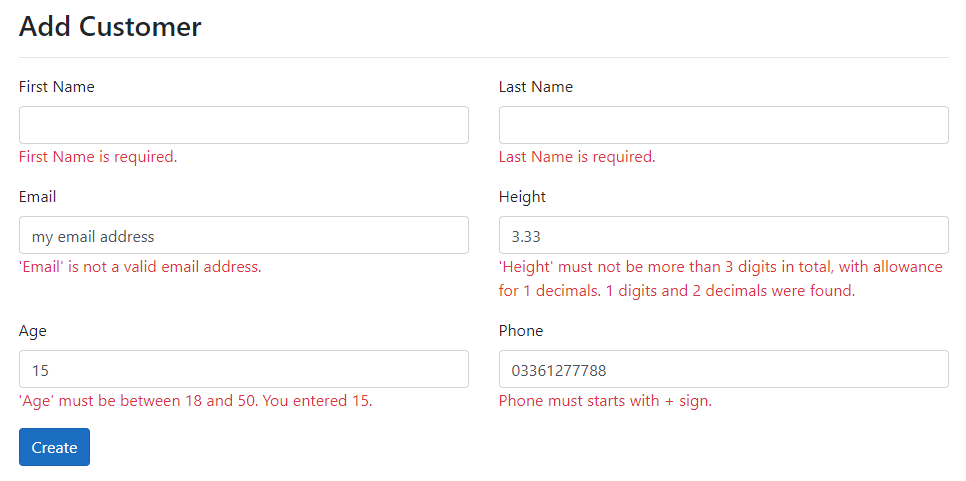
Run the project again and this time you will see the validation messages from all the validators especially if you will not input the correct values as shown below.
If you are interested to learn more about the FluentValidation built-in validators then visit the docs page.
Validating Complex Properties and Collections
So far, we were only validating the basic properties of the model class. The FluentValidation validators can also validate complex properties and collections. Let’s create a new model class AddressModel in the Models folder with some basic properties in it.
AddressModel.cs
public class AddressModel
{
    public string AddressLine1 { get; set; }
    public string AddressLine2 { get; set; }
    public string Country { get; set; }
    public string State { get; set; }
    public string PostalCode { get; set; }
}
To validate the properties of AddressModel, create the following AddressValidator in the Validators folder.
AddressValidator.cs
public class AddressValidator : AbstractValidator<AddressModel>
{
    public AddressValidator()
    {
        RuleFor(x => x.AddressLine1).NotNull().NotEmpty();
        RuleFor(x => x.Country).NotNull().NotEmpty();
        RuleFor(x => x.State).NotNull().NotEmpty();
        RuleFor(x => x.PostalCode).NotNull().NotEmpty();
    }
}
Next, declare a complex property PrimaryAddress of AddressModel type in the CustomerModel class. You can also define a property OtherAddresses that will be a list of AddressModel objects.
CustomerModel.cs
public class CustomerModel
{
    public string FirstName { get; set; }
    public string LastName { get; set; }
    public string Email { get; set; }
    public decimal Height { get; set; }
    public int Age { get; set; }
    public string Phone { get; set; }

    public AddressModel PrimaryAddress { get; set; }

    public List<AddressModel> OtherAddresses { get; set; }
}
To validate the PrimaryAddress property of CustomerModel class, you have two options.
You can use the InjectValidator method that will try to resolve an instance of IValidator<T> from ASP.NET’s service collection, where T is the same type as the property being validated.
RuleFor(x => x.PrimaryAddress).InjectValidator();
You can also specify any child validators for complex properties by using the SetValidator method.
RuleFor(x => x.PrimaryAddress).SetValidator(new AddressValidator());
To validator the OtherAddresses collection, you can use the RuleForEach method to associate the same validator to multiple items in a collection.
RuleForEach(x => x.OtherAddresses).SetValidator(new AddressValidator());
I can’t cover all the cool features of FluentValidation in this post so I will recommend you to visit the library docs page to learn more about the other features.
Summary
FluentValidation is a wonderful library to simplify the data and user input validation. In this post, I tried to give you an overview of the library and some of its features. We saw some built-in methods of the library in action and also learned how to use the library to validate simple as well as complex properties. I hope you have found this post useful. If you have any comments or suggestions, please leave your comments below. Don’t forget to share this tutorial with your friends or community. You can also download the complete source code of this post using the Download Source Code button shown at the start of this post.

