If you want to develop a modern web application, you will realize very quickly that you can’t write everything on your own. You will rely on some third party client and server side libraries and components to increase your development speed. There are many online code repositories and sources available to developers these days and downloading and keeping track of all third-party packages can be a painful task. Luckily developers now have many different tools and extensions available to them which can make this task a lot easier. In this tutorial, I will demonstrate how we can use tools like Node Package Manager (npm), Library Manager (LibMan), and Nuget to download and manage server and client-side libraries in ASP.NET Core projects.
Table of Contents
Introduction to Node Package Manager (npm)
npm is one of the world’s largest repository of client-side libraries and packages from where developers can download and install different open source libraries published and shared by other developers. Npm is a subsidiary of Github and is considered a default package manager for JavaScript runtime environment Node.js. They also provide a command line tool (CLI) to developers for publishing and downloading third party libraries. In the past, the npm was used to be the package manager for just Node.js but now it is used by developers of other platforms and technologies as well.
Using npm from Command Line (CLI)
To use npm tool you need to make sure that you have downloaded and installed the Node.js on your machine. If you are using Windows, you can download the windows installer from Node.js. website. Once you have the npm command line tool (CLI) available on your machine, you can go to your project folder and can use different npm commands to download and install packages.
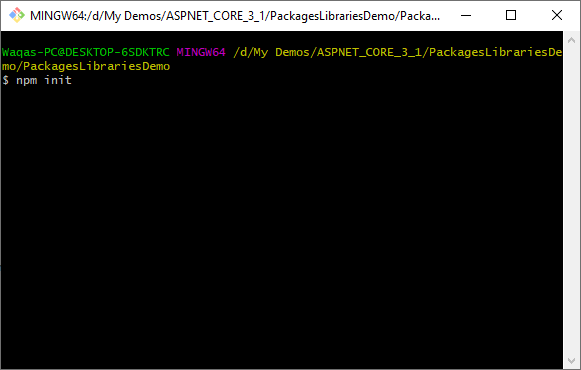
As a general rule, all projects using Node.js need to create a file called package.json that contains the project information e.g. name, author, version as well as the information about the third party libraries you are downloading and managing in your project. You can either create this file yourself using a text editor or you can use one of the npm commands (init) to generate this file automatically. Npm init command is a step by step tool to generate your package.json file. You can initialize the project using npm init command.
npm init
Open the command prompt in your project root folder and type the above command and press Enter.
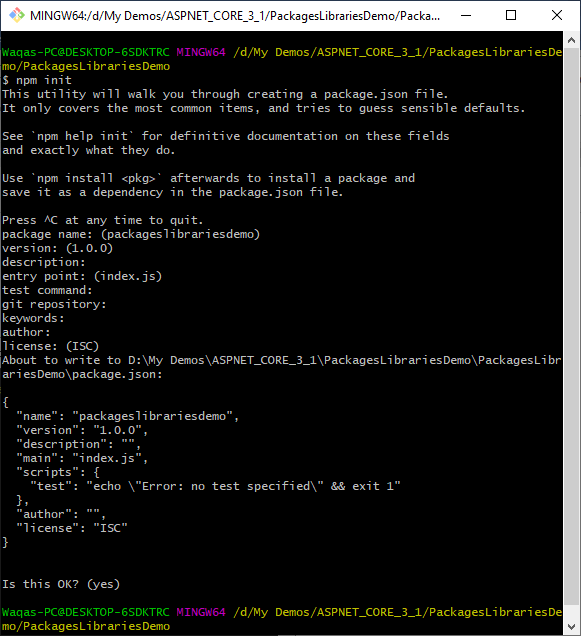
You will be asked to provide your project name, version, description, author, etc. If you don’t want to provide this information at this point, you can simply press Enter multiple times until you reach the last step where the tool will show you the sample package.json file and will ask you to confirm if the file looks ok to you. You can press enter one more time and a package.json file will be generated for you.
Next, you can use the following command to download and install packages from npm online directory.
npm install <module>
In above command, the module is the name of the module you want to download. For example, if you want to install Express (which is a well known Node.js web framework), you can run the following command:
npm install express
The above command will install the express module into /node_modules in the current directory. Please note that whenever you will install a module from npm, it will be installed into the node_modules folder.
If you will open package.json file now, you will see that metadata information about the express package is also recorded in the package.json file.
{
  "name": "packageslibrariesdemo",
  "version": "1.0.0",
  "description": "",
  "main": "index.js",
  "scripts": {
    "test": "echo \"Error: no test specified\" && exit 1"
  },
  "author": "",
  "license": "ISC",
  "dependencies": {
    "express": "^4.17.1"
  }
}
To see the full list of npm command you can visit npm docs here
Using npm from Visual Studio
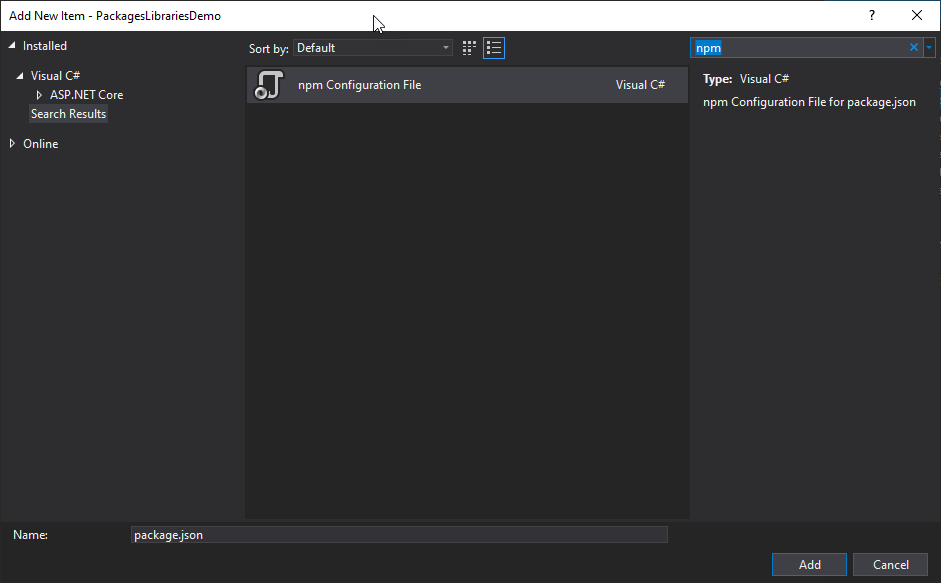
If you are not a fan of using command line interface (CLI) then you can use npm directly within Visual Studio. To use npm in Visual Studio you need to create npm configuration file using a built-in Visual Studio template. Right click on your project in Visual Studio solution explorer and add a new file by choosing npm configuration file template shown below:
Visual Studio will automatically create a package.json file for you. Now you can specify which third party client side library you want to download and use in your project. You will also get some help from the built in IntelliSense which is very useful if you want to specify a specific version of the library.
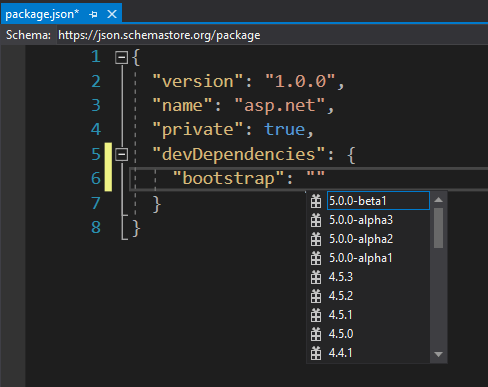
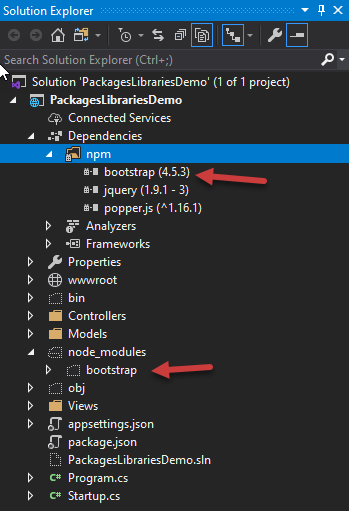
I am installing bootstrap 4.5.3 and as soon as you will save the file, you will see that the bootstrap package is downloaded in the node_modules folder and a dependency is also added under Dependencies node.
Note: If you are not seeing the node_modules folder then make sure “Show All Files” option is on in Visual Studio Solution Explorer.
To uninstall the library, you just need to remove the “bootstrap”:”4.5.3” line from your package.json file and as soon as you will save the file, bootstrap will be removed from your project.
What is Library Manager (LibMan)
If you don’t want to use npm in your project, then Microsoft has another tool for you called Library manager (LibMan). LibMan is a lightweight tool for downloading libraries and packages from the files system or content delivery networks (CDN). Currently the tool support CDNs such as CDNJS, jsDelivr, unpkg. Just like npm, this tool can also be used from the command line or from within Visual Studio.
To download LibMan tool CLI, you can type the following command in Windows PowerShell.
dotnet tool install –g Microsoft.Web.LibraryManager.Cli

Using LibMan from Command Line (CLI)
Once the tool is installed you can use ‘install’ option to download packages. You can either specify the package name and the tool will download all files within that package or you can specify the files you need. For example, you can download only bootstrap.css file available in the bootstrap 4.5.3 package as follows:
libman install [email protected] --files dist/css/bootstrap.css

To see the full list of available command you can visit LibMan docs here.
Using LibMan from Visual Studio
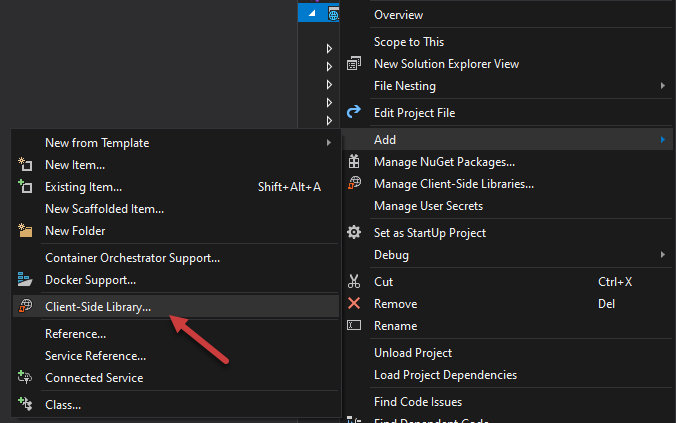
I am sure, some of you don’t like CLIs so you can use the LibMan tool inside Visual Studio as well. Right click on your project in Solution Explorer and choose Add > Client Side Library…
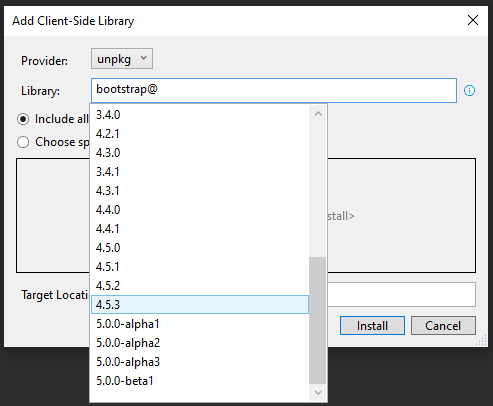
Once the tool dialog is open, you can choose which Provide you want to use from the available CDNs. You can then search client side libraries and frameworks available in the selected provider online directory. For example, if you will start typing bootstrap, you will see that the tool is searching and populating the list of all libraries with your matching keyword.
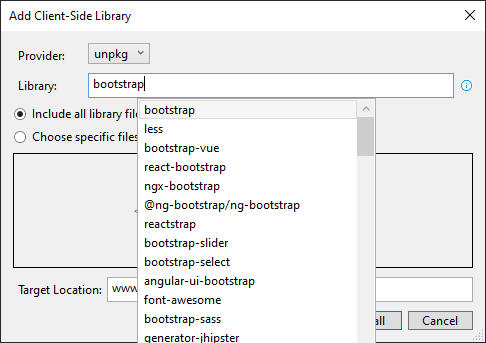
You can even choose the specific version of the library or framework you are interested in as shown below:
Once you will select the version you need, the tool will also give you the option to download all or specific files, and finally, you can specify the location where you want to download the packages and libraries in your project. In ASP.NET Core projects, wwwroot folder is normally used to save client side CSS and JavaScript libraries so you can keep the default location and press the Install button.
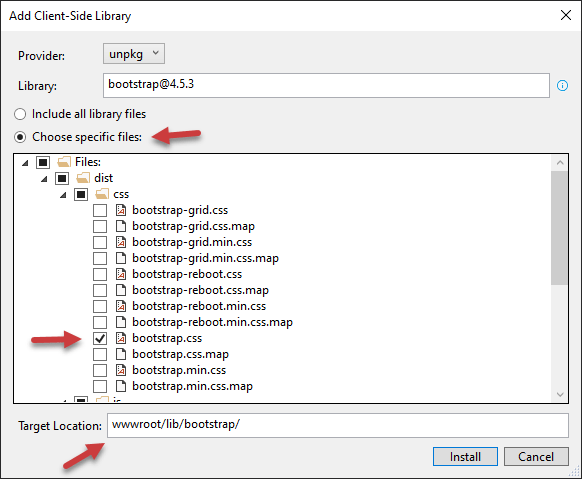
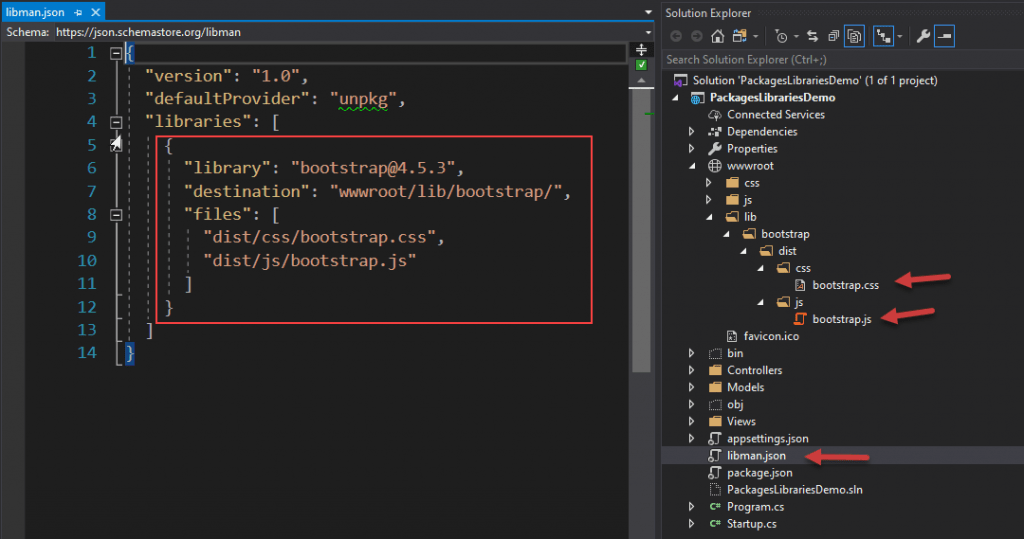
Once the package is installed, you will see that the selected files are downloaded and saved inside wwwroot folder. Secondly, you will also see a new file libman.json is added in your project. This file is similar to package.json file we saw above. It will be used to keep track of all third party libraries and packages you are downloading in your project using the LibMan tool.
What is NuGet?
While npm is a package manager for client side libraries and frameworks, NuGet is a package manager to create, share, and consume server side code and libraries in the .NET world. Developers can
- Bundle their code (DLLs) and related resources into packages (.nupkg files)
- Publish their NuGet packages to a private host (exclusive to an organization) or a public repository of packages such as nuget.org
- Search, download, and consume packages hosted by other developers
Using NuGet from PowerShell Command Line (CLI)
You can download NuGet packages in your project using the dotnet tool ‘add package’ command. For example, if you want to download a famous Newtonsoft.Json library, you can use the following command in the command window.
dotnet add package Newtonsoft.Json
Once the package is downloaded, you will notice that it is added as a dependency under a “Packages” node in Solution Explorer. If you will open the project file, you will also notice that its reference is also added as the PackageReference element.

If you want to delete the Newtonsoft package from your project, you simply need to remove the PackageReference element from your project file and build your project.
Using NuGet from Package Manager Console (CLI)
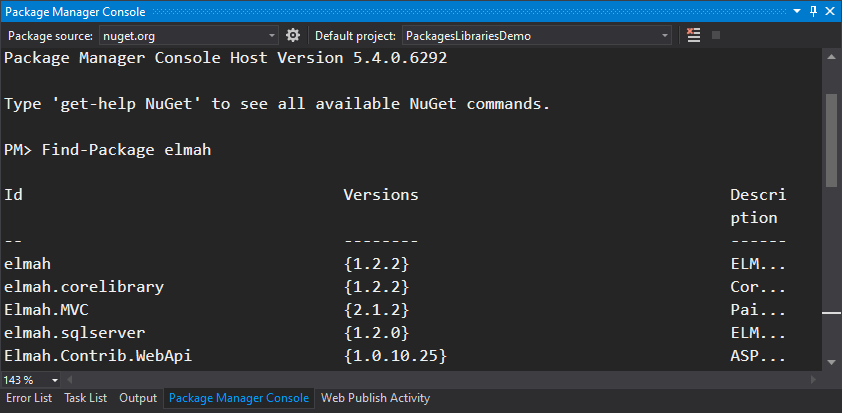
If you don’t want to use the PowerShell command window mentioned above and want to stay within Visual Studio then you can find and download NuGet packages from the NuGet Package Manager Console available in Visual Studio. This console allows you to find, install, uninstall, or update NuGet packages using CLI commands. Please note that this console is built into Visual Studio on Windows. It is not included with Visual Studio for Mac or Visual Studio Code. You can open this console using the Tools > NuGet Package Manager > Package Manager Console command in Visual Studio. Once the console is open, you can find packages with the Find-Package command as shown below.
Find-Package elmah
You will be able to see all packages with the word ‘elmah’ in the console window.
To install a specific package in your project, you can use the ‘Install-Package’ command with the package name you want to download.
Install-Package elmah
Make sure when you are using the above command, the ‘nuget.exe’ is selected as a Package source and your project is showing in the Default project dropdown.
To check the full list of NuGet commands, you can visit Nuget PowerShell Commands page in Microsoft official docs.
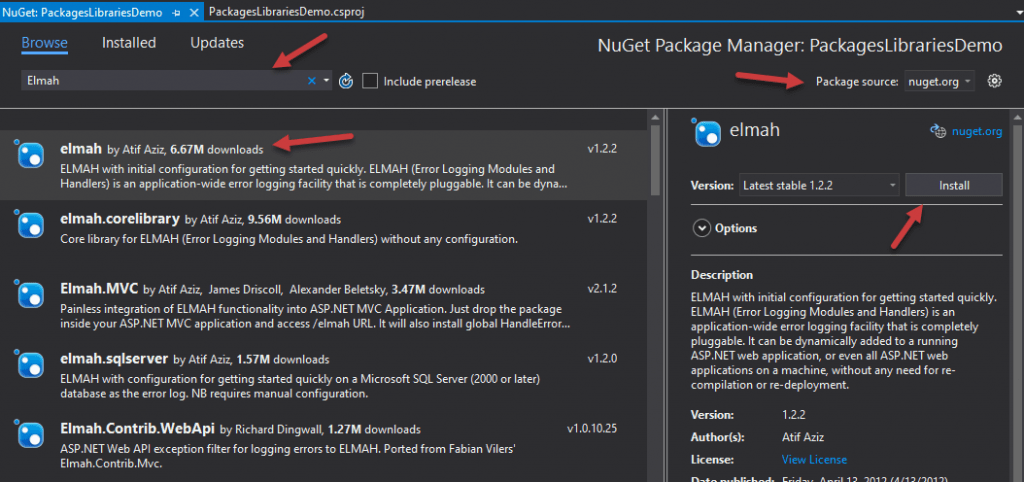
Using NuGet Package Manager UI in Visual Studio
If you don’t want to remember or learn NuGet command, then you can use the Nuget Package Manager UI available in Visual Studio on Windows. The UI interface allows you to easily search, install, uninstall, and update NuGet packages in either one project or all the projects of the solutions with ease. To open the NuGet Package Manager UI, simply Right click on your project in Solution Explorer and choose “Manage NuGet Packages…” option.
By default, the NuGet UI will display the list of most popular NuGet packages but you can search for the package you need by typing the package name in the search box. You can also select the Package source to tell the UI from where you want to download and install the packages. Once you have the package in the list, selecting the package will display its description, available versions, and dependencies on the right hand side. You can choose the version you need and click the “Install” button to start the installation process.
To learn more about the Package Manager UI you can visit the official docs here.
Summary
There are millions of third party packages available for client and server side development and I hope this tutorial has given ASP.NET Core developers an overview of the different tools and extensions you can use to search and install the third party package and library you love. Please share your feedback about this tutorial and my blog in general in the comments section.

Hi Waqas,
Using Visual Studio 2022, I installed couple of npm packages in an ASP.NET Core MVC web app. However, I am facing hard time importing the module in my .js file. I have posted the details to a StackOverflow post here: https://stackoverflow.com/questions/79584279/manage-and-consume-npm-packages-in-asp-net-core-mvc-application-using-visual-stu
It would be great if you can take a look and let me know if you get what I missed. Thank you so much!
Excellent thanks for sharing