
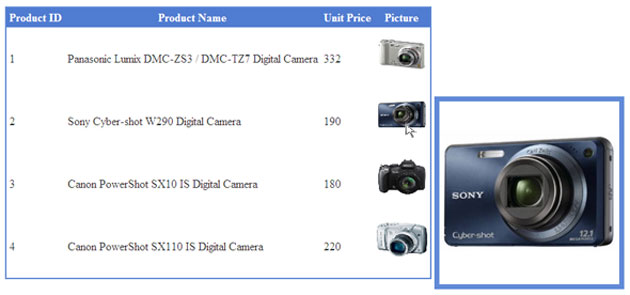
ASP.NET AJAX Controls Toolkit provides many useful controls to ASP.NET developers to build modern rich internet applications. One such control is HoverMenu control that enables you to attach popup menu with any ASP.NET control. It can be used as a simple tooltip which can be attached with a TextBox and showing users what they are suppose to enter in the textbox or like many modern ecommerce shopping applications, it can be used to display larger image of the product when user move mouse on the product thumbnail image. In this tutorial, I will show you how to achieve this functionality using HoverMenu and GridView controls.
To start this tutorial, I have created a new page which has a ScriptManager control on the top. This control is required every time you want to use any ASP.NET AJAX feature or control on you website.
<asp: ScriptManager ID="ScriptManager1" runat="server"></asp: ScriptManager>
Next, I am adding a GridView control on the page that has AutoGenerateColumns property set to false and adding three BoundField columns and a TemplateField column as shown in the markup below:
<asp:GridView ID="GridView1" runat="server" AutoGenerateColumns="False"
   CellPadding="4" ForeColor="#333333" GridLines="None" BorderColor="#628BD7" BorderStyle="Solid" BorderWidth="2px">
   <Columns>
      <asp:BoundField DataField="ProductID" HeaderText="Product ID" />
      <asp:BoundField DataField="ProductName" HeaderText="Product Name" />
      <asp:BoundField DataField="UnitPrice" HeaderText="Unit Price" />
      <asp:TemplateField HeaderText="Picture">
         <ItemTemplate>
            <asp:Image runat="server" ID="thumbnailImage"
               ImageUrl='<%# Eval("Picture") %>'  Width="70" Height="60" />
            <ajax:HoverMenuExtender ID="HoverMenuExtender1" runat="server"
               PopupControlID="popupImage"
               TargetControlID="thumbnailImage"
               OffsetX="10" OffsetY="5"
               PopupPosition="Right"
               PopDelay="100" HoverDelay="100">
            </ajax:HoverMenuExtender>
            <asp:Panel runat="server" ID="popupImage" BorderColor="#628BD7"
               BorderStyle="Solid" BorderWidth="7px">
               <asp:Image runat="server" ID="mainImage"
                  ImageUrl='<%# Eval("Picture") %>'   />
            </asp:Panel>
         </ItemTemplate>
      </asp:TemplateField>
   </Columns>
   <HeaderStyle BackColor="#507CD1" Font-Bold="True" ForeColor="White" />
</asp:GridView>
In the markup above, the ItemTemplate of the TemplateField column is first defining the small thumbnail image of the product. This image will be shown to the user when the GridView will be displayed on the page.
<asp:Image runat="server" ID="thumbnailImage"
   ImageUrl='<%# Eval("Picture") %>' Width="70" Height="60" />
Next I added HoverMenu control in the ItemTemplate and setting the basic properties of the control.
<ajax:HoverMenuExtender ID="HoverMenuExtender1" runat="server"
   PopupControlID="popupImage"
   TargetControlID="thumbnailImage"
   OffsetX="10" OffsetY="5"
   PopupPosition="Right"
   PopDelay="100" HoverDelay="100">
</ajax:HoverMenuExtender>
Finally I added a Panel control that will be used as a popup window by the HoverMenu control. This Panel can display any type of contents but for the purpose of this tutorial I am only showing the Product Image using an Image control.
<asp:Panel runat="server" ID="popupImage" BorderColor="#628BD7"
   BorderStyle="Solid" BorderWidth="7px">
   <asp:Image runat="server" ID="mainImage"
      ImageUrl='<%# Eval("Picture") %>'  />
</asp:Panel>
The following is the explanation of HoverMenu control properties.
TargetControlID: This property needs the reference of the target control. HoverMenu display itself automatically when you move mouse on the target control. In this case I have given the id of the small Image control which is defined just above the HoverMenu control.
PopupControlID: This property needs the id of the control you want to use as a popup window with AJAX HoverMenu Control in this case I have used Panel control which is defined just after the HoverMenu control.
PopupPosition: This is optional property and can be set to Left, Right, Top, Bottom or Center. It specifies the relative position of the HoverMenu control with respect to target control. OffsetX and OffsetY: These two properties specify the number of pixels to offset the HoverMenu control horizontally or vertically from its default position as specified by PopupPosition property.
PopDelay: This property specified the number of milliseconds you want the HoverMenu popup control to remain visible after the user has moved mouse out of the control.
HoverDelay: This property specified the number of milliseconds you want to elapse before the HoverMenu popup control to appears to the user.
HoverCssClass: The name of the CSS class to apply to the target control when the hover menu popup is visible. For brevity, I have not used this property in this tutorial as I directly apply border color and style to the target Panel control.
Animations: HoverMenu control also supports animations property which you can use to apply generic animation effects to your HoverMenu control.
To complete this tutorial, don’t forget to bind your GridView control with the Products Table in database. The products table I am using for this tutorial has four columns ProductID, ProductName, UnitPrice and Picture. The Picture column is storing the actual image url as string value such as “images/canon_digital_camera.jpg”. Following is the code I am using to bind the GridView with products Table.
protected void Page_Load(object sender, EventArgs e)
{
   if (!Page.IsPostBack)
   {
      LoadData();
   }
}

private void LoadData()
{
   string constr = "Server=TestServer; Database=SampleDB; uid=sa; pwd=123;";
   string query = "SELECT ProductID, ProductName, UnitPrice, Picture FROM Products";

   SqlDataAdapter da = new SqlDataAdapter(query, constr);
   DataTable table = new DataTable();

   da.Fill(table);    GridView1.DataSource = table;
   GridView1.DataBind();
}


dis tutorial is good,,,bt i want most beautiful css dialogue box
Thank you. it is helpful to me
very good post
keep it up.
very nice usefull wesite
it was really very helpful.. thanks 🙂
Assalam-o-Alikum Sir !!!!
hru???
sir plz upload more asp.net tutorials on ur website if you have time.your tutorials are very helpful for begginers and your approach is excellent to demonstrate but material is very short.
Regards
Raja Kaleem
From Pakistan( Chakwal)
Thanx for such usefull articles.
İt is simple, clear and cool 🙂
best regards…
But when we use hover extender it wil display partially when its width more than screen width.
Then how can we display the tooltip within the screen?
hello sir iam working as software engineer and i want to display the whole data base data,by using hovermenu extender to the gridview using edit and delete button,so can any one of u let me know how to work on it
Great Article..
Thanks a lot sir for this helpful tutorial on the latest tech..