
GridView control provides very flexible way to display, select, sort or edit data on ASP.NET page with ease but it does not provide an easy way to create nested grid to display master details views of your database tables. By nesting I mean you are trying to put one GridView inside another GridView to display better details view for the users. In this tutorial I will show you how easy it is to implement nested GridView scenario with minimum code.
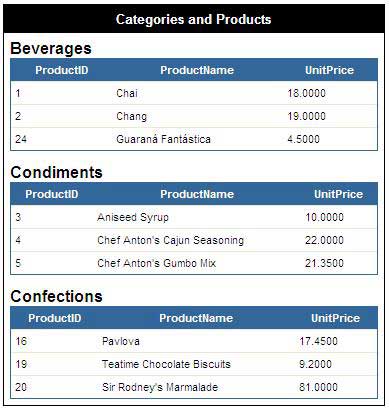
In this tutorial I am showing Categories and Products tables from Northwind database. I hope you also have Northwind sample database available to you otherwise download it from the Microsoft website.
Following code shows the HTML markup of GridView control on the page. Notice how I am using TemplateField column to add a Label and a nested GridView view control inside the MainGridView control. TemplateField column provides you option to add any number of ASP.NET controls inside GridView in one of its Template. For this tutorial I am using ItemTemplate as I want to show InnerGridView for all the items in the MainGridView.
<asp:GridView ID="MainGridView" runat="server" AutoGenerateColumns="False"
   CellPadding="6" Width="50%" Font-Names="Arial" GridLines="None" BorderColor="#000000"
   BorderStyle="Solid" BorderWidth="1px">

   <Columns>
      <asp:TemplateField HeaderText="Categories and Products">
         <ItemTemplate>

            <asp:Label runat="server" ID="lblCategoryName" Text='<%# Eval("CategoryName") %>'
               Font-Bold="True" Font-Size="12pt" />

            <asp:GridView ID="InnerGridView" runat="server" CellPadding="4" Width="100%"
               DataSource='<%# GetProductsByCategory(Eval("CategoryID").ToString()) %>'
               BorderStyle="Solid" BorderWidth="1px" Font-Size="8pt"
               BorderColor="#336699" GridLines="Horizontal">

               <HeaderStyle BackColor="#336699" Font-Bold="True" ForeColor="White" />
            </asp:GridView>

         </ItemTemplate>
      </asp:TemplateField>
   </Columns>

   <HeaderStyle BackColor="#000000" Font-Bold="True" ForeColor="White" Font-Size="10pt" />
</asp:GridView>
The most important line in the above code is where I am setting the DataSource property of the nested GridView control using ASP.NET binding expression. In the expression I am calling a custom method GetProductsByCategory which takes category id as its only parameter from the main GridView control and return the products DataTable to inner GridView control. In some online articles you will also see people using RowDataBound event of the MainGridView control to achieve the similar functionality but I have found this technique easier to implement.
Following is the C# code of the page. In the Page_Load event I am simply loading and binding categories with the MainGridView control. You will find code in GetProductsByCategory very similar to LoadCategories with only one difference that it fetches Products from Northwind database which are only available in a particular category.
protected void Page_Load(object sender, EventArgs e)
{
  if (!Page.IsPostBack)
  {
      LoadCategories();
  }
}

private void LoadCategories()
{
   string constr = @"Server=TestServer;Database=NORTHWND;uid=test; pwd=test;";
   string query = "SELECT TOP 3 CategoryID, CategoryName FROM Categories";

   SqlDataAdapter da = new SqlDataAdapter(query, constr);
   DataTable table = new DataTable();

   da.Fill(table);

   MainGridView.DataSource = table;
   MainGridView.DataBind();
}

public DataTable GetProductsByCategory(string categoryId)
{
   string constr = @"Server=TestServer;Database=NORTHWND;uid=test; pwd=test;";
   string query = "SELECT Top 3 ProductID, ProductName, UnitPrice FROM Products WHERE CategoryID = " + categoryId;

   SqlDataAdapter da = new SqlDataAdapter(query, constr);
   DataTable table = new DataTable();

   da.Fill(table);
   return table;
}


Dear Sir,
Please me to some sample for shopping cart
Great article, This solutions works well to display events for each month. Thanks Again!
Thanks for this great post. helped me a lot. Keep up the good work 🙂
Thanks u provid this code
wahoo, this is really easy way thanks
Hey,
Great information! Is theres a way to add custom linkbuttons to the InnerGridView?
Thanks!
Dan
I read also all your posts. these are really helpful.
ThanX
I read all your posts. These are very helpful. Thank you so much for this effort. Thanx 1nce again…