If you are a web designer or developer or you are involved with any kind of website development, I am sure you have heard about “JQuery” from your clients, from your friends or colleagues or from any online article. JQuery is a lightweight open source JavaScript library that in a relatively short span of time has become one of the most popular libraries on the web. This is my first tutorial on JQuery and I am targeting all those ASP.NET developers who want to use JQuery in their projects but still don’t know from where to start.
JQuery is a fast and concise JavaScript Library that simplifies HTML document traversing, event handling, animating, and AJAX interactions for rapid web development.
The major benefits of using JQuery for latest web applications is that it is very lightweight JavaScript library as its minified version is just few kilobytes in size which means it loads faster on the client. It supports latest CSS3 selectors and standards and it supports almost all the modern web browsers such as IE 6.0+, FireFox 2+, Safari 3.0+, Opera 9.0+ and Chrome.
The good news for ASP.NET developers is that Microsoft has partnership with JQuery and the latest version of Visual Studio 2010 ships with built in JQuery library and full intellisense support. Even if you developing web applications using Visual Studio 2008, JQuery is always available free to download and use in your projects. You can get the latest version of JQuery from its official website JQuery.com.
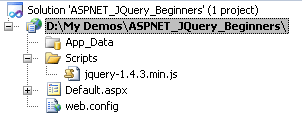
Once you have downloaded JQuery you are ready to play with it. Create a Website project in Visual Studio and add JQuery script file in Scripts folder as shown below:

Next you need to add the JQuery script file reference in your web page. You can drag the file from solution explorer and drop it inside the <head> tag in your page.

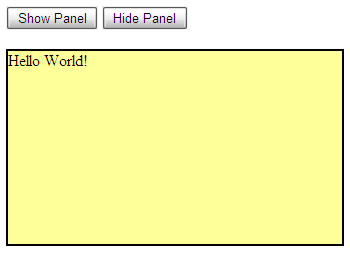
Once you have JQuery file reference added to the page, you can do so many magical things on you page but for the purpose of this tutorial and to show you a simple example I am creating two ASP.NET button controls and a Panel control on the page. Clicking “Show Panel” button will make the panel visible with JQuery slide down effect and clicking the “Hide Panel” button will hide the panel with JQuery slide up effect.
<asp:Button ID="Button1" runat="server" Text="Show Panel" />
<asp:Button ID="Button2" runat="server" Text="Hide Panel" />

<br /><br />

<asp:Panel runat="server" ID="Panel1" Height="185px" Width="320px" style="display:none;" BackColor="#FFFF99" BorderColor="Black" BorderStyle="Solid" BorderWidth="2px">

   Hello World!

</asp:Panel>
In order to tell the browser to perform some action using JQuery as soon as the document is ready or loaded, you need to add the following script block in the <head> section of your page. JQuery ready method specifies a function to execute when the DOM is fully loaded and constructed by the browser and usually the best place to attach all other event handlers and run other JQuery code.
<script type="text/javascript">

   $(document).ready(function() {

      // add JQuery or JavaScript code here

   });

</script>
Inside the ready method handler function, first I am creating some variables to access ASP.NET server controls by their client ids.
<script type="text/javascript">

   $(document).ready(function() {

      var Button1 = $("#Button1");
      var Button2 = $("#Button2");
      var Panel1 = $("#Panel1");

   });

</script>
If you are using Master Pages and your controls are inside Content pages or inside any other container such as Panel or Placeholder control then ASP.NET generates client Ids which are different then their correspondent server ids. So you may not be able to access your server side controls with the typical JQuery selector mentioned in the above code example. In that case you can use any one of the following techniques:
$("#'<%= Button1.ClientID %>'");
or
$("[id$='_Button1']");
Next I am binding JavaScript click event handlers with both buttons using JQuery click method, which takes a function handler as a parameter and execute the function every time the element click event is triggered. The complete script block code is shown below:
<script type="text/javascript">

   $(document).ready(function() {

      var Button1 = $("#Button1");
      var Button2 = $("#Button2");
      var Panel1 = $("#Panel1");

      Button1.click(function (e) {
         Panel1.slideDown();
         e.preventDefault();
      });

      Button2.click(function (e) {
         Panel1.slideUp();
         e.preventDefault();
      });

   });

</script>
Build and run your project and you will see Panel control sliding up and down with smooth animation effect.

In the above example, I used slideDown/slideUp JQuery effects, you can also use JQuery show/hide or fadeIn/fadeOut methods if you want different effect on your page. You may be wondering what JQuery e.preventDefault() method does. JQuery e.preventDefault() method disables the default action of the element so in the above case when user will click ASP.NET button it will execute our JQuery code and prevent the button to post back to the server.
I hope, you have found this tutorial useful and it will give you some basic knowledge of JQuery and its use in ASP.NET. I will recommend you to visit JQuery.com for complete list of JQuery selectors, events and methods. I also hope you will continue visiting my website in future as I am writing more tutorials on JQuery for you.


Hi Sir,
how to select the jpg texts and image content and how to extract the text than how to apply the xml content?
Very useful page to start with jQuery in ASP.
Thanks a ton!
its really useful.
Jazakallah For Very Good Information about Jquery with Asp.net
nice
Very nice
Thanks very much.
your explanation, step by step is so clear.
keep on teaching !
Luc
Dear Sir,
It is so good for beginning JQuery.
Jazzak Allah
Regards
Azhar Ahmad
Good article for beginners 🙂
Thanks 🙂
NICE AND USE ARTICLE
nice article
ss
ss
fabulous
how to use this code between repeater control, its not display output, please help me.
Thanks Sir,
Nice explanation of JQUERY for beginners level.
Azhar Iqbal
Dotnet65
Looks good.
Thank u dear, your tutorial is very useful. Great!!!
sir its a really nice article.but if possible then send article in wihich client side validation and also in any server control , to enable check box like yahoo mail or msn mail.
sir r u teaching if yes then where?evs or any other institute.
Very helpful. I like your way to describe things. You make things more simpler than they are…
Thank you.
Dear Sir,
It is so good for beginning JQuery.
Jazzak Allah
Regards
Azhar Ahmad
thanks Alot sir..
great ARticle..easy to understand..
I think it is good introductory lesson of JQuery for me. Thnaks for this.
Sir thanks for this stuff..easy to understand..