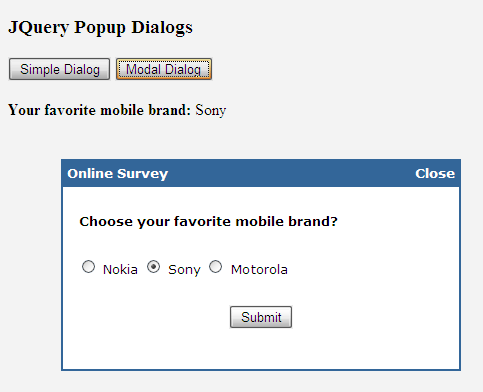
If you are a regular internet user and specially visit sites like Facebook, Twitter, Yahoo Mail, I am sure you are familiar with the popup dialog windows appears on the screen asking you different options or display information or warning messages. Popup dialog windows are child windows and commonly used in GUI systems and User Interface designs to interact with the user without disturbing the main application or window workflow. In this tutorial, I will show you how you can create simple and modal popup dialog windows using JQuery.

Before I start this tutorial, I assume that you are familiar with HTML, CSS and JavaScript, and if you are not then please visit www.w3schools.com for some easy tutorials. I also assume that you know what JQuery is and how to use it in your web pages. I will recommend you to read my other JQuery tutorials on this website to learn the basics of JQuery. You can also visit www.jquery.com to learn and download the latest version of JQuery.
The first thing you need is the basic HTML code to create a popup dialog box. Most developers normally use HTML div element to create floating dialog windows. Following is the HTML code I have used in this tutorial to create buttons and popup dialog windows shown in the above figure.
<h3>JQuery Popup Dialogs</h3>

<input type="button" id="btnShowSimple" value="Simple Dialog" />
<input type="button" id="btnShowModal" value="Modal Dialog" />

<br /><br />

<div id="output"></div>

<div id="overlay" class="web_dialog_overlay"></div>

<div id="dialog" class="web_dialog">
   <table style="width: 100%; border: 0px;" cellpadding="3" cellspacing="0">
      <tr>
         <td class="web_dialog_title">Online Survey</td>
         <td class="web_dialog_title align_right">
            <a href="#" id="btnClose">Close</a>
         </td>
      </tr>
      <tr>
         <td> </td>
         <td> </td>
      </tr>
      <tr>
         <td colspan="2" style="padding-left: 15px;">
            <b>Choose your favorite mobile brand? </b>
         </td>
      </tr>
      <tr>
         <td> </td>
         <td> </td>
      </tr>
      <tr>
         <td colspan="2" style="padding-left: 15px;">
            <div id="brands">
               <input id="brand1" name="brand" type="radio" checked="checked" value="Nokia" /> Nokia
               <input id="brand2" name="brand" type="radio" value="Sony" /> Sony
               <input id="brand3" name="brand" type="radio" value="Motorola" /> Motorola
            </div>
         </td>
      </tr>
      <tr>
         <td> </td>
         <td> </td>
      </tr>
      <tr>
         <td colspan="2" style="text-align: center;">
            <input id="btnSubmit" type="button" value="Submit" />
         </td>
      </tr>
   </table>
</div>
In the above HTML code, there are two important elements. The first element is the div tag with the id “overlay”. This div will cover the entire page width and height to create a semi-transparent background when the popup dialog window will appear on the screen.
<div id="overlay" class="web_dialog_overlay"></div>
The second important element is the div tag with the id “dialog”. This div will be used as popup dialog and can contain any type of HTML inside. I put an HTML table and created a simple online survey for this tutorial.
<div id="dialog" class="web_dialog">
...
</div>
You may have noticed that the HTML code shown above is using the CSS classes web_dialog_overlay, web_dialog, web_dialog_title etc. Following is the CSS code for all the classes I used in this tutorial.
<style type="text/css">

.web_dialog_overlay
{
   position: fixed;
   top: 0;
   right: 0;
   bottom: 0;
   left: 0;
   height: 100%;
   width: 100%;
   margin: 0;
   padding: 0;
   background: #000000;
   opacity: .15;
   filter: alpha(opacity=15);
   -moz-opacity: .15;
   z-index: 101;
   display: none;
}
.web_dialog
{
   display: none;
   position: fixed;
   width: 380px;
   height: 200px;
   top: 50%;
   left: 50%;
   margin-left: -190px;
   margin-top: -100px;
   background-color: #ffffff;
   border: 2px solid #336699;
   padding: 0px;
   z-index: 102;
   font-family: Verdana;
   font-size: 10pt;
}
.web_dialog_title
{
   border-bottom: solid 2px #336699;
   background-color: #336699;
   padding: 4px;
   color: White;
   font-weight:bold;
}
.web_dialog_title a
{
   color: White;
   text-decoration: none;
}
.align_right
{
   text-align: right;
}

</style>
There are few important things to explain in the above CSS code. Note how the .web_dialog_overlay class top, right, bottom, left, height and width properties are set to make sure it covers the entire browser display area. Furthermore, notice how the transparency is set using opacity, -moz-opacity and filter properties. In the .web_dialog class the important properties are width, height, top, left, margin-left and margin-top which are set appropriately to make sure the popup dialog appears in the center of the screen. You can play with these properties to display popup dialog anywhere you want. The display property for both classes is set to none to keep both div elements hidden. Another important property is the z-index which sets the stack order of different elements on the screen. The element with the greater stack order will always be in front of the elements with the lower stack order.
Now I am moving to the important JQuery and JavaScript code which will show you how to show/hide popup dialog windows using JavaScript and JQuery. You make sure you have included the required JQuery library reference in the head element of your page.
<script src="scripts/jquery-1.4.3.min.js" type="text/javascript"></script>
Following is the complete JQuery and JavaScript code I used in this tutorial:
<script type="text/javascript">

   $(document).ready(function ()
   {
      $("#btnShowSimple").click(function (e)
      {
         ShowDialog(false);
         e.preventDefault();
      });

      $("#btnShowModal").click(function (e)
      {
         ShowDialog(true);
         e.preventDefault();
      });

      $("#btnClose").click(function (e)
      {
         HideDialog();
         e.preventDefault();
      });

      $("#btnSubmit").click(function (e)
      {
         var brand = $("#brands input:radio:checked").val();
         $("#output").html("<b>Your favorite mobile brand: </b>" + brand);
         HideDialog();
         e.preventDefault();
      });

   });

   function ShowDialog(modal)
   {
      $("#overlay").show();
      $("#dialog").fadeIn(300);

      if (modal)
      {
         $("#overlay").unbind("click");
      }
      else
      {
         $("#overlay").click(function (e)
         {
            HideDialog();
         });
      }
   }

   function HideDialog()
   {
      $("#overlay").hide();
      $("#dialog").fadeOut(300);
   }

</script>
In the above code, there are two JavaScript functions ShowDialog() and HideDialog() defined to show/hide both transparent overlay div and dialog window. The ShowDialog function also has conditional code to implement simple or modal dialog windows. If you are displaying the modal window then clicking the overlay div will not hide the dialog box, and user has to close the popup window using the Submit button or Close link on top. These two functions are called from different button click events in the JQuery ready method. Finally there is a click event handler for btnSubmit which display the user favorite mobile brand in output div element.
I hope you have found this tutorial useful, and you will start using JQuery based Popup dialog windows in your web applications. If you want to download the complete source code of the tutorial click the “Download Source Code” button. You can also click the “Live Demo” button to watch the tutorial in action.


Hi there! I understand this is somewhat off-topic however I had to ask. Does building a well-established website such as yours take a lot of work? I am completely new to blogging but I do write in my diary on a daily basis. I’d like to start a blog so I will be able to share my experience and thoughts online. Please let me know if you have any suggestions or tips for new aspiring blog owners. Appreciate it!|
I will recommend you to check WordPress which is the most popular blogging platform in the world. You can create a free account, choose a theme and start blogging in minutes.