
XML is very versatile and still the most commonly used data format in most applications we developed today. The .NET Framework provides several namespaces and classes that allow developers to read, write and interact with the XML documents. Many developers over the last few months have requested me to write a tutorial on generating XML documents from the data stored in SQL Server database so I thought to write something on this topic. In this tutorial, I will demonstrate how we can load data from SQL Server database and generate complex XML documents programmatically using the classes and XML related attributes available in .NET Framework. I will also explain how we can create XML elements with multiple namespace prefixes.
Let’s start by creating a new Windows Form application GenerateComplexXMLFromDatabase in Visual Studio 2015 Professional Edition. I am using .NET Framework 4.6.1 for this tutorial but you can use an older version as well.
When the Windows Form designer appears in Visual Studio, add a TextBox control from the toolbox. We need to set following properties of TextBox control.
- Dock = Fill
- Font = Courier New, 12pt
- Multiline = True
- ScrollBars = Vertical

Textbox should look like a notepad style text editor after setting the above properties. We will use this textbox to display the generated XML later in this tutorial.
To load data from SQL Server database, I have created a new database and added two tables Roles and Users. I also added some sample data in these tables.

Double click the form in Visual Studio form designer to open the Form Load event handler. Write the following lines of code that is calling three different methods we will implement shortly.
private void Form1_Load(object sender, EventArgs e)
{
   var data = GetDataFromDatabase();
   var account = BuildObjects(data);
   var xml = GenerateXml(account);

   textBox1.Text = xml;
}
- The first method GetDataFromDatabase will load data from database and returns DataSet object.
- Second method BuildObjects will take DataSet as input parameter and will build .NET classes from the DataSet. It will then return the Account object which will be the root element of our generated XML.
- Third method GenerateXml will serialize the Account object and its nested classes into XML.
Table of Contents
Loading Data from SQL Server
First of all, we need to write a code to load data from SQL Server Database. There are many different ways you can connect .NET applications with SQL Server database. You can use ADO.NET DataReader and DataSet objects or you can use Entity Framework to communicate with database. For the purpose of this tutorial, I will write very basic and straight forward ADO.NET code that will load both Users and Roles tables into DataSet object. The following code is creating two SqlDataAdaper objects which will load data from Roles and Users database tables. The code is also creating Relationship between those two tables within DataSet. This relationship will be used later in this tutorial when we will iterate both parent and child tables to generate XML. If you want to read more about ADO.NET then read my other tutorials on ADO.NET technology.
private DataSet GetDataFromDatabase()
{
    String conStr = @"server=TestServer; database=TestDatabase; user id=test; password=test;";
    SqlConnection con = new SqlConnection(conStr);

    SqlCommand cmd1 = new SqlCommand("SELECT * FROM Roles WHERE Approved = 1", con);
    SqlCommand cmd2 = new SqlCommand("SELECT * FROM Users WHERE Activated = 1", con);

    SqlDataAdapter da1 = new SqlDataAdapter(cmd1);
    SqlDataAdapter da2 = new SqlDataAdapter(cmd2);

    DataSet ds = new DataSet("AccountsDataSet");

    da1.Fill(ds, "Roles");
    da2.Fill(ds, "Users");

    DataRelation parentChildRelation = new DataRelation("Roles_Users",
        ds.Tables["Roles"].Columns["Id"],
        ds.Tables["Users"].Columns["RoleId"]);

    ds.Relations.Add(parentChildRelation);

    return ds;
}
Creating .NET Classes with XML Serialization Attributes
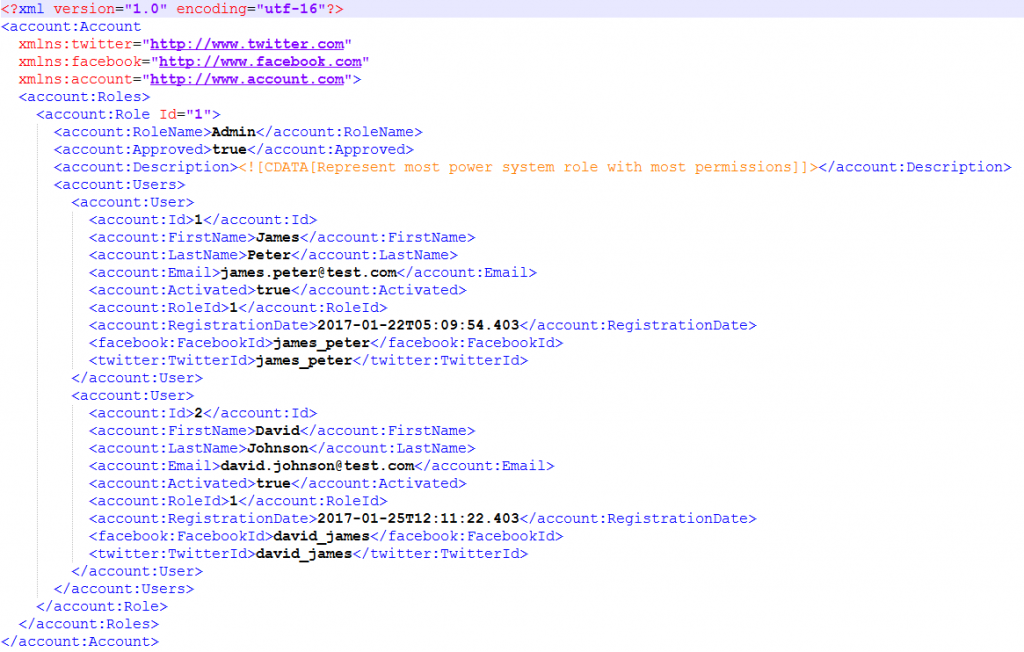
We want to generate XML similar to the following so we need to create few classes and decorate them with XML attributes.
First of all, create a User class and decorate the class with Serializable and XMLRoot attributes. The Serializable attribute indicates that a class can be serialized and XMLRoot attribute controls XML serialization of the attribute target as an XML root element. The properties of the class User are decorated with XmlElement attribute which indicates that a public field or property will be serialized as an XML element.
using System;
using System.Collections.Generic;
using System.Linq;
using System.Text;
using System.Threading.Tasks;
using System.Xml.Serialization;

namespace GenerateComplexXMLFromDatabase
{
    [Serializable]
    [XmlRoot("User")]
    public class User
    {
        [XmlElement("Id")]
        public int Id { get; set; }

        [XmlElement("FirstName")]
        public string FirstName { get; set; }

        [XmlElement("LastName")]
        public string LastName { get; set; }

        [XmlElement("Email")]
        public string Email { get; set; }

        [XmlElement("Activated")]
        public bool Activated { get; set; }

        [XmlElement("RoleId")]
        public int RoleId { get; set; }

        [XmlElement("RegistrationDate")]
        public DateTime RegistrationDate { get; set; }

        [XmlElement("FacebookId", Namespace = "http://www.facebook.com")]
        public string FacebookId { get; set; }

        [XmlElement("TwitterId", Namespace = "http://www.twitter.com")]
        public string TwitterId { get; set; }

    }
}
If we will serialize the above User class, the following XML will be generated. Notice how the FacebookId and TwitterId elements are generated with a facebook and twitter prefixes. This is because the properties FacebookId and TwitterId of User class are decorated with an XmlElement that specified the namespaces as well. These namespaces will be matched with the similar namespaces we will define shortly in XML generation code.
<User>
  <Id>1</Id>
  <FirstName>James</FirstName>
  <LastName>Peter</LastName>
  <Email>james.peter @test.com</Email>
  <Activated>true</Activated>
  <RoleId>1</RoleId>
  <RegistrationDate>2017-01-22T05:09:54.403</RegistrationDate>
  <facebook:FacebookId>james_peter</facebook:FacebookId>
  <twitter:TwitterId>james_peter</twitter:TwitterId>
</User>
Next we need to create following Role class in the project. Notice that the Id property is decorated with the XmlAttribute attribute which specifies that the XmlSerializer must serialize the class member as an XML attribute. We want Description property of the Role class to generate CDATA contents so I am decorating the actual Description property with XmlIgnore attribute to instructs the XmlSerializer that we don’t want this property to be serialized at all and then create another property DescriptionCData which create CDATA section and return it as XmlCDataSection object.
using System;
using System.Collections.Generic;
using System.Linq;
using System.Text;
using System.Threading.Tasks;
using System.Xml.Serialization;

namespace GenerateComplexXMLFromDatabase
{
    [Serializable]
    [XmlRoot("Role")]
    public class Role
    {
        [XmlAttribute("Id")]
        public int Id { get; set; }

        [XmlElement("RoleName")]
        public string Name { get; set; }

        [XmlElement("Approved")]
        public bool Approved { get; set; }

        [XmlElement("Description")]
        public System.Xml.XmlCDataSection DescriptionCData
        {
            get
            {
                return new System.Xml.XmlDocument().CreateCDataSection(Description);
            }
            set
            {
                Description = value.Value;
            }
        }

        [XmlIgnore]
        public string Description { get; set; }

        [XmlElement("Users")]
        public UsersContainer UsersContainer { get; set; }

    }
}
We will generate XML from the SQL Server database and we can have multiple users in a single role in database that’s why we have created a UsersContainer class to keep the collections of User objects.
[Serializable]
public class UsersContainer
{
    [XmlElement("User")]
    public List<User> Users { get; set; }

    public UsersContainer()
    {
        Users = new List<User>();
    }
}
If we will serialize the Role class, the following XML will be generated.
<Role Id="2">
	<RoleName>Sales</RoleName>
	<Approved>true</Approved>
	<Description>
		<![CDATA[Represent a role associated with sales staff]]>
	</Description>
	<Users>
		<User>
			<Id>3</Id>
			<FirstName>Kevin</FirstName>
			<LastName>Joseph</LastName>
			<Email>[email protected]</Email>
			<Activated>true</Activated>
			<RoleId>2</RoleId>
			<RegistrationDate>2017-01-26T12:11:22.403</RegistrationDate>
			<facebook:FacebookId>kevin_joseph</facebook:FacebookId>
			<twitter:TwitterId>kevin_joseph</twitter:TwitterId>
		</User>
	</Users>
</Role>
Finally, we need to create an Account class that will act as the root element of our XML document.
[Serializable]
[XmlRoot("Account")]
public class Account
{
    [XmlElement("Roles")]
    public RolesContainer RolesContainer { get; set; }
}
An Account object can contain multiple roles in it so we need to create a container class to keep the collection of Role objects.
[Serializable]
public class RolesContainer
{
    [XmlElement("Role")]
    public List<Role> Roles { get; set; }

    public RolesContainer()
    {
        Roles = new List<Role>();
    }
}
Build Objects to Generate XML
Once all the above classes are implemented, we need to create objects of these classes and need to set properties of from the data loaded from the database into DataSet. Let’s write a second method BuildObjects in our project Form1 class that will take DataSet as an input parameter and will build Account as well as nested objects from it.
private Account BuildObjects(DataSet ds)
{
    var account = new Account();
    account.RolesContainer = new RolesContainer();

    foreach (DataRow role in ds.Tables["Roles"].Rows)
    {
        Role r = new Role();
        r.Id = Convert.ToInt32(role["Id"]);
        r.Name = role["Name"].ToString();
        r.Approved = Convert.ToBoolean(role["Approved"]);
        r.Description = role["Description"].ToString();

        DataRow[] users = role.GetChildRows(ds.Relations["Roles_Users"]);
        if (users.Length > 0)
        {
            r.UsersContainer = new UsersContainer();
            foreach (DataRow user in users)
            {
                User u = new User();
                u.Id = Convert.ToInt32(user["Id"]);
                u.RoleId = Convert.ToInt32(user["RoleId"]);
                u.FirstName = user["FirstName"].ToString();
                u.LastName = user["LastName"].ToString();
                u.Email = user["Email"].ToString();
                u.FacebookId = user["FacebookId"].ToString();
                u.TwitterId = user["TwitterId"].ToString();
                u.Activated = Convert.ToBoolean(user["Activated"]);
                u.RegistrationDate = Convert.ToDateTime(user["RegistrationDate"]);

                r.UsersContainer.Users.Add(u);
            }
        }

        account.RolesContainer.Roles.Add(r);
    }

    return account;
}
In the above code, the first foreach loop will iterate over all the Roles available in Roles table in DataSet. It will then create a Role class object for every database row and populate the properties of Role object with the data available in every row in Roles table. The method then calls GetChildRows method to fetch the child table User objects. Notice how the DataRelation object is passed as a parameter to GetChildRows method. This is to tell GetChildRows method to fetch data only from the child table which is related to parent table using the relation named Roles_Users. There may be some other child tables of parent table Roles in DataSet but they will not be related with the parent table Roles using the same relationship object and name so they will not be fetched here. If child rows are found, the second foreach loop will iterate over the child rows and will create User class objects. Finally, users will be added in the UsersContainer and roles will be added in RolesContainer.
Serialize Objects to XML
Once we have our Account object filled with roles and users, we need to use .NET Framework XmlSerializer to serialize the object into XML. Following method GenerateXml will do exactly that. The method will also create XmlSerializerNamespaces object to add three namespaces with different prefixes. Notice that the facebook and twitter namespaces URLs are matching with the Namespaces we used above to decorate the User class properties FacebookId and TwitterId. Finally, we are using Serialize method of XmlSerializer class to generate the XML from .NET objects.
private string GenerateXml(Account account)
{
    var serializer = new XmlSerializer(typeof(Account));
    var settings = new XmlWriterSettings { Indent = true };
    string xml = "";

    XmlSerializerNamespaces namespaces = new XmlSerializerNamespaces();
    namespaces.Add("account", "http://www.account.com");
    namespaces.Add("facebook", "http://www.facebook.com");
    namespaces.Add("twitter", "http://www.twitter.com");

    using (var sww = new StringWriter())
    {
        using (var writer = XmlWriter.Create(sww, settings))
        {
            serializer.Serialize(writer, account, namespaces);
            xml = sww.ToString();
        }
    }

    return xml;
}
Here is the complete code of Form1.cs file
using System;
using System.Collections.Generic;
using System.ComponentModel;
using System.Data;
using System.Data.SqlClient;
using System.Drawing;
using System.IO;
using System.Linq;
using System.Text;
using System.Threading.Tasks;
using System.Windows.Forms;
using System.Xml;
using System.Xml.Serialization;

namespace GenerateComplexXMLFromDatabase
{
    public partial class Form1 : Form
    {
        public Form1()
        {
            InitializeComponent();
        }

        private void Form1_Load(object sender, EventArgs e)
        {
            var data = GetDataFromDatabase();
            var account = BuildObjects(data);
            var xml = GenerateXml(account);

            textBox1.Text = xml;
        }

        private DataSet GetDataFromDatabase()
        {
            String conStr = @"server=WAQAS-PC; database=MyShopDb; user id=sa; password=sql;";
            SqlConnection con = new SqlConnection(conStr);

            SqlCommand cmd1 = new SqlCommand("SELECT * FROM Roles WHERE Approved = 1", con);
            SqlCommand cmd2 = new SqlCommand("SELECT * FROM Users WHERE Activated = 1", con);

            SqlDataAdapter da1 = new SqlDataAdapter(cmd1);
            SqlDataAdapter da2 = new SqlDataAdapter(cmd2);

            DataSet ds = new DataSet("AccountsDataSet");

            da1.Fill(ds, "Roles");
            da2.Fill(ds, "Users");

            DataRelation parentChildRelation = new DataRelation("Roles_Users",
              ds.Tables["Roles"].Columns["Id"],
              ds.Tables["Users"].Columns["RoleId"]);

            ds.Relations.Add(parentChildRelation);

            return ds;
        }

        private Account BuildObjects(DataSet ds)
        {
            var account = new Account();
            account.RolesContainer = new RolesContainer();

            foreach (DataRow role in ds.Tables["Roles"].Rows)
            {
                Role r = new Role();
                r.Id = Convert.ToInt32(role["Id"]);
                r.Name = role["Name"].ToString();
                r.Approved = Convert.ToBoolean(role["Approved"]);
                r.Description = role["Description"].ToString();

                DataRow[] users = role.GetChildRows(ds.Relations["Roles_Users"]);
                if (users.Length > 0)
                {
                    r.UsersContainer = new UsersContainer();
                    foreach (DataRow user in users)
                    {
                        User u = new User();
                        u.Id = Convert.ToInt32(user["Id"]);
                        u.RoleId = Convert.ToInt32(user["RoleId"]);
                        u.FirstName = user["FirstName"].ToString();
                        u.LastName = user["LastName"].ToString();
                        u.Email = user["Email"].ToString();
                        u.FacebookId = user["FacebookId"].ToString();
                        u.TwitterId = user["TwitterId"].ToString();
                        u.Activated = Convert.ToBoolean(user["Activated"]);
                        u.RegistrationDate = Convert.ToDateTime(user["RegistrationDate"]);

                        r.UsersContainer.Users.Add(u);
                    }
                }

                account.RolesContainer.Roles.Add(r);
            }

            return account;
        }

        private string GenerateXml(Account account)
        {
            var serializer = new XmlSerializer(typeof(Account));
            var settings = new XmlWriterSettings { Indent = true };
            string xml = "";

            XmlSerializerNamespaces namespaces = new XmlSerializerNamespaces();
            namespaces.Add("account", "http://www.account.com");
            namespaces.Add("facebook", "http://www.facebook.com");
            namespaces.Add("twitter", "http://www.twitter.com");

            using (var sww = new StringWriter())
            {
                using (var writer = XmlWriter.Create(sww, settings))
                {
                    serializer.Serialize(writer, account, namespaces);
                    xml = sww.ToString();
                }
            }

            return xml;
        }
    }
}
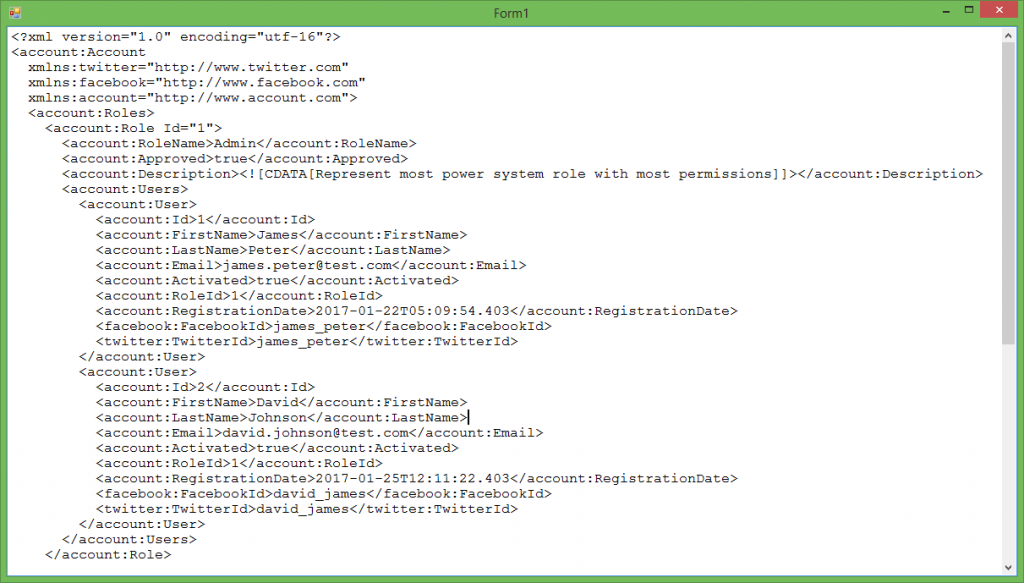
Press F5 to run the project and you will see the XML similar to the following generated in the TextBox control.
In this tutorial, I tried my best to teach you how we can load data from SQL Server database and generate complex XML documents programmatically using C#. If you are struggling with the tutorial code then you can download the complete project source code by clicking the Download Code button on top of this tutorial. Keep visiting my website for more tutorials in the future.


Nice article
Thanks, I am glad you liked it.