LINQ to SQL is one of the most widely used implementation of LINQ. It is so common that many developers completely overlooked other implementations of LINQ such as LINQ to DataSet or LINQ to Objects. Although LINQ to SQL is only available for SQL Server databases but it is still using all the features available in the other LINQ implementations. In this tutorial, I will give you brief introduction of LINQ to SQL, DataContext object, Entity classes and Object Relational Designer along with some simple LINQ to SQL queries.
In the current world of object-oriented programming languages such as C# or VB.NET, developers model their classes to represent real world object such as employees, customers, orders etc. These objects need to be persistent in such a way that their data should not be lost when the application close or restart. However, most of the databases used these days are relational and they store data as records in tables, not as objects. This caused a mismatch between the object-oriented world and the relational database world. For example, an employee class that contains multiple addresses or contact numbers stored in collections will most likely be stored in multiple database tables such as employee table, an address and contacts table.
Another problem is that the data types in relational database are normally different than the data types available in object-oriented programming languages. To read data from databases into programs, developers need to do lot of data types conversions which not only required extra work but also error prone.
LINQ to SQL is an API for working with SQL Server databases. It translates LINQ expressions to equivalent SQL or T-SQL queries and passes them on to the SQL Server database for execution and then returns the results back to the calling application. To solve the problem of mismatching between database tables and objects, LINQ to SQL generates object-relational mapping (ORM) implementation to seamlessly maps tables and columns to classes and properties with the help of mapping attributes. One can argue that there are already hundreds of ORM tools in the market that do exactly what LINQ does, mean they can also generate the abstract layer of business objects mapped with database tables. But you have to keep in mind that those tools does not provide you the full blown query language that is similar to SQL and also integrated directly into the programming language as LINQ does.
LINQ to SQL Data Modeling
To use LINQ to SQL in programs developers need to create a thin abstraction layer over the relational database model. This layer contains set of entity classes which are mapped to tables in databases. By using these entity classes the data in tables can not only be queried but can also be modified. There are two ways you can generate these entity classes in your project.
Object Relational Designer
Object Relational Designed also called O/R Designer provides an easy to use graphical interface for creating entity classes one at a time. You can add or remove database tables directly to the designer and the corresponding entity classes will be generated automatically for you.
SQLMetal
SQLMetal is a command line tool to generate entity classes for all the tables, views, stored procedures at once. This tool is available at Visual Studio command prompt and if you will just type sqlmetal in command window you will see all the available options for this tool.
The DataContext
The DataContext class handles the communication between LINQ and external relational database. Each instance of this class establishes a connection to a database and provides several services such as identity tracking, change tracking etc. In LINQ to SQL context, the DataContext class connects us to the database, monitor what we have changed and update the database when needed by the program. To use this class in your application, you typically need to create a class derived from the DataContext class and normally it has the same name as your database. If you are using SQLMetal tool described above, it will also generates the DataContext child class with the same name as your database.
The DataContext class uses metadata information to map the physical structure of relational data on which the entity classes and the code generation is based. Once you have the class derived from the DataContext class, it is easier to create entity classes as members of this class to represent the tables in underlying database.
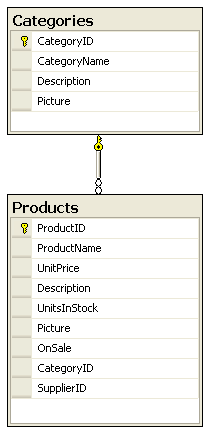
To explain you how all these important concepts work together lets create a Visual Studio project and use Object Relational Designer to generate the DataContext and entity classes. For the purpose of this tutorial, I have created a sample database named SampleDB in SQL Server 2005 Express Edition with the two tables shown in the figure below. I have also added some records in the tables to perform LINQ to SQL queries later in this tutorial.
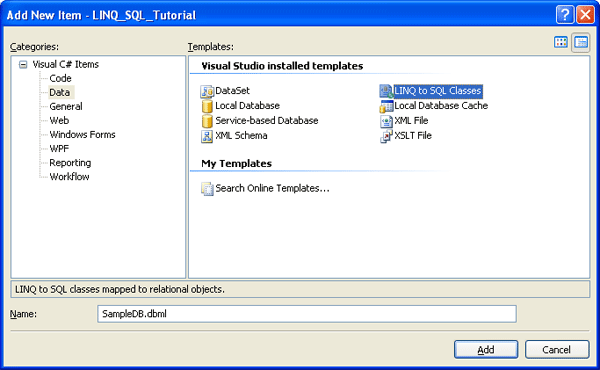
Once the database is ready, create a new Console Application inside Visual Studio and then right click on your project name inside Solution Explorer and choose Add > New Item option. You will see the following Add New Item dialog box on your screens. Click the Data category on the left hand side and select LINQ to SQL Classes template from the available templates list. Give the file same name as the database as SampleDB.dbml in my case and click the Add button.
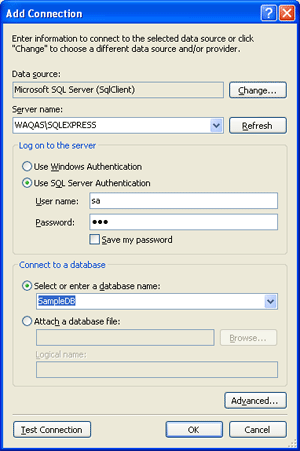
You will see the Object Relational Designer appears inside Visual Studio asking you to create data classes by dragging items from Server Explorer or Toolbox to the design surface. You need to add a database connection inside Server Explorer to drag database tables to the designer. Make sure your Server Explorer is visible and if your Server Explorer is not visible go to View menu and click Server Explorer. Inside Server Explorer right click on Data Connections and click Add Connection option. You will see Add Connection dialog box appearing on screen asking you information about your data source. For this tutorial I have given the information about my database as shown in the figure below. You can see the SampleDB is selected as a database name to generate the DataContext class. You can also click the button Test Connection to check whether the information you have provided is correct or not. Click the OK button once you have done with Add Connection dialog box.
Once the connection is added in Server Explorer, you need to expand the Tables collection in the database and need to drag the Categories and Products table to the designer surface as shown in the figure below:
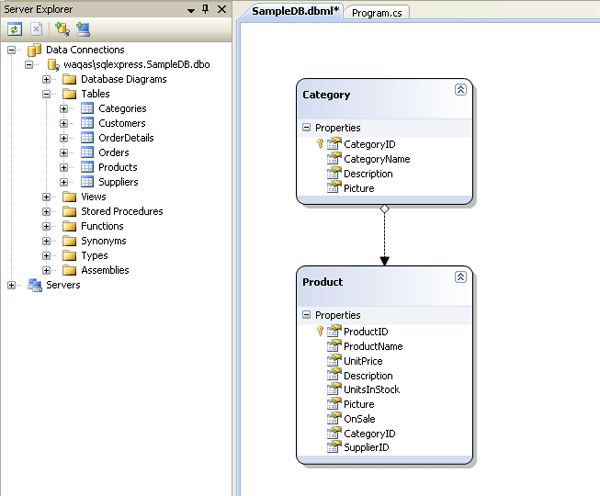
Save and close the SampleDB.dbml file and locate the file named SampleDB.designer.cs in the Solution Explorer. I want you to check the DataContext derived class and entity classes generated for you automatically by the Object Relational Designer in this file. The first line of interest is the following class declaration in which you can see how the class named SampleDBDataContext is mapped to my SampleDB database with the help of DatabaseAttribute. You can also see the class is inheriting the System.Data.Linq.DataContext class.
[System.Data.Linq.Mapping.DatabaseAttribute(Name="SampleDB")]
public partial class SampleDBDataContext : System.Data.Linq.DataContext
{

}
The next important piece of code in the class is automatically generated nested class named Category. This is an entity class which is mapped to the Categories table in the database and you can guess it by looking at the Table attribute on top of the class. The similar code is also generated for the Products table with another entity class named Product.
[Table(Name="dbo.Categories")]
public partial class Category : INotifyPropertyChanging, INotifyPropertyChanged
{

}
Inside the generated entity classes you can also see how the columns in database tables are mapped to class properties. For example the CategoryName column in database table is mapped with the help of Column attribute as shown in the code below:
[Column(Storage="_CategoryName", DbType="NVarChar(50) NOT NULL", CanBeNull=false)]
public string CategoryName
{

}
You can see how easy is to generate a complete ORM abstraction layer with the help of Object Relational Designer. Once the DataContext and entity classes are generated you are ready to run LINQ to SQL queries to your underlying database. The remaining of this tutorial will show you how to run some simple LINQ to SQL queries using the DataContext, entity classes and LINQ to SQL operators.
The first thing you need before running LINQ to SQL queries is the database connection string. You can store it your project configuration file but for this tutorial I am saving it directly in a local string variable. Next you need to create the SampleDBDataContext object and need to pass your connection string into its constructor as shown below:
string constr = @"Server=Waqas\SQLEXPRESS; Database=SampleDB; uid=sa; pwd=123;";
SampleDBDataContext db = new SampleDBDataContext(constr);
Now I am creating a query to display all the categories from the Categories table in my database. I am also doing sorting based on the CategoryID column with the help of OrderBy operator.
var query = from c in db.Categories
            orderby c.CategoryID
            select c;

foreach (var item in query)
{
    Console.WriteLine(item.CategoryID + " : " + item.CategoryName);
}
If you will run the above query you will see the results similar to the following output depending upon the data you have in your categories table in database.
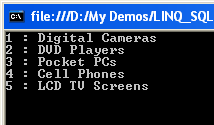
In my next query I am querying the products table to display all the products which have unit price greater than 300 in the sorting order based on UnitPrice column.
var query = from p in db.Products
            where p.UnitPrice > 300
            orderby p.UnitPrice
            select p;

foreach (var item in query)
{
    Console.WriteLine(item.UnitPrice + " : " + item.ProductName);
}
The above query will display the following results when executed.

You can perform all types of queries now on your database tables with the help of hundred of operators available in LINQ. You can perform complex multi table joins or can perform grouping on your tables. You can also insert, update or delete data in your tables with the help of LINQ to SQL queries as well as you can perform complex multi table updates with the help of transactions support available in LINQ. It is not possible for me to cover all these things in this tutorial but I will be writing more tutorials on these topics very soon and will published those tutorials for all of you on my website. I hope I have given you enough information about LINQ to SQL in this tutorial that you can dig deeper into the world of LINQ to SQL yourself and can play more tricks with LINQ in your applications.


ASL,
The way you explained is very useful for the beginners.Thanks alot for posting this one.
You have done a great job, really helpful for learners like me…… keep it up
Thanks soooooooooooooooo much.
Ma Salam
This tutorial is very easy to understand by the beginners …..Very useful one.Thanks
thanks
Good jobs !
ASALAM O ALIKUM WR. WB.
SIR I NEED YOUR MOBILE NO. I HAVE SOME VERY USEFUL VIDEOS REGARDING SHAREPOINT SERVER. LINQ. ETC…
I WANT TO SHARE IT WITH YOU
JZAK ALLAH
ASALAM O ALIKUM. WR. WB.
SYED QAISER AZIZ
Principle software Eng/ Team Lead
nice tutorial Sir!!!
thanks……