
In ASP.NET 3.5, Microsoft introduced two new databound controls: the ListView and DataPager control which you can use to display and paginate your data in extremely flexible way. In this tutorial I will show you how you can use ListView control to display data from the database. I will introduce you how different templates in ListView control work and how you can use ListView control to render any type of HTML markup you want.
The ListView control can be thought as a super flexible GridView control. You can use it to display, edit, delete, select, sort and page your data just like GridView. However unlike GridView control it is totally template driven which means developers need to use its different templates to control the rendered output markup just as they do in Repeater control. This gives developers flexibility to generate HTML tables, div, span or any other tags to generate their data output. In ListView control Microsoft combines all the good features of Repeater, DataList, GridView, DetailsView and FormView controls in a single more powerful and flexible control.
The ListView control markup is specified with the help of following templates.
- AlternatingItemTemplate
- EditItemTemplate
- EmptyDataTemplate
- EmptyItemTemplate
- GroupSeparatorTemplate
- GroupTemplate
- InsertItemTemplate
- ItemSeparatorTemplate
- ItemTemplate
- LayoutTemplate
- SelectedItemTemplate
Note: It is not possible to cover all the above templates in one tutorial so in this tutorial I will only focus on LayoutTemplate, ItemTemplate, AlternatingItemTemplate and EmptyDataTemplate.
LayoutTemplate is used this template to specify the containing element markup for the entire ListView control. This can be table or div tag or any other container in which you want to display all your ListView contents.
ItemTemplate specifies the markup used to render each record bound to the ListView control.
AlternatingItemTemplate is used to render different content for alternating items in a ListView control.
EmptyDataTemplate is used to render the markup when no data is available to display in a ListView control.
To get better understanding of the above mentioned templates let’s start with a simple scenario in which I will use HTML <div> tags to display some database records. The code below demonstrates the use of all above templates.
<asp:ListView ID="ListView1" runat="server">
   <LayoutTemplate>
      <div style="border:solid 2px #336699; width:20%;">
         <asp:PlaceHolder ID="itemPlaceholder" runat="server" />
      </div>
   </LayoutTemplate>
   <ItemTemplate>
      <div style="border: solid 1px #336699;">
         <%# Eval("ProductName")%>
      </div>
   </ItemTemplate>
   <AlternatingItemTemplate>
      <div style="border: solid 1px #336699; background-color: #dadada;">
         <%# Eval("ProductName")%>
      </div>
   </AlternatingItemTemplate>
   <EmptyDataTemplate>
      No records found
   </EmptyDataTemplate>
</asp:ListView>
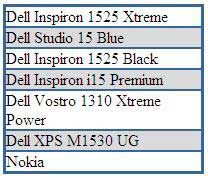
In the LayoutTemplate I am using HTML <div> tag to create the main container in which all the items of ListView will be rendered. The <div> tag also contains a Placeholder control with an ID property set to itemPlaceholder. This control is never rendered to the browser and gets replaced with the contents of the ItemTemplate.
The ItemTemplate and AlternatingItemTemplate both also have similar <div> tags to render normal and alternate items from the data source. Both of these templates are using ASP.NET data binding expression syntax with Eval method to retrieve data from data source. Finally, I am using EmptyDataTemplate to display contents when data source return no data to display. Following figure shows the output of the above ListView control.
The code behind file code is very straight forward as I am binding DataTable object with the ListView control in the Page_Load event.
protected void Page_Load(object sender, EventArgs e)
{
   if (!Page.IsPostBack)
   {
      BindListViewControls();
   }
}

private void BindListViewControls()
{
   string constr = "Server=TestServer;Database=TestDB;uid=test;pwd=test;";
   string query = "SELECT ProductID, ProductName, UnitPrice FROM Products";

   SqlDataAdapter da = new SqlDataAdapter(query, constr);
   DataTable table = new DataTable();

   da.Fill(table);

   ListView1.DataSource = table;
   ListView1.DataBind();
}
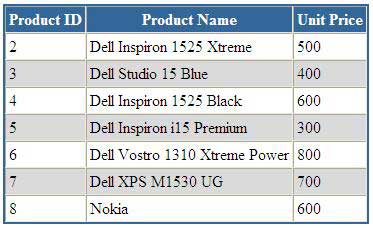
You can use ListView control to render any HTML elements you want. You can use HTML table, bulleted lists or even blog tag cloud to render ListView contents. The following ListView control is showing you how you can render GridView style HTML table using the ListView control.
<asp:ListView ID="ListView2" runat="server">
   <LayoutTemplate>
      <table style="border: solid 2px #336699;" cellspacing="0" cellpadding="3" rules="all">
         <tr style="background-color: #336699; color: White;">
            <th>Product ID</th>
            <th>Product Name</th>
            <th>Unit Price</th>
         </tr>
         <tbody>
            <asp:PlaceHolder ID="itemPlaceHolder" runat="server" />
         </tbody>
      </table>
   </LayoutTemplate>
   <ItemTemplate>
      <tr>
         <td><%# Eval("ProductID")%></td>
         <td><%# Eval("ProductName")%></td>
         <td><%# Eval("UnitPrice")%></td>
      </tr>
   </ItemTemplate>
   <AlternatingItemTemplate>
      <tr style="background-color: #dadada;">
         <td><%# Eval("ProductID")%></td>
         <td><%# Eval("ProductName")%></td>
         <td><%# Eval("UnitPrice")%></td>
      </tr>
   </AlternatingItemTemplate>
</asp:ListView>
The above ListView will render HTML table as following figure shows:
I hope now you have the basic idea how the ListView control rendered its output based on its markup, data binding expression and web controls you used in LayoutTemplate and ItemTemplate. There are number of other templates which can be used to add paging, insertion, editing or deleting interfaces. I need some time to write tutorials about other templates and these tutorials will be available to you very soon.


great article…..
great article…..
great exmple for a fresher.
It is really helpfull