
JQuery is growing in stature day by day and so as the number of interesting scenarios in which it can be used in modern web applications. One of the very common UI requirements is to display the tabular data on page in controls such as ASP.NET GridView or ListView and then provides record editing facility using a popup dialog through which user can update data in the backend database as well as in the front end control asynchronously without a full server post back. There are very few tutorials online, which shows how to put together a complete example of using ASP.NET ListView control to display data, JQuery code to display Popup Dialog, AJAX code to send asynchronous calls to the server, ADO.NET code to select/update backend database and ASP.NET web service. In this tutorial, I will show you how to use all these pieces of the jigsaw puzzle together to implement a complete online record editing scenario.
Before you start reading this tutorial I am making a silly assumption that you know the basics of ASP.NET ListView control and also know how to call web services using JQurey AJAX. If you don’t then I recommend that you must read my other tutorials on ListView control, JQuery, AJAX and Web services before reading this tutorial. Even if you are not fully familiar with all these technologies than don’t stop reading, just follow this tutorial from the start to end, and you will be able to understand everything quite easily without losing too many hairs on your head.
To get started, create an ASP.NET website and drag the ListView control on the page from the toolbox. ASP.NET ListView control is introduced in ASP.NET 3.5 and it enables you to bind and display data items individually or as a group. It supports paging, sorting, selections, editing, insertions, deletions and many other cool features. It also gives developers full control on the HTML markup rendered on the page with the help of templates. In this tutorial, we will use LayoutTemplate which defines the main layout of the control and ItemTemplate which defines the data bound content to display for a single item. The following markup shows ListView control used in this tutorial.
<asp:ListView ID="ListView1" runat="server">
   <LayoutTemplate>
      <table class="table" cellspacing="0" cellpadding="3" rules="rows">
         <tr class="headerRow">
            <th style="width:40px;"></th>
            <th style="width:40px;">ID</th>
            <th style="width:230px;">Name</th>
            <th style="width:230px;">Fee</th>
         </tr>
         <tbody>
            <asp:PlaceHolder ID="itemPlaceHolder" runat="server" />
         </tbody>
      </table>
   </LayoutTemplate>
   <ItemTemplate>
      <tr>
         <td>
            <img id="btnEdit" style="cursor: pointer;" alt="Edit" src="images/edit.png"
                onclick="EditStudent(this);" />
         </td>
         <td>
            <span id="id"><%# Eval("ID") %></span>
         </td>
         <td>
            <span id="name"><%# Eval("Name")%></span>
         </td>
         <td>
            <span id="fee"><%# Eval("Fee")%></span>
         </td>
      </tr>
   </ItemTemplate>
</asp:ListView>
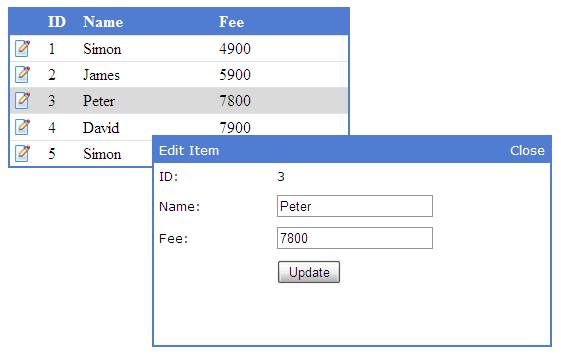
In the markup above, the ListView control LayoutTemplate is defining the main layout of the control using the HTML table element. The other noticeable thing is the use of onclick event for the img element which is calling EditStudent JavaScript function. The EditStudent function will display the following edit form in a popup dialog each time user will click the Edit Icon. Define the following editForm div element just below to the ListView control in your page HTML markup.
<div id="editForm" class="editForm">
   <table style="width:100%;" cellpadding="5" cellspacing="0">
      <tr class="headerRow">
         <td>Edit Student</td>
         <td style="text-align: right;">
            <a onclick="CloseEditStudentDialog();" style="cursor: pointer;">Close</a>
         </td>
      </tr>
      <tr>
         <td>ID:</td>
         <td><span id="spnID"></span></td>
      </tr>
      <tr>
         <td>Name:</td>
         <td><input type="text" id="txtName" /></td>
      </tr>
      <tr>
         <td>Fee:</td>
         <td><input type="text" id="txtFee" /></td>
      </tr>
      <tr>
         <td></td>
         <td>
            <input type="submit" id="btnUpdate" value="Update" onclick="UpdateStudent(); return false;" />
         </td>
      </tr>
   </table>
</div>
You may have noticed that two more JavaScript functions CloseEditStudentDialog and UpdateStudent are being used in the edit form HTML markup above. I will show you the JavaScript code of all these functions later in this tutorial.
Next step is to create an ASP.NET web service that will be responsible to fetch student records from the database table and will also provide a method to update the record. Add an ASP.NET web service in your project with the name StudentWebService.asmx and define two methods GetStudents and UpdateStudent in the code behind file of the web service. Here is the complete code for the web service.
[WebService(Namespace = "http://tempuri.org/")]
[WebServiceBinding(ConformsTo = WsiProfiles.BasicProfile1_1)]
[System.Web.Script.Services.ScriptService]
public class StudentWebService : System.Web.Services.WebService {

    public StudentWebService () {

        //Uncomment the following line if using designed components
        //InitializeComponent();
    }

    [WebMethod]
    public DataTable GetStudents()
    {
        string constr = @"Server=TestServer; Database=SampleDB; uid=waqas; pwd=123";
        string query = "SELECT ID, Name, Fee FROM Students";
        SqlDataAdapter da = new SqlDataAdapter(query, constr);
        DataTable table = new DataTable();
        da.Fill(table);
        return table;
    }

    [WebMethod]
    public int UpdateStudent(int id, string name, decimal fee)
    {
        SqlConnection con = null;
        string constr = @"Server=TestServer; Database=SampleDB; uid=waqas; pwd=123";
        string query = "UPDATE Students SET Name = @Name, Fee = @Fee WHERE ID = @ID";

        con = new SqlConnection(constr);
        SqlCommand command = new SqlCommand(query, con);
        command.Parameters.Add("@Name", SqlDbType.NVarChar).Value = name;
        command.Parameters.Add("@Fee", SqlDbType.Decimal).Value = fee;
        command.Parameters.Add("@ID", SqlDbType.Int).Value = id;

        int result = -1;
        try
        {
            con.Open();
            result = command.ExecuteNonQuery();
        }
        catch (Exception)
        { }
        finally
        {
            con.Close();
        }
        return result;
    }
}
In the above code, notice the use of ScriptService attribute on top of the class definition. This attribute is required to communicate with the web service from JavaScript. For brevity, I used hard coded connection strings in the methods above. You can store connection strings in web.config in your web application. You may also need to change connection string parameters such as server, database, user id or password according to your machine environment. I used a simple database table Student with three columns ID, Name and Fee in this tutorial. You can create this table in your SQL Server database for the implementation of this tutorial. The code is using basic ADO.NET SqlConnection, SqlCommand, SqlAdapter and DataTable objects to retrieve and update data in the database. We need to call GetStudents method on the page load event to display student records on ListView control. Following code shows how to use the web service in Page Load event.
protected void Page_Load(object sender, EventArgs e)
{
   if (!Page.IsPostBack)
   {
      StudentWebService service = new StudentWebService();
      ListView1.DataSource = service.GetStudents();
      ListView1.DataBind();
   }
}
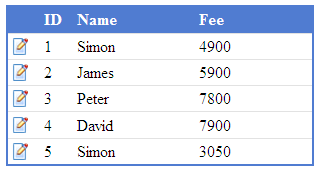
Add the following CSS styles in the head section of your page and run the application. You will see the ListView control showing student records as shown in the figure below.
<style type="text/css">
   .table
   {
      border: solid 2px #507CD1;
      width: 500px;
   }
   th
   {
      text-align: left;
   }
   .headerRow
   {
      background-color: #507CD1;
      color: White;
   }
   .highlightRow
   {
      background-color: #dadada;
   }
   .editForm
   {
      display: none;
      position: fixed;
      width: 380px;
      height: 200px;
      top: 50%;
      left: 50%;
      margin-left: -190px;
      margin-top: -100px;
      background-color: #ffffff;
      border: 2px solid #507CD1;
      padding: 0px;
      z-index: 102;
      font-family: Verdana;
      font-size: 10pt;
   }
</style>
Now is the time to make small edit icon working and showing user the popup dialog form to edit student records. For this we need to write some JavaScript functions and JQuery code in the page. Add the following JQuery library reference in the head section of the page.
<script src="scripts/jquery-1.4.3.min.js" type="text/javascript"></script>
Next add the HTML script block and declare some variables to keep track of the editable row and to store the current student data as shown below:
<script type="text/javascript">
   var row;
   var id, name, fee;
   ...

</script>
Inside ListView control, the edit icon image has defined onclick event, which calls EditStudent JavaScript function. So this is the first function you need to define in JavaScript code block.
function EditStudent(editButton)
{
   row = $(editButton).parent().parent();
   id = $("#id", row).text();
   name = $("#name", row).text();
   fee = $("#fee", row).text();
   row.addClass("highlightRow");
   DisplayEditStudentDialog();
   return false;
}
The EditStudent function is storing the reference of the current row in the row variable declared above. Then it finds the id, name and fee span elements in the current row and stores their text in other three variables. Finally, it calls DisplayEditStudentDialog function to show the popup dialog.
function DisplayEditStudentDialog() {
   $("#spnID").text(id);
   $("#txtName").val(name);
   $("#txtFee").val(fee);
   $("#editForm").show();
}
The DisplayEditStudentDialog first stores the values of id, name and fee variables in span and text boxes in the dialog box and then calls JQuery show method to display the following editForm on the screen.

When user clicks update button, the following UpdateStudent function is called that used JQuery AJAX function to call UpdateStudent method defined in Web Service code. It passes id, name and fee as parameters in JSON format to the web service and on the success execution of the web service method it updates span elements in the ListView control and calls CloseEditStudentDialog. If you are not familiar with JQuery AJAX, JSON and Web Service calls and want to learn more about them then I will recommend you to read my other JQuery tutorials on this website.
function UpdateStudent(e)
{
   name = $("#txtName").val();
   fee = $("#txtFee").val();

   $.ajax({
      type: "POST",
      url: "StudentWebService.asmx/UpdateStudent",
      data: "{'id':'" + id + "', 'name':'" + name + "', 'fee':'" + fee + "'}",
      contentType: "application/json; charset=utf-8",
      dataType: "json",
      success: function(response)
      {
         var result = response.d;
         if (result > 0)
         {
            $("#name", row).text(name);
            $("#fee", row).text(fee);
            row.removeClass("highlightRow");
            CloseEditStudentDialog();
         }
         else
         {
            alert('There is some error during update');
         }
      },
      failure: function(msg)
      {
         alert(msg);
      }
   });
   return false;
}
Finally, we need CloseEditStudentDialog function to hide the popup dialog from the screen on successful update.
function CloseEditStudentDialog()
{
   $("#editForm").hide();
   row.removeClass("highlightRow");
}
I hope you have learned many new techniques in this tutorial, and you have implemented the complete tutorial successfully. If you want to download the Source Code of this tutorial click the Download Source Code button. If you want to see live demo of this tutorial click the Live Demo button.


what does these line do,when i used the same code in my web site it gives me error
[WebService(Namespace = “http://tempuri.org/“)]
[WebServiceBinding(ConformsTo = WsiProfiles.BasicProfile1_1)]
[System.Web.Script.Services.ScriptService]
Excellent Article. Clean Example.. Thank you
Good tutorial!! How would you add validation using validate() JQuery plugin?
Hi your code is excellent, but i am facing problem when adding in WebApplication project where Appcode folder is not available. so i added the webService in RootDirectory of application. But the webserice is not calling. can u help me this.
I used this code well executed. but in master page having a child page .I just found a problem that update button is not working. i need this . if ur in online give urs favourable response
Great solution, indeed !
Very Nicely Done
Thanks Brother to share your tutorial to help us solve any unsolved problem of us.i request you to share more topics you faced to work on Asp.net.that would help us a lot..
Again Thanks
what is response.d;?
from the code:
function UpdateStudent(e) {
success: function(response)
{
var result = response.d;
if (result > 0)
else …
In simple words, response.d is a json data returned by the service when Ajax based asynchronous communication is taking place.
This is nice concept implement by you but in this way if i am using Data manipulation how do i manteine whether my session is expire or not
Hi, this is an excellente post, but i have a proble, internal server error 500 when i try to call de web service. have you some idea about why is this happening?? thanks for reply.
Thanks, great article, very neat!
I have a couple of questions
Can I pass viewstate information to the service using the jquery ajax?
I have a site with authentication, how can I check at the service call that is done by a valid service?
Thanks again!
greate!
every thing is here. read and enjoy
Sir,
I Download Your Code
but this is not working just i change database
it not update database
and also i remove “return false;” in btnUpdate event
Can u show me about inserting the record into the database with listview and jquery.
Ignore my second question. I forgot the row part in $(“txtDescription”, row).val(Description);
This is a very good article. Thanks for your efforts.
I have a couple of questions.
1. Does this model require that web services are used for the list view? Can you just use Web services for the UpdateStudent() Function?
2. I have followed this example to the T. But I cannot get the ListView row to update with the values in the UpdateStudent(e) function. Refreshing the page updates the values, but that defeats the purpose of async calls.
Again, thanks for this excellent article,
Nathan
Nice article. Very well explained….
Great solution! This is what I looked for. Many thanks! Eva