
XML is one of the most popular topics these days. As the use of XML files is increasing, more and more developers want to learn how to write, read and consume XML documents from different programming languages. In the following tutorial, I will show you how you can use .NET Framework built in class XmlTextWriter to generate XML document in C#.
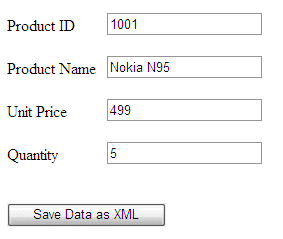
XmlTextWriter is one of many useful classes in System.Xml namespace, and it provides several useful methods to write a complete XML Document from scratch. Following form is simple ASP.NET web form asking user to input some data about the product. I will save this data in a separate XML document named Product.xml using XmlTextWriter object.
Following C# code is saving all the user input values in XML file.
protected void Button1_Click(object sender, EventArgs e)
{
    // Declare XmlTextWriter Object
    XmlTextWriter writer = null;

    try
    {
        // Map file path to server physical root directory
        string filePath = Server.MapPath("~") + "\\Product.xml";
        // Create XmlTextWriter object with UTF32 Encoding

        writer = new XmlTextWriter(filePath, System.Text.Encoding.UTF8);
        writer.Formatting = Formatting.Indented;


        // Write Xml Declaration with version 1.0
        writer.WriteStartDocument();


        // Write some comments
        writer.WriteComment("Product Information");
        writer.WriteComment("Created On: " + DateTime.Now.ToString("dd-MMM-yyyy"));
        writer.WriteComment("===============================");


        // Write Xml Document Root Element
        writer.WriteStartElement("Product");


        // Write attribute name and value to current Element
        writer.WriteAttributeString("ProductID", TextBox1.Text);


        // Write Xml Element with Name and Inner Text
        writer.WriteElementString("ProductName", TextBox2.Text);
        writer.WriteElementString("ProductQuantity", TextBox3.Text);
        writer.WriteElementString("ProductPrice", TextBox4.Text);


        // Write Product Element closing Tag
        writer.WriteEndElement();


        // Write End of Document
        writer.WriteEndDocument();


        // Flush and Close Writer
        writer.Flush();

        Response.Redirect("Product.xml");
    }
    catch (Exception ex)
    { }
    finally
    {
        writer.Close();
    }
}
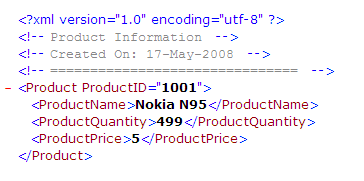
and here is the XML file generated by the above code.


Very Simple, and to the point. Thank you. Got me into working with the XMLTextWriter right away, thank you
Very Simple, and to the point. Thank you. Got me into working with the XMLTextWriter right away, thank you
Thanks for give this type of tutorial,it is helpful for learning dotnet 2.0.
Thanks
Santosh Kumar
http://www.operativesystems…